
Fiddle Leaf Figs (Ficus lyrata) have taken the indoor plant world by storm with their strikingly large, glossy leaves and architectural presence. Their popularity is not just for their aesthetic appeal; they are also relatively easy to care for and can be propagated successfully at home. In this comprehensive guide, we will delve into the art and science of propagating Fiddle Leaf Fig clippings, ensuring you have all the information you need to grow your collection or share with friends.
Why Propagate Fiddle Leaf Figs?
Propagating Fiddle Leaf Figs is a rewarding endeavor for several reasons:
- Cost-Effective: Instead of purchasing new plants, you can create your own at no cost.
- Plant Expansion: You can increase your collection without the need for extra space.
- Gifting: Share your love of plants with friends and family by giving them a cutting.
- Sustainability: Propagation contributes to a more sustainable gardening practice by making the most of your existing plants.
Understanding the Fiddle Leaf Fig
Before diving into propagation techniques, it’s essential to understand the Fiddle Leaf Fig itself. Native to the tropical rainforests of West Africa, this species thrives in humid environments with dappled sunlight. It prefers well-draining soil and a consistent watering schedule. The Fiddle Leaf Fig is known for its distinctive, violin-shaped leaves that can grow up to 18 inches long.
Selecting the Right Cutting
The first step in propagating a Fiddle Leaf Fig is selecting the right cutting. Here’s what to look for:
1. Healthy Leaf Selection
Choose a healthy leaf that is at least 4-6 inches long, attached to a sturdy stem. Avoid leaves that are yellowing, wilting, or showing signs of disease or pest infestations.
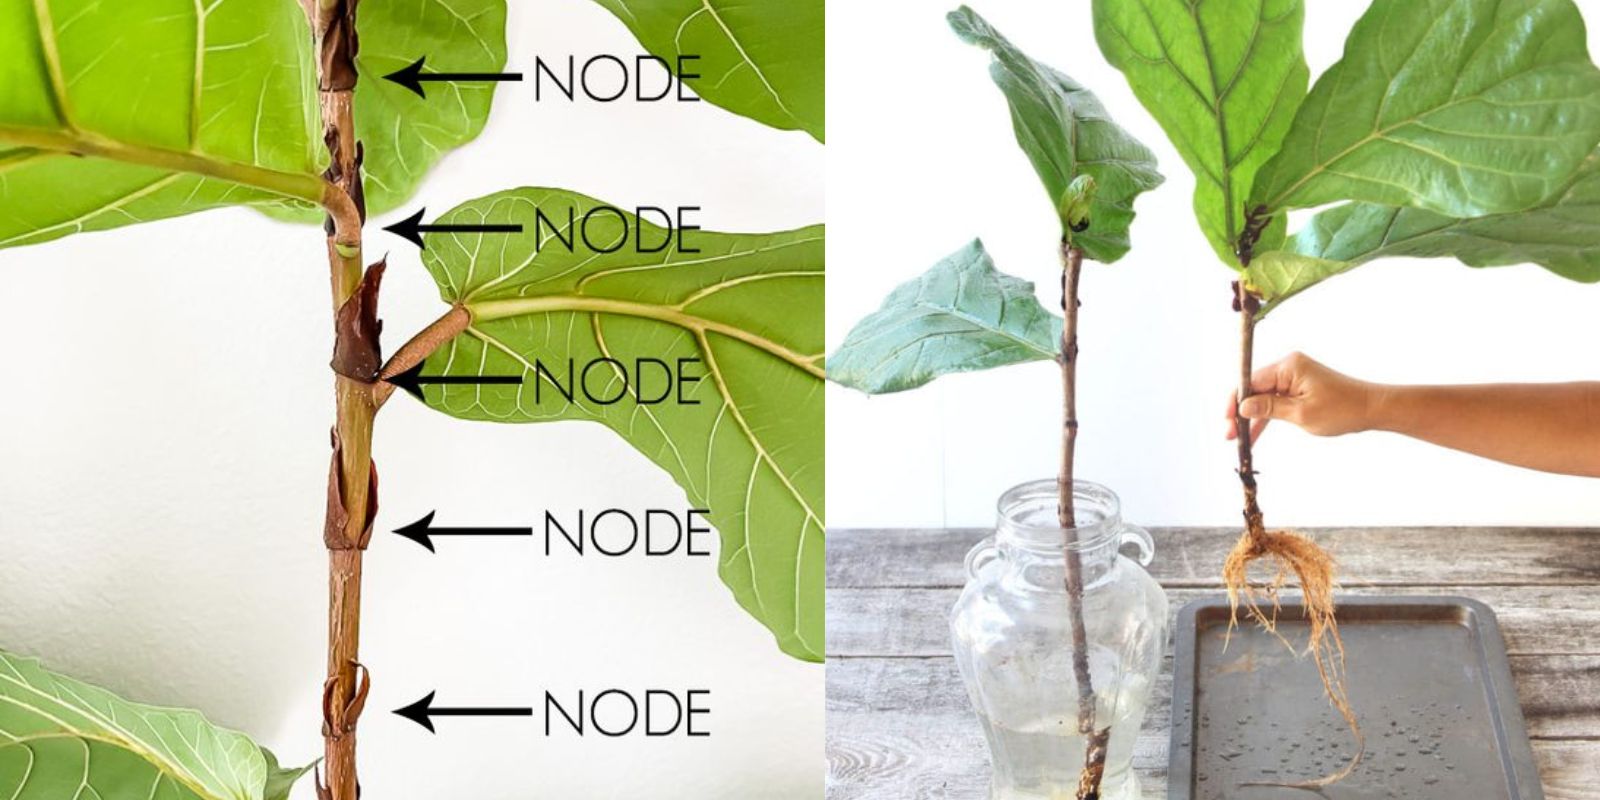
2. Look for Nodes
The best cuttings are those that have a node, which is the small bump on the stem where leaves grow. Nodes are crucial for root development and will help ensure successful propagation.
3. Timing is Key
The best time to take cuttings is during the growing season, typically in spring or early summer when the plant is actively growing. This increases the likelihood of successful rooting.
The Cutting Process
Once you’ve selected your cutting, it’s time to take action. Follow these steps:
1. Gather Your Tools
You’ll need:
- Clean, sharp scissors or pruning shears: Sanitize your cutting tool with rubbing alcohol to prevent the spread of disease.
- A small pot: Ensure it has drainage holes.
- Potting mix: A well-draining mix is essential, such as a combination of peat, perlite, and orchid bark.
2. Make the Cut
Using your sanitized scissors, make a clean, diagonal cut just below the node. Aim for a cutting that is about 4-6 inches long. The diagonal cut increases the surface area for rooting.
3. Callous the Cut End
Let the cutting sit in a dry, warm place for 24-48 hours. This process allows the cut end to callous over, reducing the risk of rot when planted.
Preparing for Planting
1. Choosing the Right Soil
A well-draining potting mix is crucial for successful propagation. You can create your own mix by combining:
- 1 part peat moss
- 1 part perlite
- 1 part orchid bark
This mix provides adequate aeration and drainage, which are essential for root development.
2. Filling the Pot
Fill your small pot with the prepared potting mix, leaving about an inch of space at the top. Moisten the soil lightly, but don’t saturate it, as excessive moisture can lead to rot.
Planting the Cutting
1. Inserting the Cutting
Make a small hole in the soil with your finger or a stick, then gently insert the calloused end of the cutting into the soil, burying it about 1-2 inches deep. Ensure the node is underground, as this is where roots will emerge.
2. Firming the Soil
Gently firm the soil around the base of the cutting to provide stability. This helps prevent the cutting from toppling over while establishing roots.
Creating a Humid Environment
Fiddle Leaf Fig cuttings thrive in humidity. Here are a couple of methods to maintain moisture:
1. Cover with a Plastic Bag
Place a plastic bag over the pot, ensuring it doesn’t touch the leaves. This creates a mini greenhouse effect, maintaining high humidity levels. Make sure to remove the bag occasionally to allow for air circulation and prevent mold growth.
2. Use a Propagator
If you have a propagator, this is an excellent option for maintaining humidity while allowing for air circulation. Just ensure it has adequate drainage.
Optimal Light Conditions
Fiddle Leaf Figs love bright, indirect light. Here’s how to provide the right conditions:
1. Placement
Position the pot in a warm spot where it will receive bright, indirect sunlight. Avoid direct sunlight, as this can scorch the leaves.
2. Rotating the Plant
If possible, rotate the pot every few days to ensure even light exposure on all sides, promoting balanced growth.
Watering and Care
1. Initial Watering
After planting the cutting, water the soil lightly to moisten it. Ensure that excess water can drain out to prevent waterlogging.
2. Regular Monitoring
Check the moisture level of the soil regularly. The top inch of soil should be allowed to dry out before watering again. Overwatering is one of the most common mistakes made during propagation.
Patience is Key
1. Root Development
It may take several weeks (typically 4-6 weeks) for roots to develop. During this time, avoid disturbing the cutting too much. You can gently tug on the cutting to feel for resistance, indicating root growth.
2. Signs of Success
Look for new growth, such as small leaves emerging from the cutting. This is a positive sign that rooting has occurred.
Transplanting the New Plant
Once your Fiddle Leaf Fig cutting has developed a robust root system, it’s time to transplant it into a larger pot:
1. Choosing a Pot
Select a pot that is 1-2 inches larger in diameter than the current pot. Ensure it has drainage holes to prevent water from accumulating.
2. Using Fresh Potting Mix
Fill the new pot with fresh potting mix, similar to the mix used for propagation. This provides nutrients for your growing plant.
3. Transplanting
Gently remove the rooted cutting from its current pot. Be careful not to damage the roots. Place it in the new pot and fill in around the sides with fresh potting mix, firming it gently.
4. Watering After Transplanting
Water the new plant lightly to help settle the soil around the roots. Allow excess water to drain out, ensuring the soil remains moist but not soggy.
Ongoing Care for Your Fiddle Leaf Fig
1. Light Requirements
Continue to provide bright, indirect light to promote healthy growth. If you notice your plant stretching toward the light, consider moving it closer to the light source.
2. Watering Routine
Water your Fiddle Leaf Fig when the top inch of soil feels dry to the touch. Be cautious not to overwater, as this can lead to root rot.
3. Fertilizing
After a few months of growth, consider fertilizing your Fiddle Leaf Fig with a balanced liquid fertilizer during the growing season (spring and summer) to encourage lush growth.
4. Pruning
Prune any dead or damaged leaves to maintain the plant’s health and encourage new growth. This is also an opportunity to shape the plant as it grows.
Conclusion
Propagating Fiddle Leaf Figs from cuttings is a fulfilling and enjoyable process that can lead to a beautiful collection of these iconic plants. By following the steps outlined in this guide, you can increase your chances of success and enjoy the satisfaction of growing your own Fiddle Leaf Figs from clippings. Whether you keep them for yourself or gift them to friends, these plants are sure to brighten any space. Ready to start your propagation journey? Get your scissors, and let’s grow some Fiddle Leaf Figs!
Remember to share your progress with the gardening community using hashtags like #FiddleLeafFig #PlantPropagation #Houseplants #IndoorGardening #GardeningTips!