
Sweet potatoes are not only delicious and versatile but also packed with nutrients. Growing sweet potatoes from slips is an easy and rewarding process that allows gardeners of all levels to enjoy this nutritious vegetable. In this article, we’ll explore how to start sweet potato slips, from selecting the right tubers to transplanting them into your garden, ensuring you have a bountiful harvest.
Introduction
Sweet potatoes (Ipomoea batatas) are a staple in many cuisines around the world. They are rich in vitamins, minerals, and fiber, making them an excellent addition to your diet. Growing sweet potatoes from slips is a fun and straightforward process, allowing you to take control of your food source and enjoy the satisfaction of growing your own vegetables. In this guide, we’ll walk you through the steps needed to successfully start sweet potato slips and eventually plant them in your garden.
Understanding Sweet Potato Slips
Sweet potato slips are the shoots that sprout from the tubers. They are the young plants that will develop into sweet potato vines, ultimately producing the tubers we love to eat. Starting slips is a method of vegetative propagation, which means you can grow new plants from the parts of an existing plant rather than from seeds. This method is beneficial for sweet potatoes, as it allows for faster growth and a more uniform crop.
Step 1: Selecting the Right Sweet Potatoes
The first step in starting sweet potato slips is to select the right tubers. Here are some tips to help you choose the best ones:
- Look for Healthy Tubers: Choose firm, unblemished sweet potatoes. Avoid any that have soft spots, mold, or signs of decay.
- Opt for Organic Varieties: If possible, select organic sweet potatoes. Non-organic varieties may have been treated with chemicals that inhibit sprouting.
- Choose the Right Type: There are many varieties of sweet potatoes, including orange, white, and purple types. Choose a variety that suits your taste preferences and growing conditions.
Step 2: Preparing for Sprouting
Once you have selected your sweet potatoes, it’s time to prepare them for sprouting. There are two primary methods to sprout sweet potatoes: in water or in soil.
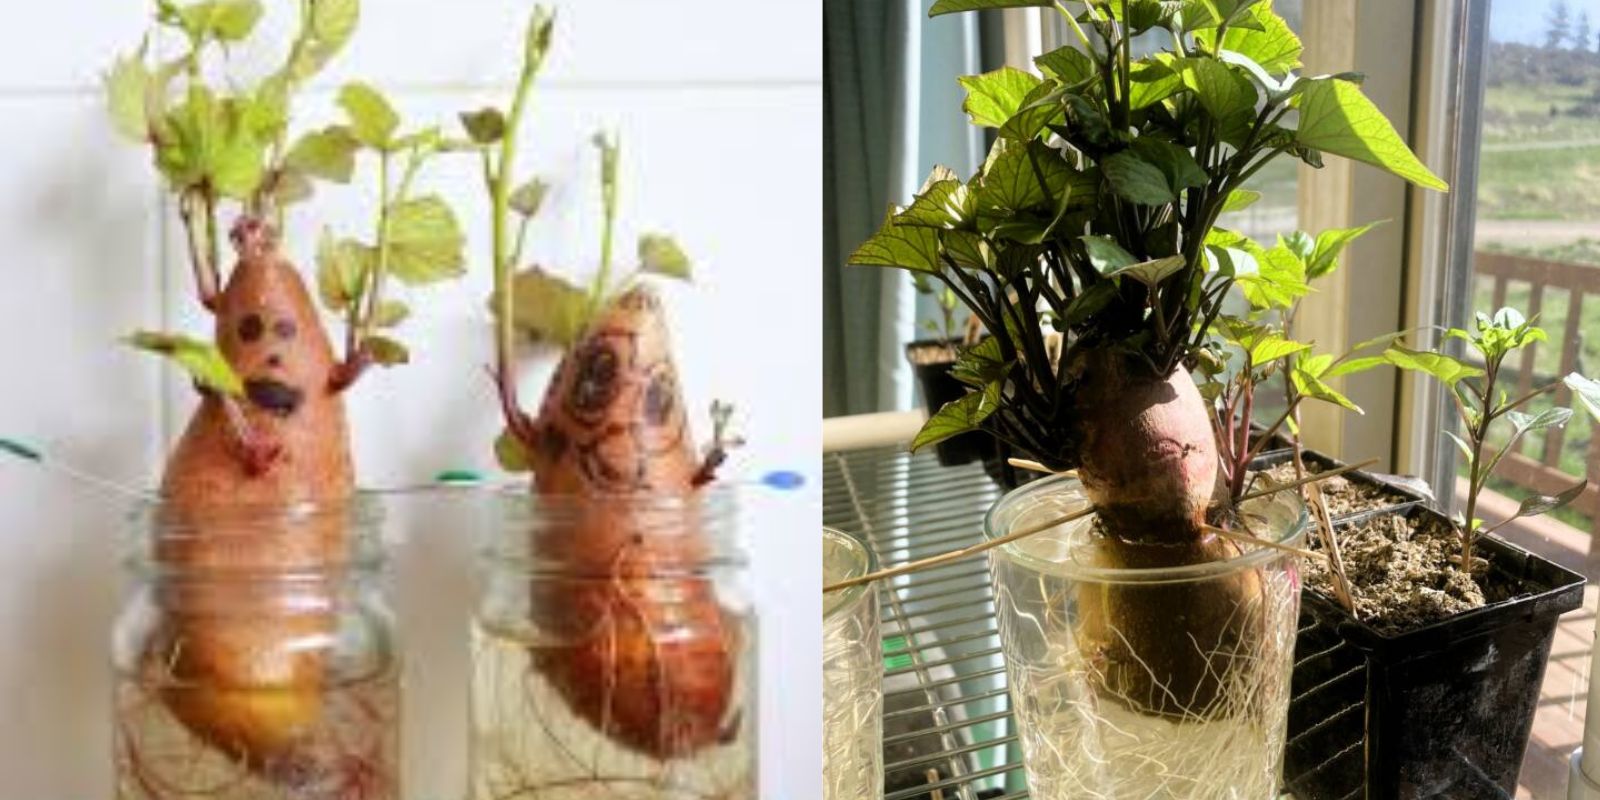
Method A: Sprouting in Water
- Gather Materials: You will need sweet potatoes, toothpicks, and a container filled with water.
- Insert Toothpicks: Take a sweet potato and insert three to four toothpicks around its middle. This will allow you to suspend the sweet potato over the water.
- Place in Water: Submerge the bottom half of the sweet potato in water, ensuring the top half remains above the waterline.
- Find a Warm Spot: Place the container in a warm, sunny location (ideally around 70°F or 21°C). Sweet potatoes need warmth and light to sprout effectively.
Method B: Sprouting in Soil
- Fill a Container with Soil: Use a pot or container filled with well-draining potting soil.
- Plant the Sweet Potato: Bury the sweet potato halfway in the soil, leaving the top exposed.
- Water the Soil: Keep the soil moist but not soggy. Too much water can lead to rot.
- Position in a Warm Spot: Like the water method, place the container in a warm and sunny location.
Step 3: Maintaining Moisture Levels
Whether you are using water or soil, it is essential to maintain the right moisture levels to encourage sprouting. Here are some tips:
- For Water Method: Change the water every few days to keep it fresh and prevent bacterial growth.
- For Soil Method: Water the soil when the top inch feels dry. Avoid overwatering, as this can cause the sweet potato to rot.
Step 4: Waiting for Slips to Grow
In about 4 to 6 weeks, you should see shoots (or slips) beginning to grow from the sweet potato. This is a thrilling moment for any gardener! Here’s what to expect:
- Shoot Development: As the slips grow, they will develop leaves and become taller. They will typically grow to about 6-8 inches long.
- Root Formation: If you are using the water method, you may also see roots beginning to develop on the slips. If you’re using soil, the slips will root directly into the soil.
Step 5: Harvesting the Slips
Once the slips reach about 6 inches in height, it’s time to harvest them. Here’s how to do it:
- Twist or Cut the Slips: Carefully twist or cut the slips off the sweet potato. Be gentle to avoid damaging the parent tuber or the newly formed slips.
- Leave Some Slips: If you want to continue growing slips from the same sweet potato, leave a few slips attached so they can continue to grow.
Step 6: Rooting the Slips
After harvesting, you’ll need to root the slips before planting them in the garden. Here’s how:
- Place in Water or Soil: You can either place the slips in a glass of water or directly into a container of soil.
- Change Water: If using water, change it every few days to keep it fresh.
- Watch for Roots: After about a week, you should see roots developing. If planting in soil, water the slips gently to help them establish.
Step 7: Transplanting Outdoors
Once the slips are rooted, they are ready to be transplanted into your garden. Follow these steps:
- Choose the Right Time: Transplant sweet potato slips after the last frost date in your area, when the soil temperature is consistently above 60°F (15°C).
- Select a Sunny Spot: Sweet potatoes love sunlight, so choose a location that receives at least 6-8 hours of sun daily.
- Prepare the Soil: Loosen the soil and amend it with compost or well-rotted manure to improve fertility and drainage.
- Plant the Slips: Dig holes in the prepared soil about 12-18 inches apart. Place each slip in the hole, covering the roots and the bottom part of the stem, leaving the top leaves exposed.
- Water Thoroughly: After planting, water the slips well to help them settle into the soil.
Caring for Your Sweet Potato Plants
Once your sweet potato slips are transplanted, proper care is crucial for a successful harvest. Here are some essential tips:
- Watering: Keep the soil consistently moist but not waterlogged. Sweet potatoes prefer evenly moist conditions, especially during dry spells.
- Mulching: Apply a layer of mulch around the plants to retain moisture, suppress weeds, and maintain a stable soil temperature.
- Fertilizing: Use a balanced fertilizer or compost to provide the necessary nutrients for healthy growth.
- Weed Control: Regularly check for weeds and remove them to reduce competition for nutrients and water.
- Pest Management: Keep an eye out for pests such as sweet potato weevils or aphids. Use organic pest control methods to manage infestations.
Harvesting Your Sweet Potatoes
After a few months of growth, it’s time to harvest your sweet potatoes! Here’s how to do it:
- Timing: Sweet potatoes are typically ready to harvest 90 to 120 days after planting, depending on the variety. You can tell they are ready when the leaves start to yellow and die back.
- Loosen the Soil: Use a garden fork or shovel to gently loosen the soil around the plants. Be careful not to puncture the tubers.
- Lift the Tubers: Carefully lift the sweet potatoes out of the ground. Handle them gently to avoid bruising.
- Cure the Tubers: After harvesting, cure the sweet potatoes by placing them in a warm, humid location for 1-2 weeks. This helps improve their flavor and storage quality.
- Store Properly: Store the cured sweet potatoes in a cool, dark place with good ventilation. They can last for several months if stored correctly.
Conclusion
Growing sweet potatoes from slips is a rewarding experience that not only provides delicious produce but also enhances your gardening skills. With just a few simple steps, you can cultivate healthy slips and enjoy a bountiful harvest of sweet potatoes. Whether you are a seasoned gardener or a beginner, starting sweet potato slips is a fun project that connects you with nature and provides nutritious food for you and your family.
Call to Action
Now that you have learned how to start sweet potato slips, it’s time to get started on your own gardening adventure! Gather your materials, select your sweet potatoes, and watch them grow into healthy slips. Don’t forget to share your progress and results with fellow gardeners using the hashtags below!
#SweetPotatoGardening #GrowYourOwnFood #GardenToTable #UrbanGardening #SustainableLiving #HomeGarden #VegetableGardening #GardeningTips #HealthyEating
Happy gardening! 🍠🌱