
Roses are often regarded as one of the most beautiful and timeless flowers in the world. Their elegant blossoms, vibrant colors, and sweet fragrances make them a sought-after addition to any garden. Whether you’re an experienced gardener or a novice looking to add some charm to your outdoor space, growing roses is a rewarding experience that can transform your garden into a floral paradise. The best part? With a few simple techniques, you can successfully propagate and care for roses at home.
In this article, we will walk you through the process of growing and maintaining roses in your garden, providing you with a complete guide that includes everything from propagation to care. By following these straightforward steps, you can enjoy healthy, thriving rose plants that will bloom beautifully for years to come.
Step 1: Choose the Right Type of Rose
Before diving into the growing process, it is essential to choose the right type of rose for your climate, garden space, and personal preferences. There are various types of roses, each with unique characteristics, so you must select one that fits your needs. Some of the most common types include:
- Hybrid Tea Roses: Known for their large, classic blooms and long stems, hybrid tea roses are a popular choice for bouquets.
- Climbing Roses: Perfect for trellises, arbors, or fences, climbing roses offer vibrant flowers that spread upward.
- Floribunda Roses: These roses produce clusters of smaller blooms and are great for creating colorful, dense arrangements.
- Miniature Roses: Compact and perfect for containers or small garden spaces, miniature roses are ideal for anyone with limited space.
- Shrub Roses: Known for their hardiness and ability to thrive with minimal care, shrub roses are perfect for beginners.
Once you have selected the right rose variety for your garden, it’s time to move on to the next step: propagating new rose plants.
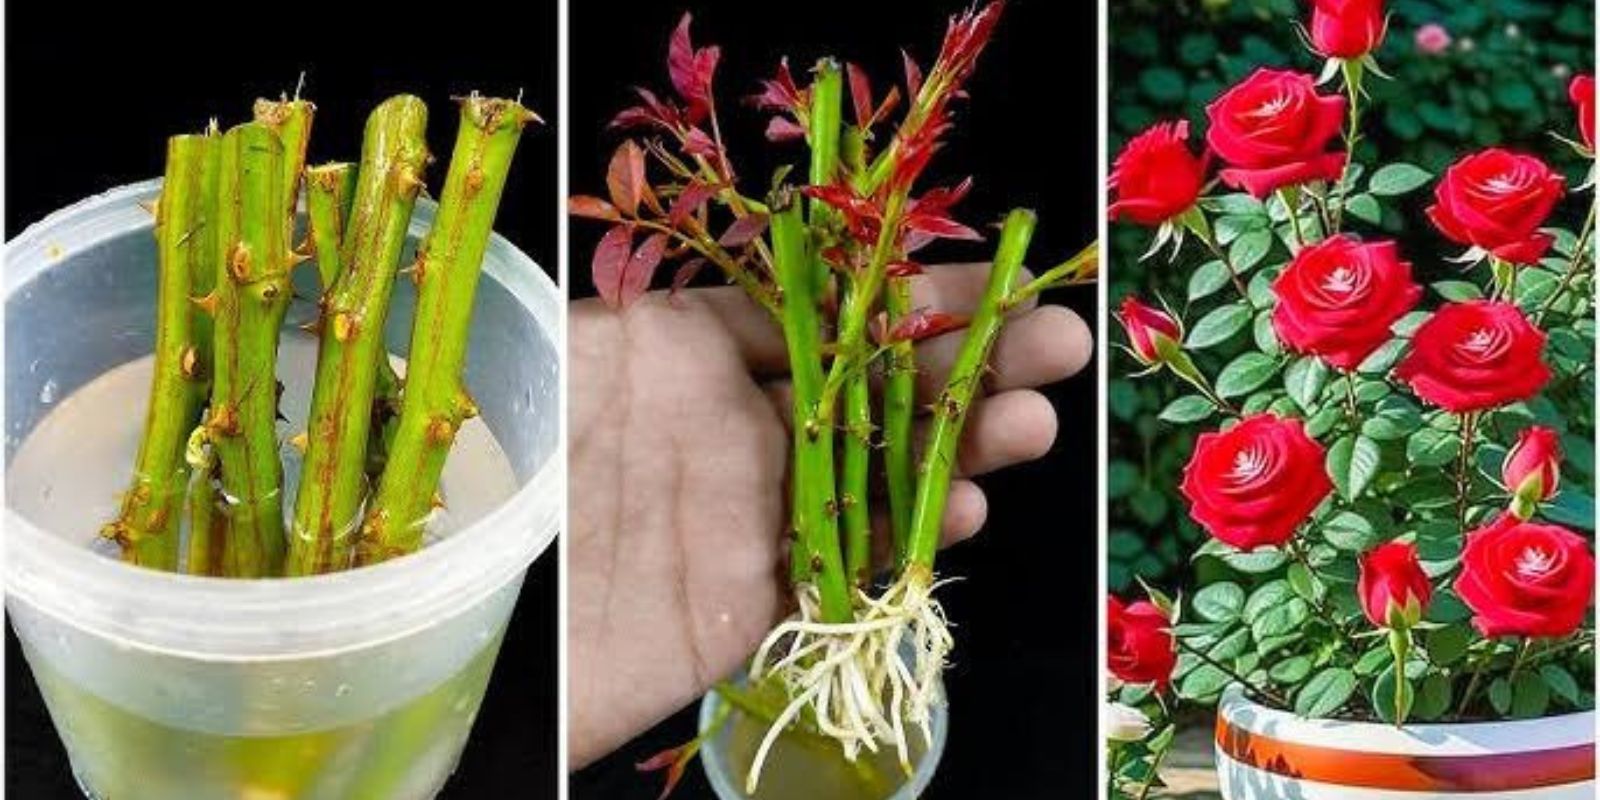
Step 2: Propagating Roses from Cuttings
Propagating roses from cuttings is a simple and effective way to grow new rose plants. This process allows you to create a copy of an existing rose, ensuring that the new plant will have the same characteristics as the parent. Here’s how to propagate roses from cuttings:
- Choose a Healthy Stem: Select a healthy rose stem from a mature plant. The stem should be firm, free from disease or pests, and have at least 3-4 nodes (the points where leaves attach to the stem). A cutting taken from a vigorous, disease-free plant will have the best chances of success.
- Take the Cutting: Use a sharp, clean knife or pruning shears to cut a 6-8 inch long piece of the stem at a 45-degree angle. Make the cut just below a node, as the node will encourage the formation of roots. Remove any leaves from the lower half of the cutting.
- Apply Rooting Hormone: Rooting hormones promote the growth of roots from cuttings. After taking the cutting, dip the cut end into rooting hormone powder. This step is optional but can increase the chances of successful rooting.
- Prepare the Potting Mix: Use a well-draining potting mix that is rich in organic matter. A mixture of 50% garden soil, 30% cocopeat, and 20% vermicompost is ideal for rose cuttings. Fill a small pot or container with this mix.
- Plant the Cutting: Insert the cut end of the stem into the potting mix, burying it about 2-3 inches deep. Firm the soil around the cutting to ensure it is secure. Water the cutting well, making sure the soil is moist but not waterlogged.
- Provide the Right Environment: Place the potted cutting in a bright, warm location with indirect sunlight. The ideal temperature for rooting rose cuttings is between 65°F and 75°F (18°C and 24°C). If necessary, cover the cutting with a plastic bag or a clear plastic dome to retain humidity. This helps create a greenhouse effect that encourages root growth.
- Water and Wait for Root Development: Keep the soil consistently moist but not soaking wet. Water the cutting whenever the soil feels dry to the touch. After approximately 45 days, the cutting should have developed a healthy root system. To check, gently tug on the cutting—if it resists, roots have formed.
Step 3: Caring for Your New Rose Plants
Once your rose cutting has successfully rooted, it’s time to transition it to its permanent spot in your garden or container. Proper care is essential to ensure that the rose plant thrives and produces beautiful blooms. Follow these tips to give your roses the best care:
- Choose the Right Location: Roses need plenty of sunlight to grow well. Select a location in your garden that receives at least 6 hours of direct sunlight per day. If growing roses in a container, ensure the container has adequate drainage to prevent root rot.
- Fertilize Regularly: Roses are heavy feeders, and they will benefit from regular fertilization throughout the growing season. After the first week of planting, add a balanced fertilizer, such as NPK (nitrogen, phosphorus, potassium), to the soil. Use a slow-release fertilizer or liquid fertilizer every 4-6 weeks to ensure that your roses receive the nutrients they need.
- Water Properly: Roses require consistent moisture, especially during the growing season. Water your roses deeply, aiming for the roots, rather than watering the leaves. Avoid overhead watering, as this can promote fungal diseases. Watering early in the morning or late in the evening is best to prevent evaporation and disease.
- Prune Regularly: Pruning is essential to maintain the shape and health of your rose plants. Remove any dead, damaged, or diseased wood, and cut back any spent blooms to encourage new growth. Pruning also helps to improve air circulation around the plant, reducing the risk of fungal infections.
- Mulch Around the Base: Apply a 2-3 inch layer of mulch around the base of your rose plant. Mulch helps retain soil moisture, suppresses weeds, and regulates soil temperature. Organic mulches such as wood chips, straw, or compost are ideal.
- Protect from Pests and Diseases: While roses are relatively hardy, they can be susceptible to certain pests and diseases, such as aphids, black spot, and powdery mildew. Monitor your plants regularly and take action if you notice any signs of pests or disease. Use organic pest control methods such as neem oil or insecticidal soap to manage infestations.
- Deadhead Regularly: To encourage continuous blooming, deadhead spent flowers by cutting them back to the next set of leaves. This process prevents the plant from focusing its energy on producing seeds and encourages the growth of new flowers.
Step 4: Enjoy the Blooms
After a few months of care and attention, you will be rewarded with stunning blooms. Roses are known for their beauty, and nothing compares to the satisfaction of watching your home-grown roses come into full bloom. You can cut the flowers and use them in bouquets or simply admire them in your garden.
Conclusion
Growing and caring for roses can be an enjoyable and rewarding experience for any gardener. With the right techniques, such as propagating roses from cuttings, providing proper care, and ensuring optimal growing conditions, you can enjoy the beauty of roses in your own backyard. By following the steps outlined in this guide, you will be able to cultivate healthy rose plants that will bloom beautifully and add a touch of elegance to your garden.
Remember, patience is key when growing roses. Whether you’re planting a new cutting or caring for an established plant, taking the time to nurture your roses will pay off in the form of vibrant, fragrant flowers that will brighten your garden and your home.
So, gather your supplies, select the perfect rose variety, and get started on your rose-growing journey today! Happy gardening!