
Soil temperature is one of the most important factors affecting plant growth. From seed germination to root development, the temperature of the soil directly influences the health and productivity of your garden. Whether you’re a novice gardener or an experienced horticulturist, understanding how to measure and interpret soil temperature is essential for ensuring your plants thrive. This is where soil temperature gauges come into play.
In this comprehensive guide, we’ll explore the importance of soil temperature, how to use soil temperature gauges effectively, and provide tips for making the most of this essential gardening tool.
The Importance of Soil Temperature
Soil temperature is a critical factor in determining how well plants grow. It affects seed germination, root development, nutrient absorption, and the overall vigor of plants. Different plants have specific temperature requirements, which means that planting too early or too late can hinder growth or even kill the plants.
For instance, cool-season crops like peas, lettuce, and spinach prefer soil temperatures between 45°F and 65°F (7°C – 18°C), while warm-season crops like tomatoes, beans, and peppers thrive in soil temperatures between 70°F and 85°F (21°C – 29°C). Knowing the soil temperature allows gardeners to plant at the optimal time, increasing their chances of success.
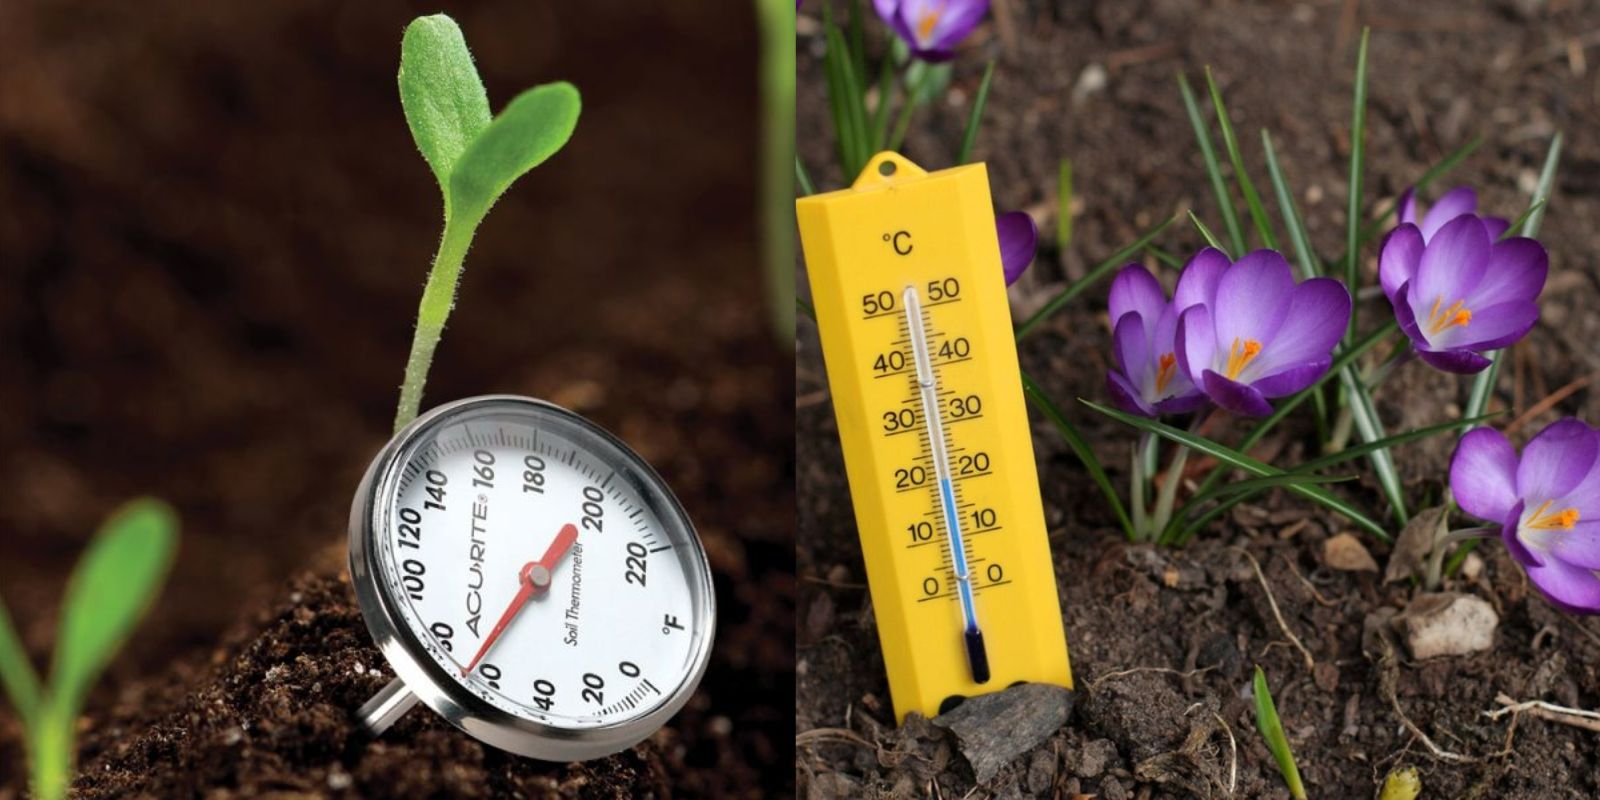
The Role of Soil Temperature Gauges
A soil temperature gauge is a tool used to measure the temperature of the soil at various depths. Accurate soil temperature measurements are crucial for deciding the best time to plant seeds, transplant seedlings, or apply fertilizers. The right temperature can improve germination rates, promote healthy root growth, and prevent the planting of crops in unsuitable conditions.
These gauges come in a variety of designs, ranging from simple manual thermometers to digital models that provide precise readings. Some gauges are designed for shallow readings (ideal for monitoring seedbeds), while others can measure deeper soil temperatures, which is important for established plants and root health.
Types of Soil Temperature Gauges
There are several types of soil temperature gauges available for gardeners, each with its own set of advantages and applications. Let’s take a look at the most common types:
1. Analog Soil Thermometer (Mercury or Alcohol-Based)
- How It Works: These thermometers have a metal probe that is inserted into the soil, with a scale showing the temperature.
- Pros: Simple to use, inexpensive, and reliable.
- Cons: May require manual calibration, and readings can be less precise compared to digital models.
2. Digital Soil Thermometer
- How It Works: A digital thermometer provides a digital readout of the soil temperature, offering precise measurements.
- Pros: Accurate readings, easy to read display, and can include features like maximum and minimum temperature records.
- Cons: Generally more expensive than analog models, and some may require batteries.
3. Soil Probe with Dial or Digital Display
- How It Works: These probes are often inserted into the soil to a specific depth (such as 2 to 4 inches) and provide either a dial or digital readout of the temperature.
- Pros: Provides an accurate and immediate reading of the temperature at the desired depth.
- Cons: Some models can be more fragile and may break with heavy use.
4. Wireless Soil Temperature Gauge
- How It Works: These advanced models feature sensors that transmit temperature data wirelessly to a display or smartphone app.
- Pros: Offers convenience and remote monitoring, allowing you to track soil temperature over time.
- Cons: Expensive, and may require an internet connection or additional devices.
How to Use a Soil Temperature Gauge
Using a soil temperature gauge is simple, but for the most accurate readings, it’s important to follow some basic steps. Here’s how to measure the soil temperature properly:
1. Choose the Right Time to Measure
- Timing: Measure soil temperature in the morning, before the sun has had a chance to warm up the soil. This ensures you get an accurate baseline temperature. For more precise data, take several readings throughout the day to account for fluctuations.
- Conditions: Avoid measuring after heavy rainfall or irrigation, as wet soil can affect temperature readings.
2. Insert the Probe at the Correct Depth
- Shallow Depth (2-4 inches): For monitoring seed germination, plant establishment, and shallow-rooted plants like lettuce and spinach, measure the temperature at a depth of 2 to 4 inches.
- Deeper Depth (6-8 inches): For established plants and to check root health, measure deeper, typically between 6 to 8 inches below the surface. This is particularly important for perennial plants and fruiting trees.
3. Insert the Gauge Properly
- Insert the probe of the gauge into the soil gently and steadily, ensuring that it’s not forced into the soil, which could damage the probe or create an inaccurate reading.
- If you’re using an analog thermometer, ensure that the metal probe is fully inserted before taking a reading.
4. Wait for the Reading
- Allow the gauge to settle and provide a stable reading. Analog thermometers may take a few minutes to register, while digital models provide quicker feedback.
- Record the temperature at various points in your garden to get a more accurate reading of the overall soil conditions.
5. Interpret the Results
- Compare the measured soil temperature with the ideal temperature range for your plants. For example, if the soil temperature is below 50°F (10°C), cool-season crops like broccoli and kale will thrive, while warm-season crops like tomatoes may not perform well.
- You can also monitor temperature fluctuations over time, which helps you adjust your gardening activities, such as planting or fertilization.
Tips for Using Soil Temperature Gauges Effectively
1. Check Multiple Locations
- Soil temperature can vary in different parts of your garden due to exposure to sunlight, shade, and soil composition. To get an accurate picture, take readings from different areas of your garden.
2. Use a Gauge with Multiple Depth Options
- If you plan to use the soil gauge for multiple types of plants, consider purchasing a model that allows you to measure soil temperature at different depths. This can help you assess both seedbed conditions and the health of established plants.
3. Monitor Soil Temperature Regularly
- Soil temperature can change throughout the day, especially in early spring and late fall. For optimal planting times, monitor your garden’s soil temperature regularly to ensure that the conditions are ideal for your crops.
4. Consider Weather Conditions
- Extreme weather events like heavy rainfall or heatwaves can temporarily alter soil temperatures. Make sure to account for these changes when interpreting your readings.
5. Invest in a Quality Gauge
- Although there are inexpensive soil temperature gauges available, investing in a high-quality model can provide you with more accurate readings and greater durability over time.
When to Plant Based on Soil Temperature
Knowing when to plant is one of the most important aspects of gardening, and soil temperature plays a key role in determining the right timing. Here are some guidelines to follow:
- Cool-Season Crops: Plant crops like peas, lettuce, and spinach when the soil temperature is between 45°F and 65°F (7°C – 18°C).
- Warm-Season Crops: Plant crops like tomatoes, peppers, and beans when the soil temperature reaches 70°F to 85°F (21°C – 29°C).
- Heat-Loving Crops: Crops like melons, pumpkins, and sweet potatoes should be planted when the soil temperature is consistently above 75°F (24°C).
Conclusion
Soil temperature is a critical yet often overlooked factor that directly impacts plant health and growth. By using soil temperature gauges, gardeners can make informed decisions about when to plant, how to adjust their care practices, and how to create the optimal growing environment for their crops. These simple devices can significantly improve your gardening success by helping you track soil conditions and ensure that your plants receive the right temperature for thriving.
Investing in a reliable soil temperature gauge and learning how to use it effectively will give you an edge in your gardening efforts, making it easier to grow healthier, more productive plants. Keep monitoring soil temperatures regularly, adjust your planting schedule accordingly, and watch your garden flourish!
Ready to take control of your garden’s success? Start using a soil temperature gauge today and share your gardening journey with us! 🌱🌞
#SoilTemperature #GardeningTips #HealthyPlants #GreenThumb #SoilHealth #GardenScience #PlantGrowth #HomeGardening #GardeningCommunity