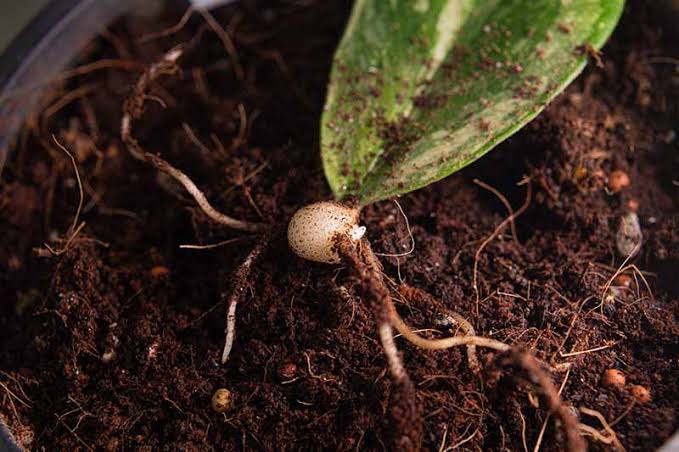
If you’ve ever admired the glossy, emerald-green leaves of a ZZ plant (Zamioculcas zamiifolia) and wished you could have more of them around your home, good news — you can! This hardy houseplant is not only easy to care for but also incredibly simple to propagate. With a little patience and the right method, you can grow new ZZ plants from just a single stem or leaf.In this guide, we’ll walk you through how to propagate a ZZ plant step-by-step, share expert tips, and help you turn one plant into many! Whether you’re in the United States, United Kingdom, or Canada, this method works beautifully in any home environment.🌱 Why Propagate a ZZ Plant?The ZZ plant is one of the easiest indoor plants to grow, making it perfect for beginners. Propagating it allows you to:Expand your indoor garden without spending extra money.Share cuttings with friends and family.Refresh your plant if it’s overgrown or has damaged stems.Plus, there’s something deeply satisfying about watching new roots form and new leaves emerge — it’s like nature’s magic unfolding right on your windowsill.🧡 What You’ll NeedBefore you begin, gather these simple tools and materials for your ZZ plant propagation:A healthy ZZ plantSharp, clean scissors or pruning shearsA glass jar or small potWater (filtered or rainwater is best)Potting mix (well-draining, such as a mix for succulents or cacti)Optional: rooting hormone (for faster growth)🌿 Methods to Propagate a ZZ PlantYou can propagate a ZZ plant in several ways — through leaf cuttings, stem cuttings, or division. Let’s explore each one!🌱 1. Propagating from Leaf CuttingsThis is the simplest method — all you need is a leaf!Steps:Select a healthy leaf from your ZZ plant.Use sterilized scissors to cut it off cleanly, including a small portion of the stem.Let the cutting dry for a few hours so the wound can callous.Place the leaf cutting in a jar of water or directly in moist soil.If you’re using water, change it every few days to keep it fresh.Within a few weeks, you’ll notice tiny roots and a bulb-like rhizome forming at the base. Once the roots are about an inch long, transplant your cutting into a pot with well-draining soil.💡 Tip: This method takes patience — it can take 2–3 months for roots to develop, but it’s worth the wait!🌿 2. Propagating from Stem CuttingsIf your ZZ plant has long stems, this method works beautifully and often grows faster than leaf propagation.Steps:Choose a mature stem with several healthy leaves.Cut it near the base of the plant using sterilized scissors.Allow the cut end to dry and callous for a few hours.Place the stem in water or moist potting mix.For water: Keep the base submerged but not the leaves.For soil: Ensure the potting mix stays slightly damp, not soggy.Keep the cutting in bright, indirect light and be patient.You’ll soon see roots growing, followed by new shoots — a sure sign your new ZZ plant is thriving!🌼 Tip: Add a drop of liquid fertilizer to the water once roots start to appear to encourage stronger growth.🌿 3. Propagating by DivisionIf your ZZ plant is mature and has multiple stalks, division is the quickest and most reliable way to propagate.Steps:Carefully remove the plant from its pot.Gently separate the rhizomes (the thick, potato-like roots) with your hands or a clean knife.Make sure each section has at least one stem and a few healthy roots.Plant each division into its own pot with fresh potting mix.Water lightly and place in a bright, indirect spot.🌿 Pro Tip: Avoid overwatering right after division — ZZ plants prefer slightly dry conditions while settling into their new homes.☀️ Best Conditions for Successful PropagationTo ensure your ZZ plant propagation thrives, keep these growing conditions in mind:Light: Bright, indirect light is ideal. Avoid direct sunlight, which can scorch new growth.Temperature: Maintain a warm environment (65–80°F / 18–27°C).Humidity: Average indoor humidity is perfect.Soil: Use a well-draining mix — a combination of potting soil, perlite, and sand works best.Water: Let the soil dry slightly between watering. ZZ plants dislike soggy roots.🪴 Practical Tips for ZZ Plant Propagation SuccessBe patient. ZZ plants are slow growers, so don’t rush the process.Use rooting hormone if you want to speed up root development.Keep cuttings stable. Avoid moving them too often while roots are forming.Avoid overwatering. It’s the most common reason cuttings fail.Label your jars or pots with dates to track progress.💧 Water Tip: Filtered or rainwater works better than tap water, especially in areas with high chlorine levels.🌼 How to Care for Your New ZZ PlantsOnce your propagated ZZ plants are established in soil:Water every 2–3 weeks, letting the soil dry out between waterings.Wipe the leaves occasionally to keep them shiny and dust-free.Fertilize lightly during the growing season (spring and summer).Rotate your pots monthly so your plants grow evenly toward the light.Over time, you’ll see new stems sprout — your propagated plant will start looking just like the original!🌿 Common Mistakes to AvoidEven though ZZ plants are tough, propagation can fail if you:Use soggy soil (causes root rot)Expose cuttings to direct sunlightForget to change the water (if propagating in water)Use dull or unclean scissors, which can damage stemsTake your time, and handle each cutting with care for the best results.🌱 Conclusion: Your Easy Guide to Growing More GreenWith this amazing how to propagate a ZZ plant idea, you can multiply your favorite houseplant effortlessly. Whether you choose leaf cuttings, stem cuttings, or division, each method brings joy and a deeper connection to your indoor garden.So grab your scissors, prepare a few jars or pots, and start your propagation journey today. Soon, you’ll have a thriving collection of lush, shiny ZZ plants — perfect for gifting or adding natural beauty to every corner of your home! 🌿✨