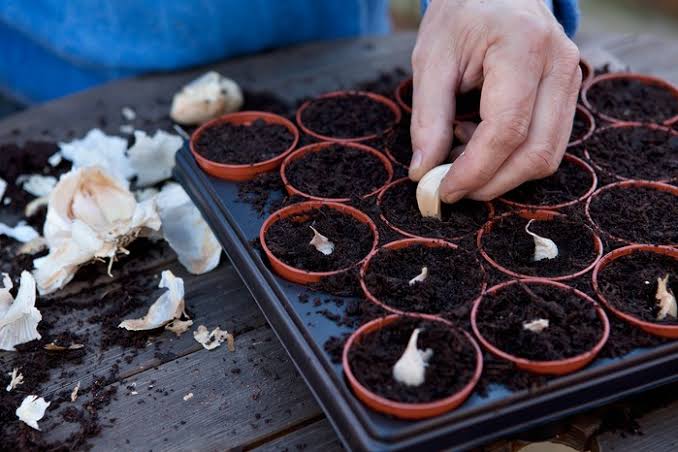
Before you grab a trowel, it helps to know why this is such a smart project.Cheap and productive – One clove becomes a whole bulb. A few bulbs can plant a whole bed.Low maintenance – Once planted, garlic mostly just needs weeding and occasional watering.Cold-hardy – Many varieties love cool weather, making them ideal for much of the U.S., U.K., and Canada.Tastes better – Fresh homegrown garlic is usually stronger, sweeter, and more complex than supermarket bulbs.When you Transform your garden with How to plant garlic from cloves!, you’re setting yourself up for months of flavor with very little effort.Choosing the Right Garlic for Your ClimateNot all garlic is the same. Picking the right type is a big part of success.Hardneck vs Softneck GarlicHardneck GarlicGreat for colder climates (northern U.S., much of Canada, cooler parts of the U.K.).Produces a stiff central stalk and garlic scapes (curly flower stalks you can eat).Cloves are usually larger and easier to peel.Doesn’t store quite as long as softneck (typically several months).Softneck GarlicBetter for milder climates (warmer U.S. states, milder coastal regions in the U.K.).No scapes; more floppy, soft stems (often used for garlic braids).Smaller but more numerous cloves per bulb.Often stores for a long time—sometimes 6–9 months.Whichever you choose, you’ll still Transform your garden with How to plant garlic from cloves!—just match the type to your typical winter.Seed Garlic vs Grocery Store GarlicSeed garlic (sold by garden centers or online):Specifically grown for planting.Usually healthier, with known variety and better disease resistance.Grocery store garlic:Can work sometimes, especially if locally grown.May be treated to stop sprouting, or may carry diseases.If you’re serious about transforming your garden, get proper seed garlic at least for your first attempt.When and Where to Plant GarlicBest Time to PlantIn most regions, garlic is planted in fall:United States & Canada (cool/temperate areas):Plant about 4–6 weeks before the ground freezes.Common window: late September to November, depending on your zone.United Kingdom:Many gardeners plant in October–November, or early spring for certain varieties.If you miss fall, you can plant garlic in early spring, but bulbs may be smaller. It’s still a good way to learn and practice.Best LocationTo really Transform your garden with How to plant garlic from cloves!, give it the right spot:Full sun – Aim for 6+ hours of direct sun per day.Well-drained soil – Garlic hates sitting in waterlogged soil.Loose, fertile earth – Sandy loam or raised beds are ideal.If your soil is heavy clay, consider raised beds or adding compost and organic matter to improve drainage.Step-by-Step: Transform Your Garden with How to Plant Garlic from Cloves!Here’s the heart of the process.H2: Step 1 – Prepare the BedClear the area of weeds and old roots.Loosen the soil to at least 8–10 inches (20–25 cm) deep using a fork or shovel.Mix in compost or well-rotted manure to improve fertility and texture.Rake the surface smooth.Well-prepared soil is essential if you want to Transform your garden with How to plant garlic from cloves! and get large, healthy bulbs.H2: Step 2 – Separate the ClovesTake your garlic bulbs and break them apart by hand into individual cloves.Leave the papery skin on each clove—don’t peel them.Pick the biggest, healthiest cloves for planting; save the tiny ones for cooking.Each clove will grow into one full bulb, so choose your “seed” carefully.H2: Step 3 – Planting Depth and SpacingA simple rule: pointy end up, flat end down.Depth:Plant cloves about 2–3 inches (5–7 cm) deep from clove tip to soil surface.Spacing:Space cloves 4–6 inches (10–15 cm) apart in rows.Leave 8–12 inches (20–30 cm) between rows.Cover the cloves with soil and gently firm it down. You’ve now officially started to Transform your garden with How to plant garlic from cloves!H2: Step 4 – Mulch and WaterMulch helps protect cloves over winter and keeps weeds down.Add a 2–4 inch (5–10 cm) layer of straw, shredded leaves, or similar organic mulch.Water thoroughly after planting so the soil settles around the cloves.After this, garlic usually only needs occasional watering in fall (if rainfall is low).In very cold areas, mulch gives extra insulation; in milder ones, it evens out temperature swings.Caring for Garlic as It GrowsOnce planted, garlic doesn’t demand much—but a little attention goes a long way.H2: In Late Winter / Early SpringYou’ll see green shoots poking through the mulch once the weather warms.If the mulch layer is very thick and blocking shoots, gently pull it back a bit.Make sure the bed doesn’t dry out completely, especially as growth picks up.H2: Watering and FeedingGarlic likes even moisture, especially in spring as bulbs form.Water deeply when the top couple inches of soil dry out.Avoid soggy soil—overwatering can cause rot.For extra growth, you can apply a balanced organic fertilizer or a nitrogen-rich feed (like fish emulsion) in early spring, following the package directions.H2: Garlic Scapes (Hardneck Varieties)If you planted hardneck garlic, you’ll see curly green stalks (scapes) emerge in late spring or early summer.When the scapes make a loop or two, cut them off where they emerge.This redirects energy back into the bulb and can increase bulb size.Bonus: scapes are edible and delicious—great in stir-fries, pesto, or grilled.Harvesting, Curing, and Storing GarlicThis is where your decision to Transform your garden with How to plant garlic from cloves! really pays off.H2: When to HarvestLook at the leaves:When about 1/3–1/2 of the leaves have turned yellow/brown (usually mid- to late summer), it’s time to check.Carefully dig up one or two bulbs with a fork or spade—don’t just yank by the stalk.If the bulbs are well-formed with distinct cloves and still have several green leaves, you’re good to harvest.H2: How to HarvestUse a garden fork to loosen the soil around each plant.Lift bulbs gently—don’t damage them by pulling hard on the stems.Shake off loose soil (but don’t wash with water).H2: Curing the BulbsCuring dries and toughens the skins so your garlic stores well.Lay bulbs in a single layer or hang in bundles in a dry, shaded, well-ventilated place (like a shed, garage, or covered porch).Let them cure for 2–4 weeks.Once the skins are dry and papery, trim the roots and cut the stalks down to a couple of inches (unless you plan to braid softneck garlic).H2: Storing GarlicStore cured bulbs in a cool, dry, dark place with good air flow (not the fridge).Use mesh bags, baskets, or crates—not sealed plastic.Softneck types often keep for many months; hardneck types for a bit less.Remember to set aside your biggest, healthiest bulbs as seed for next year. That’s how you keep the cycle going and keep your garden transformed year after year.Practical Tips to Transform Your Garden with How to Plant Garlic from Cloves!Here are some quick, actionable tips:Start small: Even a 3×3 ft (1×1 m) patch or a raised bed corner can grow a surprising amount of garlic.Raised beds help: In areas with heavy clay or lots of rain, raised beds improve drainage and reduce rot.Rotate crops: Don’t plant garlic (or other alliums like onions/leeks) in the same spot year after year to reduce disease buildup.Weed regularly: Garlic doesn’t like competition. Keep the bed weed-free, especially in spring.Label varieties: If you grow more than one type, label them; you’ll quickly figure out your favorites.Use every part: Hardneck scapes, small bulbs, and extra cloves can all be used in the kitchen—nothing goes to waste.These small habits make it much easier to truly Transform your garden with How to plant garlic from cloves! and enjoy reliable harvests.ConclusionWhen you Transform your garden with How to plant garlic from cloves!, you’re choosing a crop that’s:Easy to plantTough enough for varied climates in the U.S., U.K., and CanadaIncredibly rewarding in the kitchenBy choosing the right type for your climate, planting cloves at the right depth and spacing, mulching, watering a bit in spring, cutting scapes, and curing your harvest, you can turn a simple patch of soil into months of homegrown garlic.Start with a bulb or two of seed garlic this season. Follow these steps, and by next summer, you’ll be pulling up your own fragrant bulbs—and saving some cloves to plant again. That’s how you keep the cycle going and continually Transform your garden with How to plant garlic from cloves! year after year.