
Introduction
Growing roses from cuttings is a gratifying way to expand your garden with beautiful blooms. One of the simplest and most effective methods for rooting rose cuttings is using a 2-liter soda bottle as a makeshift greenhouse. This innovative approach not only provides a controlled environment for the cuttings but also makes the process of growing roses fast and easy. In this article, we’ll explore how to successfully propagate roses using this method, ensuring you get strong, healthy new plants.
Step-by-Step Guide
1. Selecting and Preparing Cuttings
Choosing the Right Cuttings
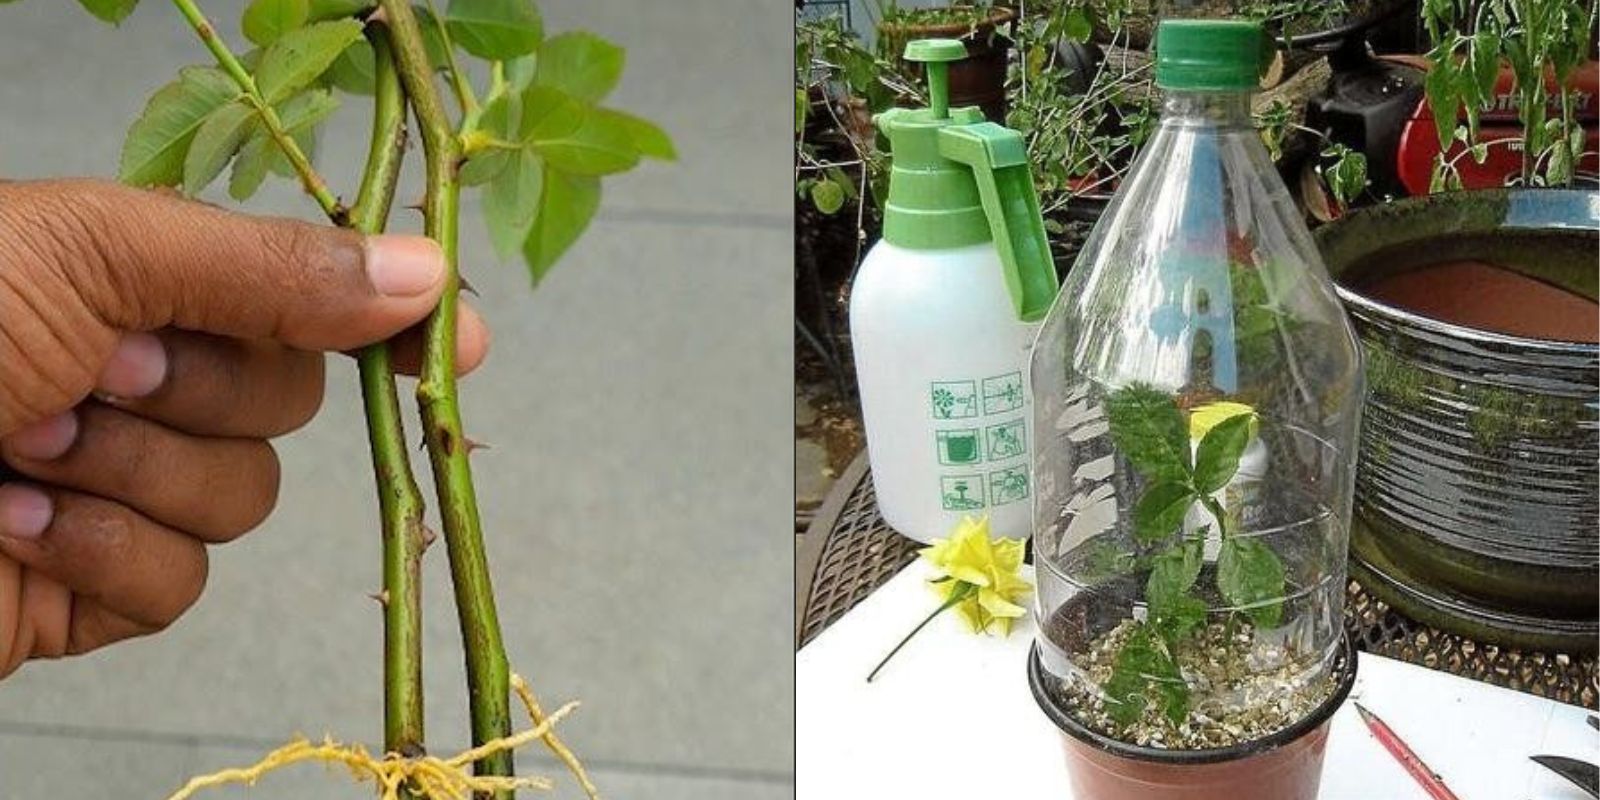
To start, select healthy rose stems from an existing plant. Look for stems that are about 6-8 inches long and have at least 2-3 nodes (the small bumps where leaves attach to the stem). It’s crucial that the cuttings are free from disease and pests. Stems that are too young or too woody might not root well, so aim for a middle-ground.
Preparing the Cuttings
Using sterilized pruning shears or scissors, make a clean cut just below a node. Remove the lower leaves, leaving 2-3 leaves at the top of the cutting. This helps the cutting focus its energy on root development rather than sustaining leaves. Optionally, dip the cut end in rooting hormone, which can significantly enhance root formation by stimulating the production of new roots.
2. Preparing the Soda Bottle
Cleaning and Cutting the Bottle
Take a clean 2-liter soda bottle and cut off the bottom part using a utility knife or scissors. Ensure the bottle is thoroughly cleaned to avoid any potential contaminants. The bottom of the bottle will serve as the drainage area, while the remaining part will act as a greenhouse.
Creating Drainage Holes
Poke several small drainage holes in the bottom of the bottle. Proper drainage is essential to prevent waterlogging, which can lead to root rot. The holes will allow excess water to escape, keeping the soil moist but not soggy.
3. Planting the Cuttings
Filling the Bottle
Fill the bottle with a well-draining potting mix. A mix designed for seedlings or cuttings is ideal, as it provides the right balance of aeration and moisture retention. Gently pack the soil to ensure it’s stable but not too compacted.
Inserting the Cuttings
Make a small hole in the soil with a pencil or stick and insert the rose cuttings, burying the nodes just below the surface of the soil. Make sure the cuttings are upright and spaced a few inches apart to prevent overcrowding. Press the soil gently around the cuttings to hold them in place.
4. Creating a Greenhouse Effect
Covering the Cuttings
Place the top part of the soda bottle over the cuttings, effectively creating a mini greenhouse. This cover helps maintain high humidity levels, which is crucial for the cuttings to develop roots. It also provides some protection from temperature fluctuations and pests.
Securing the Bottle
If needed, secure the bottle in place using tape or a rubber band. Ensure that the cuttings are well-covered and that the bottle is stable. You can also use the cap of the bottle if it fits snugly over the top, but it’s not always necessary.
5. Maintaining the Right Conditions
Light and Temperature
Place the bottle in a bright, indirect light location. Direct sunlight can be too intense and may cause overheating inside the bottle. A spot near a window with filtered light or under fluorescent grow lights works well. The temperature should be kept consistent, ideally between 65-75°F (18-24°C).
Watering and Humidity
Check the soil regularly to ensure it remains moist but not waterlogged. Water the cuttings as needed, but avoid overwatering, which can lead to root rot. If you notice condensation on the inside of the bottle, this is a good sign that humidity levels are appropriate. If condensation is excessive, remove the bottle cover briefly to allow some moisture to escape.
6. Monitoring and Transplanting
Checking for Roots
After a few weeks, gently check the cuttings for root development. You can do this by carefully lifting a cutting out of the soil to examine the roots. If you see a healthy network of roots, the cutting is ready to be transplanted. If not, re-cover the bottle and wait a little longer.
Transplanting the Cuttings
Once the cuttings have developed a strong root system, it’s time to transplant them into larger pots or directly into your garden. If moving to pots, choose containers with good drainage and use a potting mix suitable for roses. Gradually acclimate the new plants to outdoor conditions by placing them in a shaded area and gradually increasing their exposure to sunlight.
Motivation
Growing roses from cuttings is a rewarding experience that allows you to propagate your favorite varieties with ease. By using a simple 2-liter soda bottle, you can create an ideal environment for your rose cuttings, leading to faster and more successful rooting. Share your progress and inspire others to try this innovative method for growing beautiful roses at home!
Conclusion
With the right technique and a little patience, you can successfully propagate roses using a 2-liter soda bottle. This method provides a controlled environment that enhances the rooting process and helps you grow new roses quickly. Follow these steps, and soon you’ll have a flourishing collection of roses to enjoy in your garden. Happy gardening!