
African violets are beloved for their stunning flowers and their ease of care. But did you know that these charming plants can be propagated from a single leaf? This makes it simple to expand your collection or share the beauty of your plants with friends and family. Whether you’re a beginner or an experienced gardener, propagating African violets from a leaf is an easy and rewarding process that can bring you multiple new plants in no time.
In this article, we will walk you through the step-by-step process of propagating African violets from a leaf, covering all the methods you can use and offering helpful tips for success. Let’s dive in and discover how to grow more of these beautiful plants from a single leaf!
What You Need to Know About African Violet Propagation
Before jumping into the propagation process, let’s first explore a few key things you should know about African violets. These plants are native to East Africa and are known for their vibrant flowers that bloom in various colors, from deep purples to light pinks. They prefer a warm, humid environment, indirect light, and slightly moist soil.
Propagating African violets from leaves is a straightforward method that allows you to replicate the plant’s natural growth cycle. This technique can be done year-round, but the best time to propagate is during the growing season when the plant is actively producing new leaves.
Why Propagate African Violets from a Leaf?
There are several reasons why you might want to propagate African violets from a leaf:
- Expand Your Collection: If you want more African violets without purchasing new plants, propagating them from leaves is a cost-effective and satisfying way to grow your collection.
- Share the Love: Propagating African violets is a great way to share the joy of gardening with friends and family. You can gift them new plants grown from your own collection.
- Preserve Rare Varieties: If you have a rare or special variety of African violet, propagating it from a leaf ensures that you can preserve that unique plant for future generations.
- Healthy Plants: Propagation from leaves allows you to start with a healthy piece of the parent plant, which ensures that your new plants will also be strong and disease-free.
Methods for Propagating African Violets from a Leaf
There are two main methods for propagating African violets from a leaf: water propagation and soil propagation. Both methods are effective, but each has its benefits. Let’s take a closer look at each one.
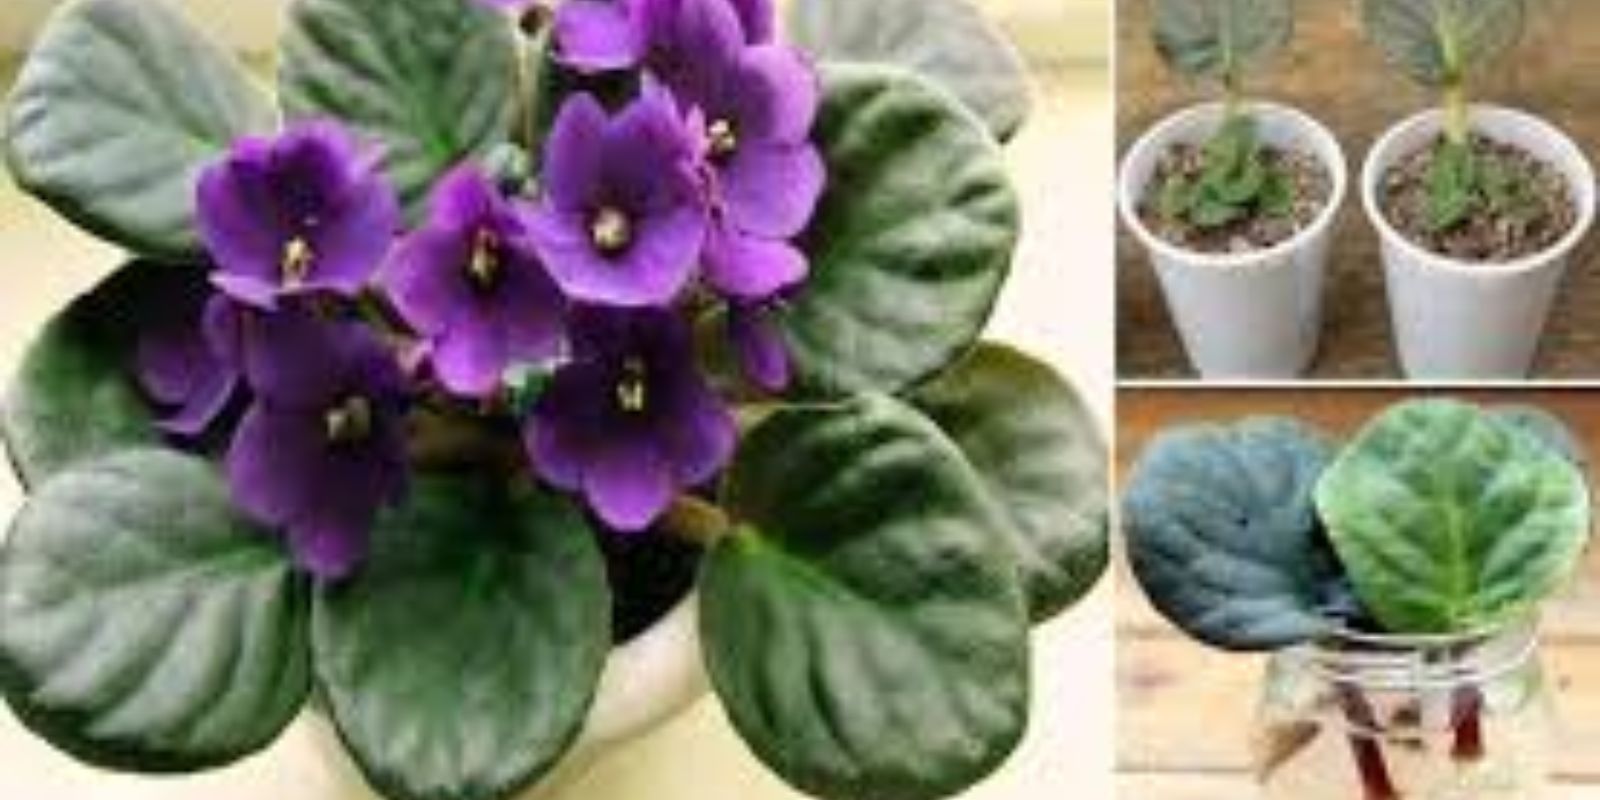
Method 1: Water Propagation
Water propagation is a simple and popular way to propagate African violets. This method is ideal for beginners because it allows you to clearly see the roots developing. Here’s how you can propagate your African violet leaf in water:
Step-by-Step Water Propagation:
- Choose a Healthy Leaf: Select a mature, healthy leaf with no spots, damage, or signs of disease. The leaf should be vibrant in color and have a strong petiole (the stem that connects the leaf to the main plant).
- Cut the Leaf: Using a sharp, sterile knife or scissors, cut the leaf from the parent plant. Leave around 2-3 inches of the petiole attached to the leaf.
- Prepare the Water: Fill a small jar or glass with water. Ensure that only the petiole (the stem) is submerged, not the leaf itself, as water should not touch the leaf to avoid rot. Use filtered water or tap water that has been left to sit for 24 hours to help eliminate any chlorine or chemicals.
- Place the Leaf in Water: Place the cutting in the jar of water with the petiole submerged. Be sure that the jar is in a location where it will receive indirect light. Avoid direct sunlight, as this can cause the water to heat up too much and harm the cutting.
- Wait for Roots to Grow: Within a few weeks, you will start to see small roots developing at the base of the petiole. Once the roots are around 1-2 inches long, and you notice small new plants (called pups) forming around the base of the leaf, your cutting is ready to be potted into soil.
- Transplant the Leaf: Gently remove the leaf cutting from the water and transplant it into a small pot with well-draining, moist potting mix. Place the pot in a warm, indirect light location and continue to keep the soil moist but not waterlogged. Over time, the new plants will grow and thrive.
Method 2: Soil Propagation
Soil propagation is another effective method that involves planting the leaf cutting directly into soil. This method is preferred by some gardeners because it eliminates the need to transfer the cutting into a pot once the roots have developed. Here’s how you can propagate your African violet leaf in soil:
Step-by-Step Soil Propagation:
- Choose a Healthy Leaf: As with water propagation, select a healthy, mature leaf from your African violet plant. The leaf should be free from damage or disease.
- Cut the Leaf: Use a sharp, sterile knife or scissors to cut the leaf, leaving around 2-3 inches of the petiole attached.
- Prepare the Pot: Choose a small pot with drainage holes, as good drainage is important to avoid root rot. Fill the pot with well-draining potting mix that is slightly moist.
- Plant the Leaf: Insert the petiole of the leaf cutting into the soil, making sure that it is deep enough to stay upright but not too deep. The leaf itself should be above the soil surface. Firm the soil around the base of the petiole to ensure stability.
- Create a Humid Environment: To encourage root growth and prevent the leaf from drying out, create a humid environment around the cutting. You can cover the pot with a plastic bag or a clear plastic dome to maintain humidity. Make sure the bag or dome does not touch the leaf.
- Wait for Roots and Pups to Develop: Keep the soil moist but not waterlogged, and place the pot in a location with indirect light. After a few weeks, you should begin to see roots developing at the base of the petiole, and small pups will start forming around the leaf.
- Transplant the Pups: Once the pups are large enough to handle, you can separate them from the parent leaf and transplant them into their own pots.
Tips for Success in Propagating African Violets from a Leaf
- Use Sterile Tools: Always use a clean, sharp knife or scissors when cutting the leaf to prevent the spread of disease or bacteria.
- Provide Indirect Light: African violets thrive in bright, indirect light. Direct sunlight can burn the leaves, so keep your propagated plants in a spot where they’ll receive filtered light.
- Maintain Humidity: African violets love humidity. Whether propagating in water or soil, it’s important to keep the cutting in a humid environment to encourage root growth and prevent the leaf from drying out.
- Be Patient: It can take several weeks for roots and new pups to form. Don’t be discouraged if you don’t see immediate results. As long as the conditions are right, the new plants will develop at their own pace.
Troubleshooting Common Propagation Issues
While propagating African violets from leaves is generally a straightforward process, there are a few common issues that may arise. Here’s how to troubleshoot them:
- The Leaf is Rotting: If you notice that the leaf is turning brown or mushy, it may be due to overwatering or improper humidity levels. Make sure you’re not submerging the leaf in water or keeping it too wet in soil. Adjust the humidity levels as needed.
- No Roots Are Growing: If you don’t see roots after several weeks, the cutting might not have been healthy enough to propagate. Try taking another cutting from a different leaf, and ensure it’s fresh and free from damage.
- The Leaf is Wilting or Drying Out: This can happen if the leaf is not receiving enough moisture or if it’s placed in direct sunlight. Make sure to maintain the proper humidity and avoid direct sun.
Final Thoughts
Propagating African violets from a leaf is an easy and rewarding way to grow more of these stunning plants. Whether you choose water or soil propagation, both methods are effective and can yield beautiful new plants with a little patience and care. By following these simple steps and keeping the right conditions in mind, you’ll be well on your way to enjoying a thriving collection of African violets in no time.
So, go ahead and give it a try! Let us know how your propagation journey goes or share your tips in the comments. Happy gardening! 🌿
Hashtags: #AfricanViolet #PlantPropagation #GardeningTips #HouseplantCare #GreenThumb #PlantLovers #PropagationSuccess #GardeningCommunity #AfricanVioletPropagation #GrowYourOwnPlants #HomeGardening #PlantParenthood