
Gardening can be a rewarding and therapeutic hobby, but it also requires careful planning and maintenance, especially when it comes to watering. For gardeners with raised beds, implementing an efficient irrigation system can save time and resources while ensuring that plants receive the proper amount of water. One of the most effective methods for watering raised bed gardens is a drip irrigation system. This article provides a comprehensive guide to setting up your own DIY drip irrigation system, helping you achieve a thriving garden with minimal effort.
Understanding Drip Irrigation
Drip irrigation is a method that delivers water directly to the roots of plants through a network of tubing and emitters. Unlike traditional methods of watering, which can lead to overwatering or water wastage, drip irrigation provides a slow, steady flow of water. This allows the soil to absorb moisture more efficiently and reduces evaporation, ensuring that your plants get the hydration they need without drowning their roots.
Benefits of Drip Irrigation for Raised Bed Gardens
- Water Conservation: Drip irrigation systems use significantly less water compared to traditional watering methods. This is particularly beneficial in areas with water restrictions or during dry seasons.
- Targeted Watering: By delivering water directly to the roots, you minimize water wastage and avoid wetting the leaves, which can reduce the risk of diseases.
- Time Efficiency: Once installed, a drip irrigation system can be automated, freeing up your time for other gardening tasks.
- Improved Plant Health: Consistent moisture helps promote healthy root development and overall plant growth.
- Flexibility: Drip irrigation systems can be tailored to the specific needs of different plants, allowing for customized watering schedules and emitter placements.
Materials Needed for Your Drip Irrigation System
To create a DIY drip irrigation system, you will need several essential materials. Here’s a list of items you’ll need:
- Drip Tubing: The mainline that carries water from the source to the plants.
- Emitters: These release water at a controlled rate and can be adjusted according to plant needs.
- Connectors and Fittings: Used to join various sections of tubing.
- Pressure Regulator: Ensures that the water pressure is suitable for the emitters.
- Filter: Prevents debris from clogging the system.
- Stakes: Used to secure the tubing in place.
- Timer (optional): Automates watering schedules.
- Hose Adapter: Connects the system to your water source.
Planning Your Drip Irrigation Layout
Before you begin assembling your system, it’s essential to plan the layout of your raised bed garden and how you want to set up the drip irrigation. Here are some steps to consider:
- Assess Your Garden Design: Take note of the size and shape of your raised beds. Consider the types of plants you will be growing and their watering needs.
- Map Out Emitter Placement: Decide where each emitter will go based on the layout of your plants. Typically, one emitter per plant is recommended, but larger plants may require two or more.
- Determine Tubing Lengths: Measure the distances between your water source and each raised bed to determine how much tubing you will need.
- Sketch a Diagram: Drawing a simple diagram of your garden layout, including emitter placement, can help you visualize how the system will work.
Step-by-Step Installation Guide
Step 1: Gather Your Materials
Make sure you have all the materials listed above ready for use. Having everything on hand will streamline the installation process.
Step 2: Cut the Drip Tubing
Using a pair of garden shears or a sharp knife, cut the drip tubing to the desired lengths based on your measurements. Ensure that you have enough tubing to reach all the emitters while keeping the design neat and organized.
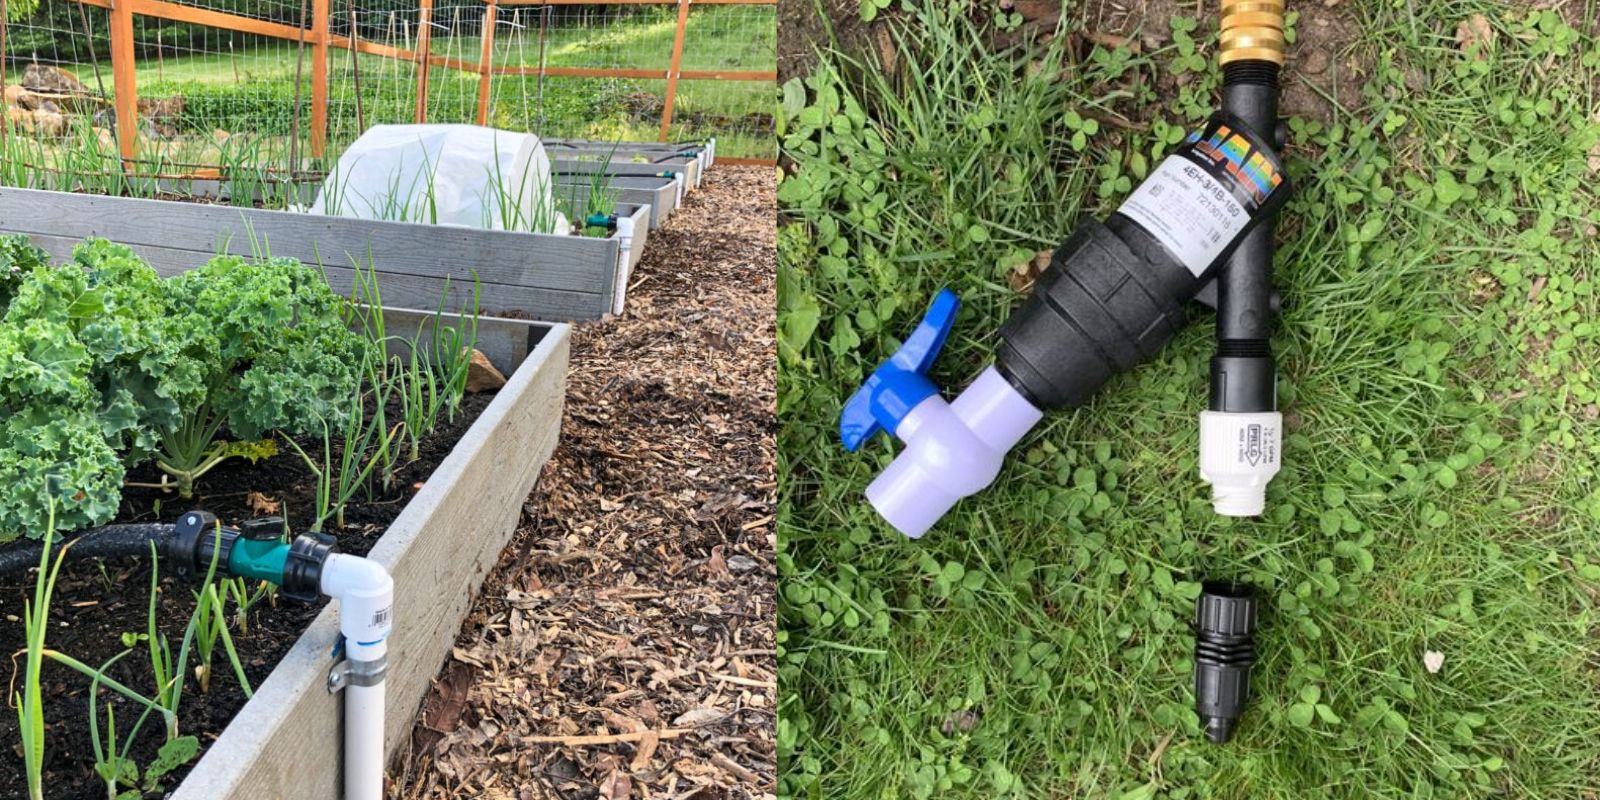
Step 3: Install the Pressure Regulator and Filter
Connect the pressure regulator and filter to your water source (such as a faucet or hose bib). The pressure regulator ensures that the water pressure remains constant, while the filter prevents debris from clogging the system.
Step 4: Lay Out the Drip Tubing
Position the mainline drip tubing along the length of your raised beds. If your beds are multiple rows, you may need to branch off with additional tubing. Use stakes to secure the tubing in place, ensuring it remains close to the plants.
Step 5: Add Emitters
Insert emitters into the tubing at the designated spots for each plant. Emitters typically come with different flow rates, so choose those that match the water requirements of your plants. Use a hole punch tool if necessary to create openings for the emitters.
Step 6: Connect Sections with Fittings
If you have multiple sections of tubing, use connectors and fittings to join them together. Ensure that all connections are tight to prevent leaks.
Step 7: Test the System
Before burying the tubing or securing it permanently, turn on the water to test the system. Check for leaks, and ensure that each emitter is working correctly. Adjust emitter placement as necessary to ensure even watering.
Step 8: Bury or Secure the Tubing
Once you are satisfied with the system’s performance, you can choose to bury the tubing slightly under the soil for aesthetic purposes or leave it exposed and secure it with stakes.
Step 9: Set Up a Timer (Optional)
If you want to automate your watering schedule, connect a timer to the water source. This will allow you to set specific times for watering, ensuring your plants receive consistent moisture.
Step 10: Monitor and Adjust
After installing your drip irrigation system, it’s essential to monitor it regularly. Check for clogs in the emitters, ensure that the water flow remains consistent, and adjust watering times based on seasonal changes and plant growth.
Maintenance Tips for Your Drip Irrigation System
- Regular Cleaning: Clean the filter and emitters periodically to prevent clogs. You can soak emitters in vinegar or a diluted bleach solution to clear any buildup.
- Inspect for Leaks: Regularly check for leaks in the tubing and connections. Replace any damaged sections as needed.
- Monitor Plant Health: Keep an eye on your plants to see if they are receiving adequate water. Adjust the system if certain areas appear dry or overwatered.
- Seasonal Adjustments: As the seasons change, your plants’ water needs may vary. Be prepared to adjust your watering schedule accordingly.
Troubleshooting Common Issues
- Emitter Clogs: If water isn’t coming out of an emitter, it may be clogged. Remove it, clean it, and reattach it.
- Uneven Watering: If some plants appear dry while others are overwatered, check the emitter placements and flow rates. Adjust accordingly.
- Low Water Pressure: If the system isn’t working effectively, check the pressure regulator and make sure your water source has adequate pressure.
- Weed Growth: If you notice weeds growing near your tubing, consider covering the area with mulch to suppress their growth.
Conclusion
A DIY drip irrigation system can revolutionize the way you care for your raised bed garden. By providing targeted, efficient watering, you can conserve water, save time, and promote healthier plant growth. With a little planning and the right materials, you can easily set up a system that meets the specific needs of your garden.
Embrace the beauty and efficiency of a drip irrigation system, and watch your garden thrive like never before. Happy gardening!
Join the conversation and share your gardening experiences with #DripIrrigation #RaisedBedGardening #SustainableGardening #DIYProjects #WaterConservation!