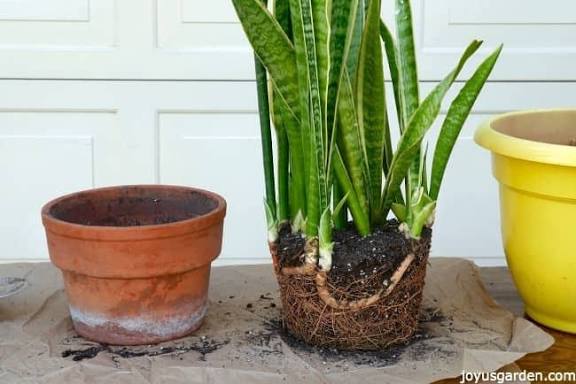
Snake plants (also called Sansevieria or Dracaena trifasciata) are tough, stylish, and easy to care for—making them perfect for homes in the United States, United Kingdom, and Canada. Even though they’re low-maintenance, they do need repotting every couple of years to prevent overcrowding and to keep their roots healthy.Below are the simplest, most reliable tips to help you repot your snake plant with confidence.🌿 Why Repotting MattersBefore you get started, it helps to know why repotting is important.Snake plants benefit from repotting because:They can become root-bound, meaning the roots circle tightly inside the pot.Fresh soil gives them new nutrients.A slightly larger pot allows for more growth.Repotting helps prevent rot by refreshing compacted or old soil.🌱 Supplies You’ll NeedTo follow these Simple tricks to How to repot a snake plant successfully!, gather:A pot 1–2 inches wider than the current oneA pot with drainage holesWell-draining soil (like cactus or succulent mix)Optional: perlite or coarse sandGloves (snake plant leaves can be stiff and sharp at the tips)A small trowel or your hands🌿 Step-by-Step: Simple Tricks to Repot a Snake Plant Successfully!1. Choose the Right Pot SizeSnake plants actually like being a little snug, so don’t jump to a huge pot.Best trick:➡️ Go up only one pot size (about 2 inches wider).A pot that’s too big holds extra moisture, which can cause root rot.2. Use the Right Soil MixSnake plants hate wet soil.Best trick:➡️ Use a fast-draining soil, such as:Cactus mixOr 2 parts potting soil + 1 part perliteGood drainage = healthier roots.3. Loosen the Root BallGently remove the snake plant from its pot. If it’s stuck:Tap the sidesRun a flat tool around the insideSqueeze flexible plastic potsBest trick:➡️ Gently loosen circling roots with your fingers to encourage outward growth.4. Trim Rot or Mushy RootsWhile optional, it’s smart to check the roots.Healthy roots = firm and pale.Unhealthy roots = mushy, smelly, or dark.Best trick:➡️ Snip off bad roots using clean scissors.This helps prevent future rot.5. Set the Plant at the Right HeightFill the new pot with some soil so the root ball sits:➡️ Just below the pot’s rim,leaving space for watering.Avoid burying the leaves—only roots go underground.6. Fill in Around the SidesAdd soil around the plant, pressing gently to remove air pockets.Best trick:➡️ Don’t pack the soil too tightly.Loose soil helps drainage and root growth.7. Water Lightly (or Not at All Yet!)This is a mistake many people make.Snake plants are sensitive to extra water after repotting.Best trick:➡️ Wait 3–5 days before watering.This allows roots to recover and reduces the chance of rot.🌞 Aftercare Tips to Keep Your Snake Plant ThrivingOnce you’ve used these Simple tricks to How to repot a snake plant successfully!, continue with basic care:✔ Give bright, indirect lightSnake plants tolerate low light, but grow faster in medium–bright light.✔ Water sparinglyWater only when the top 2–3 inches of soil is completely dry.✔ Avoid cold draftsSnake plants prefer room temperatures above 55°F / 13°C.✔ Don’t fertilize immediatelyWait 4–6 weeks before adding fertilizer, so the roots can settle.✔ Rotate the plantThis keeps growth even and prevents leaning.🌱 Bonus Tips for Even Better ResultsIf your snake plant has multiple sections, you can divide it during repotting to make new plants.Use pots made of terracotta—they help wick away moisture.If the plant is tall, add a bit of gravel at the bottom for stability.These techniques help make your Simple tricks to How to repot a snake plant successfully! even easier and more effective.🌼 Conclusion: Repot Your Snake Plant with ConfidenceRepotting doesn’t have to be complicated. With the right pot, proper soil, and a few smart techniques, you can repot your snake plant successfully and keep it growing strong for years. This guide to Simple tricks to How to repot a snake plant successfully! gives you everything you need to refresh your plant the right way.