
The Christmas cactus, known scientifically as Schlumbergera, is a beloved houseplant that brings bursts of color and joy during the holiday season. With its stunning tubular flowers that bloom in shades of pink, red, and white, it’s no wonder that many plant enthusiasts want to propagate this beautiful plant. Whether you wish to expand your collection or share it with friends and family, propagating Christmas cactus is a rewarding experience. In this article, we’ll explore three effective methods for propagation: leaf cuttings, division, and water propagation. Let’s dive into the details!
Understanding the Christmas Cactus
Before we delve into propagation methods, it’s essential to understand the Christmas cactus itself. Unlike the traditional cactus, which thrives in arid conditions, the Christmas cactus is a tropical plant native to the rainforests of Brazil. It prefers a humid environment with indirect sunlight, making it an excellent houseplant. Its unique segmented stems are adapted to store moisture, allowing it to thrive in various conditions.
Why Propagate?
- Increase Your Plant Collection: Propagation allows you to grow multiple plants from a single parent.
- Gift-Giving: Propagated plants make thoughtful gifts for fellow gardeners.
- Cost-Effective: Instead of purchasing new plants, you can create your own for free.
- Experiment with Varieties: If you have different colors, you can propagate them and create a vibrant display.
Now that we understand the appeal of propagating Christmas cactus, let’s explore the three effective methods in detail.
Method 1: Leaf Cuttings
Step 1: Selecting the Right Cutting
To start, choose a healthy segment of the Christmas cactus stem. Look for a piece that has at least two to three leaf segments, as this will increase the chances of successful propagation. Avoid any sections that appear wilted or discolored.
Step 2: Cutting the Stem
Using clean, sharp scissors or pruning shears, carefully cut the chosen segment from the parent plant. Make the cut at a joint, as this is where new growth is likely to emerge.
Step 3: Allowing to Callus
After cutting, place the segment in a dry, warm location for a few hours or overnight. Allowing the cut end to callus helps prevent rot when planted.
Step 4: Planting the Cutting
Once the cut end has dried and formed a callus, prepare a pot with well-draining potting mix. A mix designed for cacti or succulents is ideal, as it allows for proper drainage.
- Planting Tip: Use a pot with drainage holes to prevent excess water retention.
Bury the cutting about an inch deep in the soil, ensuring that the callused end is fully covered. Gently firm the soil around the base to support the cutting.
Step 5: Watering and Light Conditions
After planting, water the soil lightly to settle it around the cutting. Place the pot in a location with bright, indirect light. Avoid direct sunlight, which can scorch the cutting.
- Watering Tip: Keep the soil slightly moist but not soggy. Overwatering can lead to rot.
Step 6: Caring for the Cutting
Over the next few weeks, monitor the cutting for new growth. As roots develop, the plant will begin to show signs of new leaves and segments. Once the plant establishes a healthy root system, you can care for it like a mature Christmas cactus.
Potential Issues
- Rot: If the cutting turns mushy, it’s likely overwatered. Adjust your watering habits and ensure proper drainage.
- Leggy Growth: If the cutting stretches toward the light, it may not be getting enough light. Move it closer to a light source.
Method 2: Division
Step 1: Preparing the Parent Plant
When the Christmas cactus grows large and bushy, division is an excellent method to propagate. Start by carefully removing the parent plant from its pot. Gently shake off excess soil, exposing the root system.
Step 2: Identifying Sections to Divide
Examine the root system and identify healthy sections with several leaf segments. Each section should have some roots attached to ensure successful propagation.
Step 3: Separating the Sections
Using your hands or clean scissors, gently pull apart the identified sections. Ensure that each section has roots and at least two to three segments. If the roots are tangled, you can carefully cut them apart, but try to minimize damage.
Step 4: Re-potting Divided Sections
Prepare individual pots with well-draining potting mix. Plant each divided section, ensuring that the roots are adequately covered and the segments are above the soil level.
Step 5: Watering and Light Conditions
Water the newly potted sections lightly, ensuring the soil is moist but not overly saturated. Place them in a location with bright, indirect light.
Step 6: Caring for Divided Plants
Like with cuttings, monitor the divided sections for new growth. Water them as needed, and provide care similar to that of a mature Christmas cactus.
Potential Issues
- Transplant Shock: Newly divided plants may experience shock. Keep them in a stable environment and avoid disturbing them for the first few weeks.
- Wilting: If the divided sections wilt, it may indicate they need more water or are in too much direct sunlight.
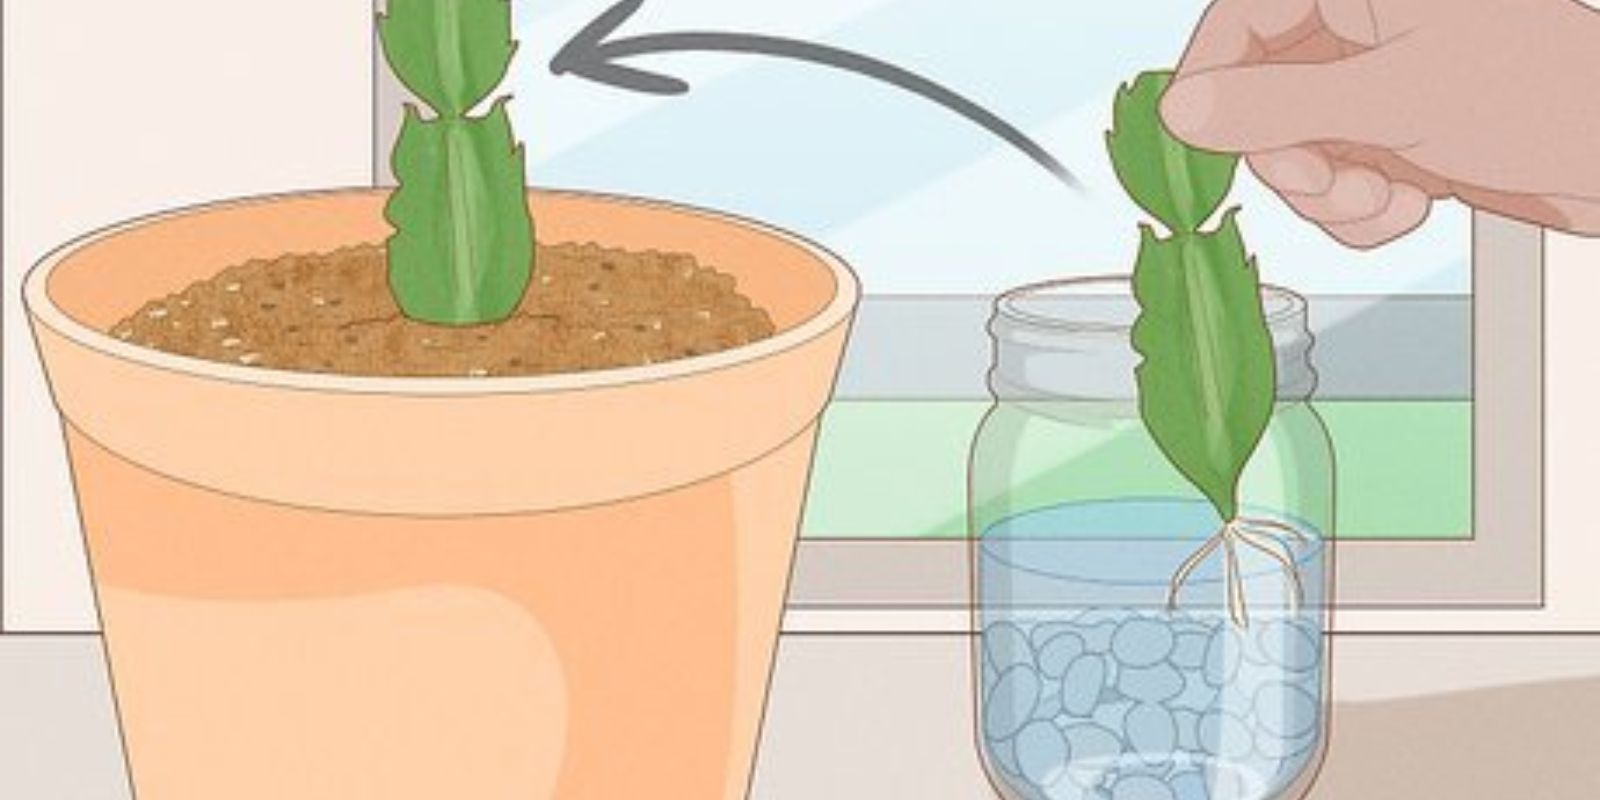
Method 3: Water Propagation
Step 1: Preparing the Cutting
Similar to the leaf cutting method, start with a healthy segment of the Christmas cactus stem. Ensure the cutting is at least two to three segments long.
Step 2: Placing in Water
Place the cutting in a glass of clean water, ensuring that the cut end is submerged while the leaf segments remain above the water line. This method allows roots to develop in a controlled environment.
Step 3: Providing Light and Fresh Water
Place the glass in a location with bright, indirect light. Change the water every few days to keep it fresh and oxygenated.
Step 4: Watching for Root Development
After a few weeks, you should begin to see roots emerging from the cut end of the stem. Once the roots are a few inches long, it’s time to transplant.
Step 5: Transplanting to Soil
Prepare a pot with well-draining potting mix. Gently remove the cutting from the water, being careful not to damage the roots. Plant the cutting in the soil, burying the roots while keeping the leaf segments above the soil.
Step 6: Caring for the New Plant
Water the soil lightly and place it in a bright, indirect light location. Monitor the plant for new growth, and care for it like a mature Christmas cactus.
Potential Issues
- Rot: If the cutting remains in water for too long without roots developing, it may rot. Monitor the cutting and transplant once roots are visible.
- Algae Growth: If left in water for an extended period, algae may develop. Change the water regularly to prevent this.
Final Thoughts
Propagating Christmas cactus can be a rewarding and enjoyable experience. Whether you choose to propagate through leaf cuttings, division, or water propagation, each method provides a way to expand your plant collection and share the beauty of this festive plant.
Remember to be patient; propagation can take time, but with proper care and attention, your efforts will be rewarded with healthy new plants that can bloom beautifully for years to come. Happy gardening!
Call to Action
Now that you know how to propagate Christmas cactus, why not try it out? Share your propagation journey on social media using hashtags like #ChristmasCactus, #PlantPropagation, #HouseplantLove, and #GardeningJoy! Join the vibrant community of plant lovers and inspire others to cultivate their green thumbs!