
Grafting is a time-honored horticultural technique that allows gardeners to propagate fruit trees, combining the best traits of two different varieties into one. By grafting, you can enjoy multiple types of fruit from a single tree, preserve valuable tree varieties, or create stronger, more disease-resistant trees. Whether you’re a beginner gardener or an experienced horticulturist, understanding the basics of grafting is essential for expanding your fruit tree collection.
In this comprehensive guide, we’ll walk you through the steps of grafting fruit trees, exploring everything from the types of grafting techniques to when and how to graft successfully.
What is Grafting?
Grafting is the process of joining two different plants together in such a way that they grow as one. The rootstock (the lower portion of the tree, which includes the roots and trunk) is combined with the scion (the upper part of the tree that includes the branches and fruiting material). The goal is for the rootstock and scion to grow together seamlessly, allowing the plant to benefit from the attributes of both.
Why Graft Fruit Trees?
There are several reasons why gardeners choose to graft fruit trees:
- Combine Varieties: Grafting allows you to grow several different types of fruit on a single tree.
- Preserve Varieties: If you have a favorite fruit variety that you’d like to preserve, grafting is a great way to do so.
- Increase Disease Resistance: The rootstock can be chosen for its resistance to specific diseases, pests, or soil conditions.
- Faster Fruit Production: Grafted trees often produce fruit more quickly than those grown from seed.
With these benefits in mind, grafting is an invaluable skill for fruit tree enthusiasts.
When to Graft Fruit Trees
Timing plays a critical role in the success of grafting. The ideal time for grafting is late winter or early spring when the tree is dormant, and new growth hasn’t yet started. During this time, the tree is less stressed and more likely to successfully heal from the graft. It’s also easier to work with the plant because the sap is still inactive.
Avoid grafting during the summer months, as the tree is in active growth, and it can be more difficult to achieve a successful graft.
Types of Grafting Techniques
There are several grafting techniques used in fruit tree propagation, but the most common methods are:
- Whip-and-Tongue Graft: This is a popular method for grafting young trees. It involves making matching cuts on both the rootstock and scion to ensure a snug fit. The “tongue” refers to a small flap of bark on each cutting that interlocks to hold the graft securely.
- Cleft Graft: This method is ideal for older rootstocks. The rootstock is cleaved open, and a scion is inserted into the split. It’s particularly useful for grafting trees of different diameters.
- Bark Graft: Best for trees that are thicker and have more developed trunks, the bark graft involves lifting the bark of the rootstock and inserting a scion underneath it. This method is often used for topworking existing trees.
- Side-Veneer Graft: This technique involves slitting the side of the rootstock and attaching the scion to it, making it an excellent choice for smaller rootstocks and scions.
Each of these grafting techniques has its own strengths and is suited to different tree sizes, ages, and varieties.
Tools You’ll Need for Grafting
Having the right tools is essential to achieving a successful graft. Here are the tools you’ll need for the process:
- Sharp Grafting Knife: A sharp, clean knife is essential to making clean cuts on both the scion and rootstock.
- Pruning Shears: These are helpful for cutting branches or smaller rootstock pieces.
- Grafting Tape or Grafting Wax: These materials hold the grafted sections together while they heal and grow together.
- Disinfectant: Use rubbing alcohol or a bleach solution to sterilize your tools before and after grafting.
- Clamps or Grafting Clips: Some methods may require clamps or clips to secure the scion to the rootstock until it heals.
Step-by-Step Guide to Grafting Fruit Trees
Step 1: Select the Right Rootstock and Scion
The first step in grafting is choosing the right rootstock and scion. Rootstock should be chosen based on the specific needs of your tree, such as disease resistance, growth rate, and soil conditions. For instance, if you’re grafting a pear tree, you might choose a rootstock that is resistant to certain soil-borne diseases.
The scion is the fruit-bearing part of the tree. Select a healthy, disease-free scion from a mature tree that produces the type of fruit you want. It’s essential to match the rootstock and scion in terms of size and growth habits for a successful graft.
Step 2: Prepare the Rootstock
To start the grafting process, you need to prepare the rootstock. Make a clean cut across the rootstock, either in a diagonal or straight line, depending on the grafting technique you are using. For whip-and-tongue grafts, you’ll create a matching cut at an angle on both the rootstock and scion. For cleft grafts, you’ll split the rootstock down the center to create a space where you can insert the scion.
Step 3: Prepare the Scion
Next, prepare the scion by cutting it to match the size and shape of the rootstock. You want a good fit so that the cambium layers (the green tissue just beneath the bark) of both the rootstock and scion come into contact. Make a matching cut on the scion at a similar angle to the rootstock’s cut. If you’re using the whip-and-tongue method, create a “tongue” on the scion by making a small slit.
Step 4: Join the Scion and Rootstock
Carefully place the scion onto the rootstock so that the cambium layers are aligned. This is crucial for the graft to take. In the whip-and-tongue method, you’ll interlock the tongue and groove on both pieces to hold them together. For cleft grafts, insert the scion into the cleft of the rootstock, ensuring the cambium layers touch as much as possible.
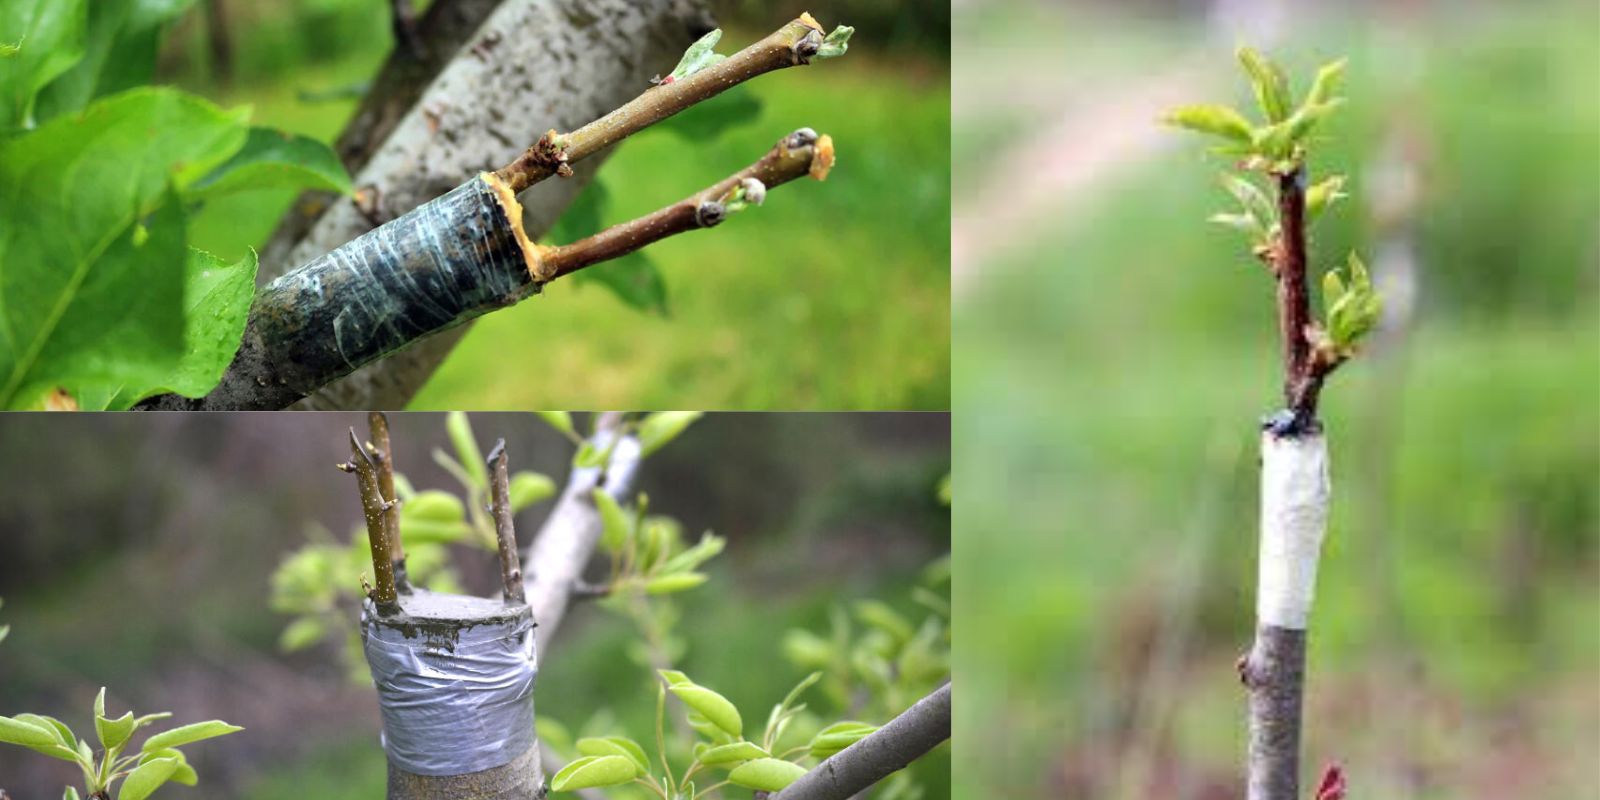
Step 5: Secure the Graft
Once the scion and rootstock are joined, it’s time to secure them. Use grafting tape or grafting wax to hold the two pieces together. Grafting tape is often used to wrap the grafted area tightly, while grafting wax can be used to seal the cut surfaces to prevent moisture loss. Be sure to cover the entire graft site to protect it from drying out.
Step 6: Care for the Grafted Tree
After grafting, place the tree in a shaded area to minimize stress. Keep it consistently watered but not soggy. Monitor the graft regularly for signs of growth, such as swelling at the graft site. You can also cover the graft with a plastic bag or make a small humidity tent to help keep it moist and protected.
Step 7: Remove the Grafting Tape
Once the graft has taken and you see new growth emerging from the scion, you can remove the grafting tape or wax. This can take anywhere from a few weeks to a few months, depending on the species and conditions. Be gentle to avoid damaging the graft.
Troubleshooting Common Grafting Problems
While grafting is a rewarding process, it doesn’t always succeed on the first try. Here are some common issues and how to fix them:
- Failure to Heal: If the scion and rootstock don’t heal together, it could be because the cambium layers weren’t aligned properly. Ensure a snug fit and adequate contact between the layers.
- Excessive Watering: Too much water can cause the graft to rot. Make sure the soil is well-drained and the graft is not overly wet.
- Unsuccessful Graft Union: If the graft fails to take, try again with a fresh scion and rootstock. Ensure all cuts are clean and free of debris.
Conclusion
Grafting fruit trees is an incredibly rewarding practice that opens up new possibilities for gardeners looking to grow a variety of fruits or preserve special tree varieties. By following the step-by-step process outlined above, you can create strong, healthy grafts and enjoy the fruits of your labor for years to come. Whether you’re looking to grow multiple types of fruit on one tree or create a custom tree variety, grafting is a skill that every fruit tree enthusiast should learn.
As with any gardening technique, practice makes perfect. So don’t be discouraged if your first graft doesn’t take—keep experimenting, and soon you’ll be mastering the art of grafting!
Are you ready to try grafting fruit trees? Share your experiences and any tips you have learned in the comments! 🍊🍎🍑
#FruitTreeGrafting #GardeningHacks #FruitTreePropagation #GreenThumb #GraftingTips #GrowYourOwnFood #GardeningCommunity