
Starting seedlings indoors can be an exciting and rewarding experience, especially when you want to get a jumpstart on your growing season. Whether you’re planting vegetables, herbs, or flowers, using peat pellets to start your seeds offers an effective and eco-friendly way to ensure healthy seedlings that are ready to be transplanted into your garden or containers. In this comprehensive guide, we will explore everything you need to know about using peat pellets for starting seedlings indoors, from the basics of what peat pellets are, to step-by-step instructions on how to use them, and tips for success. Let’s dive in!
What Are Peat Pellets?
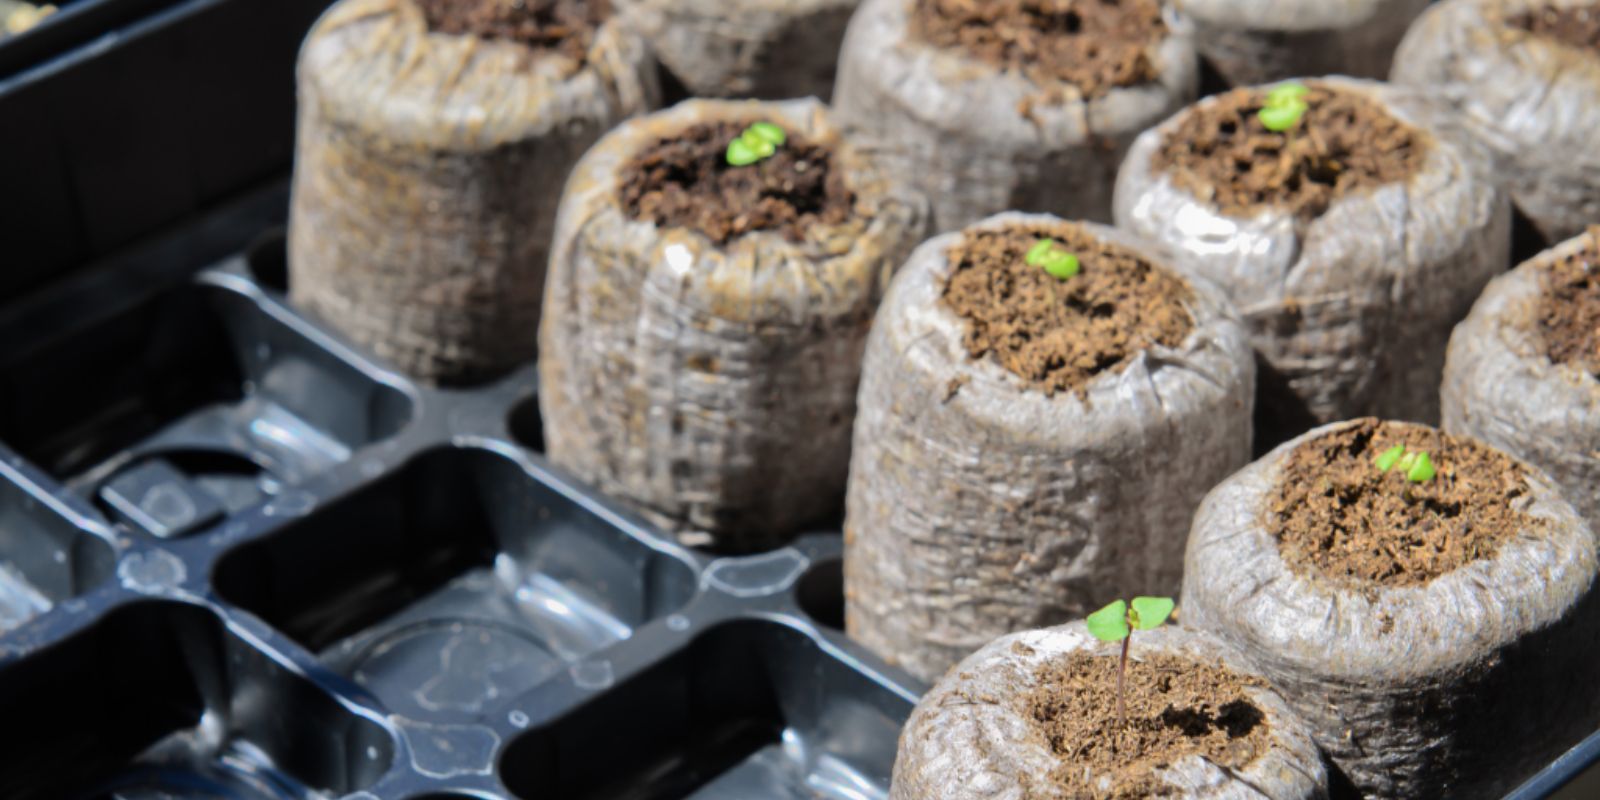
Peat pellets are small, compressed discs made from sphagnum peat moss, which is a natural material that retains moisture well and is often used in gardening. The pellets are lightweight and compact, and when water is added, they expand into small pots that are ideal for growing seeds. The key advantage of using peat pellets for seed starting is that they create a self-contained environment for your seedlings, making the transplanting process easier while reducing the risk of root damage.
Peat pellets offer several benefits, including the fact that they are biodegradable, meaning the entire pellet can be transplanted into your garden or larger containers without disturbing the roots. They are also highly convenient and available in various sizes, making them suitable for all kinds of seeds.
Why Use Peat Pellets?
Peat pellets are becoming increasingly popular for a variety of reasons:
- Convenience: The simplicity of using peat pellets makes them ideal for both beginners and experienced gardeners. They are easy to use and eliminate the need for pots, trays, or additional containers.
- Eco-Friendly: As they are made from natural sphagnum peat moss, peat pellets are an environmentally friendly option. They are biodegradable and reduce plastic waste.
- Promotes Healthy Growth: The structure of peat pellets holds moisture well, keeping seeds hydrated while allowing for good air circulation to the roots, promoting healthy seedling development.
- Easy Transplanting: Since the pellets expand and form a small “pot” around your seedling’s roots, transplanting becomes a breeze. You can simply place the entire pellet into the garden without disturbing the roots.
- No Root Disturbance: Transplanting seedlings often involves disrupting their delicate root systems. With peat pellets, seedlings are allowed to grow without interference, reducing the shock that can occur during the transplant process.
Step-by-Step Guide to Starting Seedlings Indoors with Peat Pellets
Now that we understand the benefits, let’s walk through the process of starting seedlings indoors using peat pellets. Follow these steps to ensure you have a successful seed starting experience.
Step 1: Gather the Necessary Materials
Before you begin, you’ll need to gather the following materials:
- Peat pellets: You can find peat pellets at most garden centers or online stores. They are available in different sizes, typically ranging from 1 to 2 inches in diameter. Choose the size that suits your needs.
- A shallow tray or container: This will hold the peat pellets and catch any excess water.
- Water: You’ll need water to expand the peat pellets.
- Seeds: Choose the seeds you want to start. Make sure they are appropriate for indoor seed starting and your growing zone.
- A clear plastic dome or plastic wrap (optional): This helps to maintain moisture and temperature for seed germination.
- A warm, sunny spot: Your seedlings will need plenty of light to grow strong and healthy. A south-facing window or a grow light will be ideal.
Step 2: Prepare the Peat Pellets
To begin, place the peat pellets in your shallow tray or container. Depending on the size of the pellets, you may need to space them apart to ensure they have room to expand. Once they are arranged in the tray, pour warm water over the pellets. The water should cover the pellets completely. You’ll notice the pellets begin to expand and grow in size as they absorb the water.
Allow the pellets to fully expand, which may take around 10 to 15 minutes. If any pellets don’t expand completely, you can add a little more water until they are fully soaked.
Step 3: Plant the Seeds
Once your peat pellets are expanded and have a soft, spongy texture, it’s time to plant your seeds. Use a small tool like a pencil, skewer, or your finger to make a small hole in the center of each peat pellet. The depth of the hole will depend on the size of the seed; generally, you want to plant the seed at a depth that is about two times its size.
For example, small seeds such as lettuce or herbs may need only a shallow hole, while larger seeds, like tomatoes or peppers, may require a slightly deeper hole. After making the hole, place one or two seeds into each pellet. Gently cover the seeds with a thin layer of peat to ensure they are secure.
Step 4: Provide Moisture and Heat
After planting the seeds, it’s important to keep the peat pellets moist but not waterlogged. Use a spray bottle or a gentle watering can to moisten the pellets lightly. The key is to ensure that the pellets don’t dry out but are not constantly soaking in water.
Cover the tray with a clear plastic dome or plastic wrap to maintain humidity and warmth, which are essential for seed germination. If you don’t have a dome, simply placing the tray in a warm, sunny spot will suffice.
Peat pellets tend to retain moisture well, but you’ll still need to check them regularly. If they begin to dry out, lightly mist them with water or add a little more water to the tray.
Step 5: Provide Adequate Light
Light is crucial for seedlings to grow strong and healthy. Ideally, place your seed tray in a bright, sunny location, such as a south-facing window. However, if natural light is insufficient or if the days are short, you may want to use grow lights to ensure your seedlings get the light they need.
Place the grow lights about 2-3 inches above the seedlings, and keep them on for 12-16 hours a day. This will mimic the long days of spring and encourage the seedlings to grow quickly.
Step 6: Thin Out the Seedlings
Once your seeds begin to germinate and sprout, you may notice that more than one seed has sprouted in some pellets. If this happens, gently thin out the weaker seedlings to leave only the strongest one. This will give the remaining seedling the space and resources it needs to grow healthy and strong.
Step 7: Transplant the Seedlings
Once your seedlings have grown large enough and developed a strong root system, it’s time to transplant them. The peat pellets make this process simple and stress-free. Gently remove each pellet from the tray, taking care not to disturb the roots. You can now transplant the entire pellet into your garden bed or a larger container.
The biodegradable nature of peat pellets allows them to break down naturally in the soil, so you don’t have to worry about removing the pellet or disturbing the roots when transplanting.
Tips for Success
- Keep an eye on temperature: Most seeds need warmth to germinate. Aim for temperatures between 65°F and 75°F (18°C to 24°C) for optimal growth.
- Use quality seeds: Start with high-quality, fresh seeds for the best chance of successful germination.
- Transplant at the right time: Don’t rush the transplant process. Wait until your seedlings are strong and have at least a couple of sets of leaves before moving them outside.
- Hardening off: If you’re transplanting seedlings outside, gradually introduce them to outdoor conditions over the course of a week by placing them outside for a few hours each day to harden them off.
Conclusion
Starting seedlings indoors with peat pellets is an easy, cost-effective, and eco-friendly way to ensure your plants get a healthy head start. With just a few simple materials and some basic care, you can create a thriving garden filled with strong, healthy seedlings ready to be transplanted into your garden or containers. Whether you’re a novice gardener or an experienced green thumb, peat pellets offer a convenient and sustainable solution to seed starting that will set you up for gardening success!
Get started with peat pellets today, and watch your garden grow from the comfort of your own home!