
Growing a peach tree from a pit is one of the most gratifying and exciting gardening experiences. Imagine taking the seed from a delicious peach you just ate, nurturing it into a seedling, and eventually seeing it grow into a beautiful fruit tree. While it requires patience, effort, and a little bit of time, starting a peach tree from a pit can be incredibly rewarding. In this guide, we’ll walk you through everything you need to know to start a peach tree from a pit, step by step, and provide helpful tips along the way.
Why Grow a Peach Tree from a Pit?
Peach trees are a delightful addition to any garden. Aside from producing sweet, juicy peaches, they offer shade, beautiful blossoms, and a sense of accomplishment for the gardener. Growing a peach tree from a pit is not only a fun project but also an eco-friendly and cost-effective way to cultivate a tree.
The Benefits of Growing a Peach Tree from a Pit:
- Cost Savings: Instead of buying a tree, you can start one from the pit for free.
- Connection to Nature: Starting a tree from a seed helps you understand the growth process and fosters a deeper connection to nature.
- Sustainability: Growing your own fruit trees from seeds helps reduce the demand for store-bought plants and trees.
- Personalized Experience: You can choose a peach from your favorite variety and try to replicate it by growing it from a pit, possibly yielding fruit that tastes just as delicious as the original.
What You’ll Need:
- Fresh peach pit(s) (from a ripe, organic peach)
- A nutcracker or hammer
- Paper towel
- Plastic sandwich bag
- Pot with drainage holes
- Well-draining soil (e.g., potting mix)
- Water and a sunny spot for the pot
- Patience! (It can take months for the seed to sprout)
Step 1: Harvest the Pit from the Peach
The first step in growing a peach tree from a pit is to extract the pit from a ripe peach. After enjoying your juicy peach, save the pit and thoroughly wash it under warm water to remove any leftover fruit pulp. This will help prevent mold growth during the process.
Step 2: Crack the Pit
Peach pits are hard, and you’ll need to crack them open to access the seed inside. You can do this carefully using a nutcracker or a hammer. Be sure to crack the pit gently to avoid damaging the seed inside. Once you’ve cracked the pit, you’ll notice a smooth, brown seed, which is what you’ll use to grow the peach tree.
Step 3: Cold Stratification
Peach seeds require a period of cold dormancy to mimic the winter season. This process, known as cold stratification, helps the seed break dormancy and encourages germination. It’s crucial for successful germination and growing.
How to Cold Stratify:
- Take the seed you extracted from the pit and wrap it in a damp paper towel.
- Place the wrapped seed into a plastic sandwich bag. Be sure to leave a little air in the bag so the seed doesn’t suffocate.
- Put the bag in the refrigerator and leave it there for 2-3 months. The cold, moist conditions will simulate winter, and the seed will prepare itself for germination when the temperatures warm up.
Step 4: Prepare for Planting
Once the cold stratification period has ended, it’s time to get ready for planting. At this point, your peach seed has undergone a period of dormancy, and it’s now ready to germinate.
Choosing the Right Pot and Soil:
- Select a small to medium-sized pot that has good drainage holes at the bottom. This will prevent excess water from accumulating, which can cause root rot.
- Fill the pot with well-draining soil, such as a good-quality potting mix. It’s essential to have soil that allows water to drain freely so the roots can develop healthily.
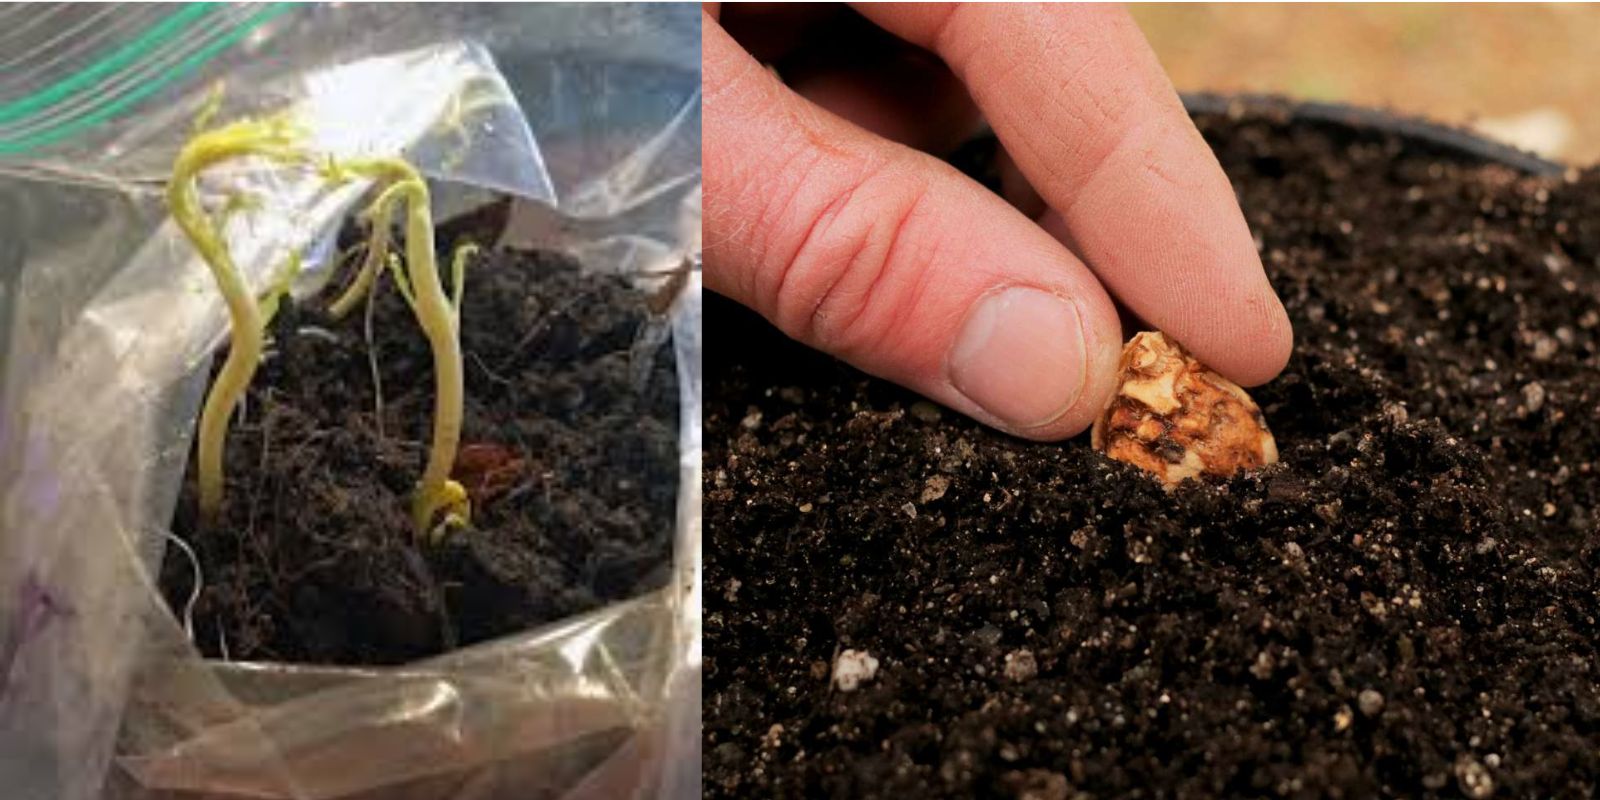
Planting the Seed:
- After removing the seed from the refrigerator, gently plant it in the soil. The seed should be planted about 1 inch deep into the soil. You don’t need to bury it too deeply—just enough to ensure it is covered.
- Water the soil lightly but thoroughly to settle the seed in place.
Step 5: Provide the Right Growing Conditions
Peach seeds require warmth, sunlight, and consistent moisture to germinate successfully. Here’s how you can help your seed grow into a healthy peach tree.
Light:
Place your pot in a sunny spot that gets plenty of light each day. A south-facing windowsill or a sunny balcony works great. Peach seeds need at least 8 hours of sunlight each day to grow properly.
Water:
Keep the soil consistently moist but not waterlogged. Too much water can lead to root rot, while too little will prevent the seed from sprouting. Check the soil regularly and add water when it feels dry to the touch, but make sure the pot has adequate drainage to prevent water from collecting at the bottom.
Temperature:
Peach seeds generally germinate best when the temperature is between 65°F to 75°F (18°C to 24°C). Keep your pot in a warm location, and be sure to avoid exposing it to extreme temperature changes.
Step 6: Wait for Germination
Peach seeds can take a while to sprout, often between 2 to 3 months, so be patient. During this time, you might notice small roots developing, but don’t be discouraged if the seed doesn’t sprout immediately.
Once the seedling starts to emerge from the soil, it will look like a small green shoot poking out of the ground. This is the first sign that your peach tree is on its way! Continue to care for your young seedling by providing plenty of sunlight, water, and warmth.
Step 7: Transplanting the Seedling
Once your peach tree seedling has grown large enough and developed several sets of leaves, it’s time to transplant it into a larger pot or into the garden. Typically, a seedling is ready for transplanting when it’s at least 6 inches tall and has a strong root system.
Transplanting to a Larger Pot:
If you’re not ready to plant the seedling in the ground, you can transplant it into a larger pot. Choose a pot that is about 3 times larger than the current one, and continue caring for the tree as it grows.
Transplanting into the Garden:
If you live in a warmer climate where peach trees can thrive, you can transplant your seedling directly into the garden. Choose a sunny, well-draining location, and make sure the tree has plenty of space to grow.
Step 8: Caring for Your Peach Tree
After transplanting your young peach tree, continue to care for it by providing it with regular watering, nutrients, and protection from pests. As the tree grows, you may need to prune it to encourage a strong, healthy structure and improve fruit production.
Tips for Success:
- Be patient: Growing a peach tree from a pit can take several years before it produces fruit.
- Keep the tree healthy: Ensure it receives adequate water, sunlight, and nutrients.
- Prune the tree regularly: Proper pruning helps to shape the tree and promote fruit production.
Conclusion
Growing a peach tree from a pit is an incredibly satisfying experience, but it requires patience and dedication. By following the steps outlined in this guide, you can turn a simple peach pit into a thriving tree that will eventually reward you with delicious fruit. Whether you’re starting a peach tree from a pit as a fun project or with the goal of growing fresh peaches in your backyard, the process is a great way to connect with nature and experience the wonders of plant growth firsthand. Happy gardening!
#GrowPeachTree #PeachFromPit #HomeGardening #FruitTrees #GardeningTips #SustainableLiving #GrowYourOwn #DIYGarden #PeachHarvest #GreenThumb