
Shipping plant cuttings is an excellent way to share your gardening successes with friends, family, or even customers. However, ensuring that your precious cuttings arrive healthy and ready to root requires careful planning and execution. This article will guide you through every step of the process, from selecting the right cuttings to preparing, packing, and shipping them effectively. With the right techniques, you can ensure your cuttings thrive in their new homes.
Understanding the Basics of Plant Cuttings
Before diving into the shipping process, it’s essential to understand what plant cuttings are and the best practices for ensuring their survival. A cutting is a piece of a plant that is used to propagate a new plant. Common types of cuttings include stem cuttings, leaf cuttings, and root cuttings. The success of these cuttings largely depends on the health of the original plant, the method of propagation, and how they are handled during shipping.
Types of Plant Cuttings
- Stem Cuttings: These are sections of stems, usually 4 to 6 inches long, that can root in soil or water. Stem cuttings can be taken from herbaceous plants, such as basil, or woody plants, like roses.
- Leaf Cuttings: Leaf cuttings are typically taken from succulents or plants with thick, fleshy leaves. The leaf is placed in soil, and roots will form from the base.
- Root Cuttings: This method involves taking sections of roots, typically from perennial plants, and planting them directly in the soil.
Choosing Healthy Cuttings
The first step in shipping plant cuttings is selecting healthy specimens. Choose cuttings that are:
- Free of Pests and Diseases: Inspect the plant thoroughly for any signs of infestations or diseases. Shipping infested plants can spread pests to other gardens.
- Well-Established: Select mature stems with several leaves for better chances of rooting. Avoid using cuttings that are too young or weak.
- Adequately Sized: Aim for cuttings that are around 4 to 6 inches long. This length is generally ideal for successful rooting.
Preparing Your Cuttings for Shipping
Once you have selected your cuttings, it’s time to prepare them for shipping. This step is crucial for ensuring they survive the journey.
1. Proper Pruning
Using clean, sharp scissors or pruning shears, cut the selected stem at an angle just below a node (the point on the stem where leaves are attached). This technique maximizes the surface area for rooting and helps the cutting absorb water more effectively. Make sure to remove any flowers or buds, as these can drain energy from the cutting.
2. Moisture Retention
Keeping the cuttings hydrated is vital for their survival during shipping. Here’s how to do it:
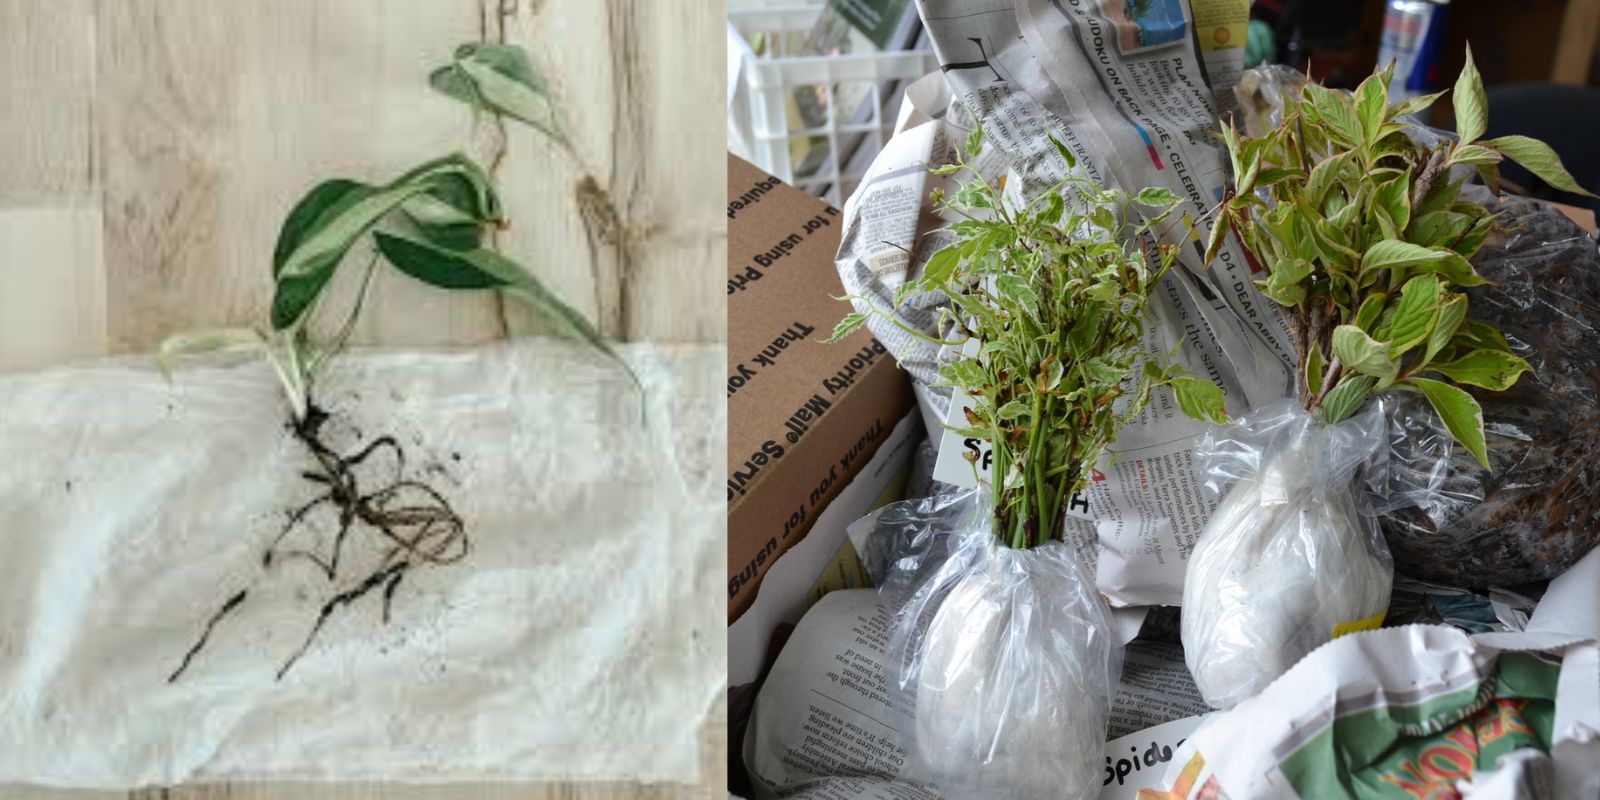
- Wrap in Damp Paper Towel: After cutting, immediately wrap the base of each cutting in a damp paper towel. This helps retain moisture around the cut end.
- Seal in Plastic: Place the wrapped cuttings in a plastic bag or wrap them with cling film. Ensure they are sealed but not completely airtight, allowing some air circulation while still retaining moisture.
3. Prepare for Transit
The next step is to package your cuttings securely to prevent damage during shipping.
4. Use a Sturdy Box
Select a sturdy box that is the right size for your cuttings. Avoid boxes that are too large, as this can lead to movement inside and potential damage. You want the cuttings to fit snugly without being overcrowded.
- Packing Materials: Use packing materials such as bubble wrap, packing peanuts, or crumpled paper to cushion the cuttings. Place the cuttings upright in the box, if possible, to minimize the risk of breakage.
- Double-Boxing: For added protection, consider double-boxing. Place the inner box with the cuttings inside a larger box with additional cushioning materials to absorb shocks during transit.
5. Labeling the Package
Proper labeling is essential for ensuring your package is handled with care.
- Label as “Live Plants”: Clearly label the box with “Live Plants” to inform postal workers that the contents require special handling.
- Include Fragile Markings: Use “Fragile” stickers or labels to indicate that the contents are delicate.
- Contact Information: Include your return address and the recipient’s address to ensure the package can be returned if needed.
Choosing the Right Shipping Method
Selecting the right shipping method can make a significant difference in how well your cuttings survive their journey.
1. Opt for Fast Shipping
Whenever possible, choose a shipping method that guarantees quick delivery. Express or priority services are ideal, as they minimize the time the cuttings spend in transit. Consider the following options:
- Overnight Shipping: For valuable or delicate cuttings, overnight shipping is the safest option.
- Two-Day Shipping: If overnight is not feasible, opt for two-day shipping to ensure the cuttings do not suffer from extended transit times.
2. Time Your Shipment
Plan your shipment to avoid weekends or holidays, as packages may be delayed in transit. Aim to ship mid-week (Tuesday or Wednesday) to ensure the package arrives before the weekend.
After Shipping: What to Expect
Once your cuttings have been shipped, it’s essential to understand what happens next and how to care for them when they arrive at their destination.
1. Care Upon Arrival
The recipient should inspect the cuttings immediately upon arrival. Here’s what to do:
- Check for Damage: Examine the cuttings for any signs of damage or stress. If the cuttings appear wilted, soak them in water for a few hours to rehydrate.
- Remove Wrapping: Carefully unwrap the cuttings and remove any plastic wrap or bag.
- Planting: Once the cuttings are properly hydrated, they can be planted in appropriate soil. Ensure they are planted at the correct depth, typically about 2 inches deep for stem cuttings.
2. Provide the Right Conditions
After planting, the recipient should provide the cuttings with suitable conditions to encourage rooting:
- Humidity: Keep the cuttings in a humid environment, such as under a plastic dome or in a greenhouse, to reduce moisture loss.
- Light: Place the cuttings in a bright, indirect light location to encourage growth without causing stress.
- Watering: Water the cuttings lightly and ensure the soil remains moist but not soggy.
Tips for Success
To ensure the successful shipping of plant cuttings, consider the following tips:
- Research Plant Needs: Understand the specific needs of the plant species you are shipping. Some plants may have unique requirements for shipping and rooting.
- Stay Legal: Be aware of any regulations regarding the shipping of live plants in your area, especially if shipping across state or national borders. Some plants may be restricted due to pest concerns.
- Communicate with the Recipient: Inform the recipient about the care needed for the cuttings once they arrive. Provide them with detailed instructions on how to plant and care for the cuttings.
- Use Quality Materials: Invest in good-quality boxes, packing materials, and labels to ensure a professional and safe shipping process.
Conclusion
Shipping plant cuttings can be a rewarding experience, allowing you to share your gardening passion with others. By following the steps outlined in this guide—selecting healthy cuttings, preparing them properly, and choosing the right shipping method—you can ensure that your cuttings arrive safely and ready to thrive in their new environment. With careful planning and attention to detail, you can successfully ship plant cuttings and enjoy the satisfaction of helping others grow their gardens.
Share Your Plant Shipping Experiences!
Have you ever shipped or received plant cuttings? Share your experiences and tips with the gardening community! Use #PlantCuttings #PlantShipping #GardeningCommunity to connect with fellow gardening enthusiasts and inspire others to share their green thumbs. Happy gardening!