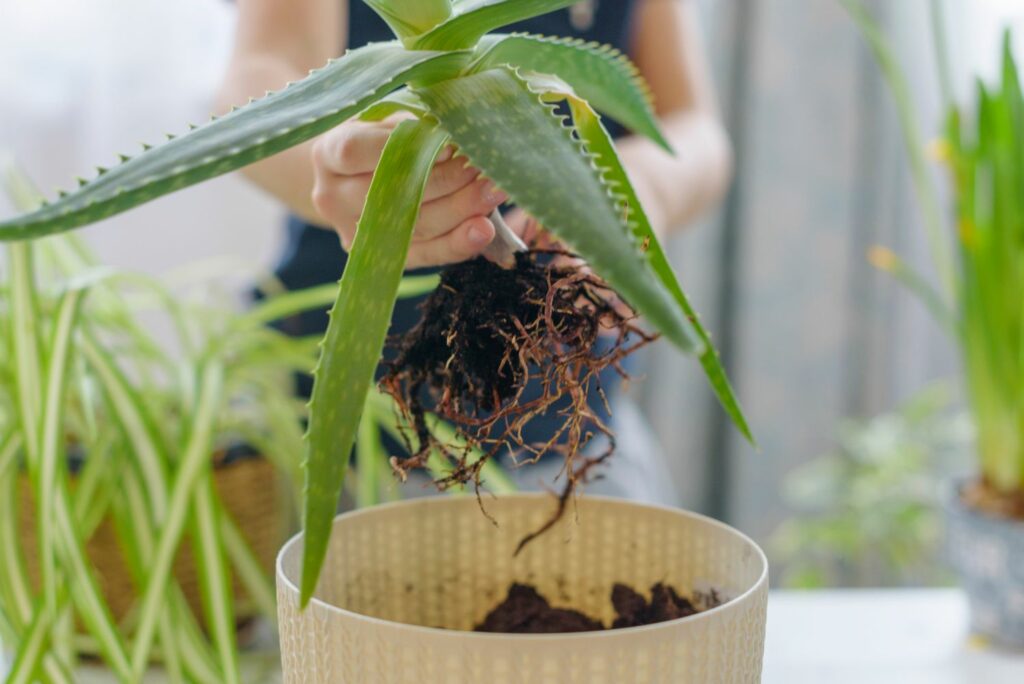
If your aloe vera plant looks a little cramped or droopy, it’s time to give it a fresh start — in true “Fresh How To Repot Aloe Vera Plant Style!” Aloe vera, with its plump, healing leaves and low-maintenance charm, deserves some occasional TLC to stay healthy and happy. Repotting isn’t just about aesthetics; it’s about helping your plant grow stronger roots and continue producing those juicy leaves full of natural goodness.Whether you’re a seasoned plant lover or a beginner ready to get your hands dirty, this guide will walk you through everything you need to know about repotting aloe vera — step by step. You’ll learn when to repot, what materials to use, and how to style your plant beautifully once it’s settled into its new home.So, grab your gardening gloves and get ready to refresh your aloe vera with this complete “Fresh How To Repot Aloe Vera Plant Style” guide!🌿 Why You Should Repot Aloe VeraBefore jumping into the how-to, let’s talk about why repotting aloe vera matters. Over time, even the hardiest aloe plants outgrow their pots. Their roots become tangled or “root-bound,” and the soil can lose nutrients and drainage efficiency.Here’s why you should repot:🌱 Healthy root growth: Fresh soil provides better aeration and nutrients.💧 Improved drainage: Aloe vera hates soggy roots — repotting ensures good airflow and proper water flow.🌞 More space for growth: A bigger pot allows the plant to expand and produce new offshoots (called “pups”).🌼 Stylish refresh: A new pot means a new aesthetic! It’s your chance to Boost Your Aloe Vera Style while keeping it thriving.🪴 When to Repot Aloe VeraTiming is key in your “Fresh How To Repot Aloe Vera Plant Style” journey. Aloe vera doesn’t need repotting too often — usually once every 2–3 years is enough.Here are clear signs your aloe is ready for a new home:Roots are visible through the drainage holes.The plant is top-heavy or leaning.The potting mix dries out too fast or stays soggy.Pups (baby plants) are crowding the main aloe.Leaves look pale, limp, or yellowed.🌞 Best time to repot: Early spring or summer, when aloe vera is actively growing. Avoid winter repotting, as the plant is semi-dormant then.🪴 Supplies You’ll NeedTo master your “Fresh How To Repot Aloe Vera Plant Style”, gather these essentials first:🌿 1. A New PotChoose a pot 1–2 inches larger than the current one.Ensure it has drainage holes — aloe roots rot in trapped water.Terracotta or clay pots are ideal because they allow airflow.🌵 2. Well-Draining Potting MixAloe vera thrives in dry, airy soil. Mix your own with:2 parts cactus or succulent mix1 part perlite or coarse sandYou can also add a bit of pumice for extra drainage.🪴 3. Gardening ToolsYou’ll need:A small trowel or spoonPruning shears (for removing damaged roots)Gloves (aloe sap can be sticky)🌸 4. Optional Styling TouchesTo elevate your repotting experience, pick:A decorative pot or ceramic planterPebbles or stones for the top layerA matching tray or stand to complement your decor🌿 Step-by-Step: How To Repot Aloe Vera Plant StyleReady to get started? Follow these simple steps for a clean, healthy, and stylish repot.🪴 Step 1: Remove the Aloe GentlyHold the base of the aloe and tilt the pot slightly. Gently tap the sides or squeeze flexible pots to loosen the soil. Pull the plant out slowly to avoid breaking the roots.🌱 Pro Tip: If your aloe has pups (small baby plants), separate them carefully for propagation!🌱 Step 2: Inspect and Trim the RootsBrush off old soil and inspect the root ball. Trim away any black, mushy, or dried-out roots with clean scissors. Healthy roots should be firm and white.This step ensures your aloe won’t carry root rot into its new home.🌿 Step 3: Prepare the New PotAdd a small layer of pebbles or gravel at the bottom of the pot. Then pour in some of your potting mix — enough to elevate the plant’s base just below the pot’s rim.This creates a breathable foundation, ensuring proper drainage and airflow.🌵 Step 4: Replant Your Aloe VeraPlace your aloe in the center of the new pot. Fill around it with soil, gently pressing to stabilize the roots. Don’t pack the soil too tightly — you want to leave room for air circulation.Leave about ½ inch of space at the top so you can water easily.💧 Step 5: Water SparinglyWait 5–7 days before watering your newly repotted aloe. This gives the roots time to heal and prevents rot.When you do water, do so deeply — let the excess drain out completely. Remember: aloe vera thrives on a “less is more” watering routine!🌼 Step 6: Style and DisplayHere’s where you can get creative with your Fresh How To Repot Aloe Vera Plant Style flair!Add decorative pebbles or moss on top for a clean look.Place your aloe near a sunny window with indirect light.Pair it with other succulents or minimalist decor for that fresh, airy vibe.🌞 Aftercare Tips for a Healthy Aloe VeraNow that your aloe is in its new pot, here’s how to keep it thriving long-term:🌿 1. Sunlight MattersAloe vera loves bright, indirect light. Too much direct sun can cause sunburn; too little can make the leaves floppy. A south or west-facing window is perfect.💧 2. Water WiselyWater your aloe only when the top 2 inches of soil are completely dry. Overwatering is the #1 cause of plant distress.🌱 Tip: Stick your finger in the soil before watering — if it feels damp, wait a few more days.🌾 3. Feed OccasionallyDuring spring and summer, feed your aloe with a diluted succulent fertilizer once every 4–6 weeks. Skip feeding during winter.🌸 4. Propagate and ShareThose little pups growing at the base? Gently remove and plant them separately. They make great gifts — or a cute way to expand your home garden!🌺 Styling Inspiration for Aloe LoversAloe vera isn’t just a healing plant — it’s also a decor statement. Try these style ideas to make your plant shine indoors or outdoors:🌿 Modern Minimalist: White ceramic pot + clean lines = spa-like freshness.🪴 Boho Chic: Woven basket planters and hanging macrame for a cozy vibe.🌵 Desert Aesthetic: Group aloe with cacti and succulents in clay pots.🌸 Kitchen Greenery: A small aloe plant adds freshness near a sunny kitchen window — plus it’s handy for burns and skin care!🌼 Common Repotting Mistakes to AvoidEven the most passionate plant parents can make mistakes. Here’s how to keep your “Fresh How To Repot Aloe Vera Plant Style” flawless:❌ Overwatering — Never water right after repotting.❌ No drainage holes — Always use a pot with holes.❌ Too much fertilizer — Aloe is a light feeder.❌ Heavy soil — Avoid garden soil; it traps moisture.❌ Too little light — Aloe vera can’t thrive in shade.🌿 ConclusionRepotting your aloe vera plant isn’t just plant care — it’s plant self-care! By following this “Fresh How To Repot Aloe Vera Plant Style” guide, you give your aloe the room, nutrients, and beauty it needs to flourish.From refreshing the soil to choosing the perfect pot, every detail helps your plant stay vibrant and healthy — while bringing fresh, natural energy to your home.So go ahead, grab that new pot, mix your soil, and get your aloe looking its best. With a bit of care and style, you’ll soon have a happy, thriving plant that’s as beautiful as it is beneficial. 🌿✨🔑 SEO Keywords (use naturally):Fresh How To Repot Aloe Vera Plant StyleHow to repot aloe veraAloe vera plant care tipsRepotting succulents guideBest soil for aloe veraAloe plant styling ideas