
Gardening is a wonderful hobby that allows you to nurture plants, beautify your surroundings, and enjoy the therapeutic benefits of working with nature. However, one common challenge many gardeners face is the cost of garden supplies, particularly flower pots. While there are countless stylish and functional pots available for purchase, they can get quite expensive, especially if you’re looking to add multiple containers to your garden. Fortunately, there’s a way to create inexpensive, personalized flower pots without breaking the bank: dressing up nursery pots.
Nursery pots are the basic plastic containers that plants come in when you buy them from a garden center. These simple, often unattractive pots are usually a few bucks each, and they may not add much visual appeal to your garden. But with a little creativity, you can transform these humble containers into stylish and functional flower pots that complement your outdoor decor. In this article, we’ll show you how to make cheap flower pots by dressing up nursery pots, turning them into eye-catching planters that suit your personal taste.
Why Use Nursery Pots for Flower Pots?
Before we dive into the DIY process, let’s take a look at why nursery pots are such a great base for creating your own custom flower pots.
- Cost-Effective: Nursery pots are relatively cheap, often costing only a few dollars. Since most gardeners already have them, reusing these pots to make flower containers is a budget-friendly option.
- Availability: Nursery pots are easy to find. You can get them from local garden centers, plant nurseries, or even re-purpose ones that you already have at home.
- Versatility: These pots come in a range of sizes, making them suitable for a variety of plants—from small flowers to larger shrubs. Plus, they have a neutral design, making them perfect for customization.
- Sustainability: Repurposing nursery pots instead of buying new decorative pots reduces waste and supports a more eco-friendly gardening practice.
Now, let’s walk through the steps to give these plain nursery pots a stylish makeover.
Step 1: Gather Your Supplies
The first step in transforming a nursery pot into a stunning flower pot is gathering your materials. Fortunately, you don’t need to spend a lot of money on supplies. Here’s what you’ll need:
- Nursery Pots: The base of your new flower pot. You can reuse pots you already have, or purchase new ones at a garden center.
- Acrylic Paint or Spray Paint: Paint is one of the most affordable and easiest ways to change the look of your pots. Opt for outdoor or weather-resistant paint to ensure your design lasts.
- Fabric: If you want to add texture and dimension to your pots, fabric can be an excellent option. You can use old fabric scraps, or pick up some inexpensive material from a craft store.
- Twine or Rope: For a rustic or farmhouse aesthetic, twine or rope can add a charming touch to your pots.
- Stickers or Decals: Decorative stickers or decals are a great way to add a little flair without much effort.
- Clear Sealer: If you paint your pots, sealing them with a clear coat will help protect the design from the elements and ensure that it lasts.
- Hot Glue Gun or Craft Glue: This will help you secure any fabric, twine, or embellishments to the pot.
Optional items:
- Stencils: If you want to add patterns or designs to your pots, stencils can make the process easier.
- Moss or Decorative Stones: To add extra texture, moss or small stones can be glued to the outside of the pot for a natural, earthy look.
Step 2: Clean and Prepare the Nursery Pots
Before you start decorating, it’s important to clean the nursery pots thoroughly. Remove any dirt or plant residue, and make sure that the pot is dry before proceeding. This will help ensure that any adhesive or paint sticks properly to the surface.
To clean the pots, simply rinse them with warm water and mild soap. Use a sponge or brush to scrub the insides and outsides of the pot, especially around the drainage holes. After cleaning, let the pots dry completely before starting the decorating process.
Step 3: Paint the Nursery Pots
One of the easiest and most dramatic ways to dress up a nursery pot is by painting it. Whether you prefer bold colors, neutral tones, or intricate patterns, painting your pots can instantly elevate their appearance.
How to Paint Your Nursery Pots:
- Choose Your Paint: For outdoor use, choose acrylic or spray paint designed for exterior surfaces. These types of paints are durable and weather-resistant.
- Prepare the Area: Lay down newspaper, a drop cloth, or some plastic sheeting to protect the surrounding area from paint splatters.
- Prime the Pot (Optional): If you’re using spray paint or a light color, you might want to apply a coat of primer first. This step is optional but can help the paint adhere better and create a smoother finish.
- Apply the Paint: If you’re using spray paint, hold the can about 6 to 12 inches away from the pot and spray in even strokes. If you’re using acrylic paint, use a brush to apply an even layer. Be sure to cover all visible areas.
- Let It Dry: Allow the paint to dry completely before handling the pot. If you want to add a second coat of paint, wait for the first coat to dry before applying it.
- Seal the Pot: Once the paint is completely dry, apply a clear sealant to protect the design. This will help the paint last longer, especially if the pots are exposed to the elements.
Step 4: Add Texture and Detail
Once the base coat of paint is dry, you can start adding texture and details to your pots. This is where you can get creative and make the pots truly unique.
Ideas for Adding Texture:
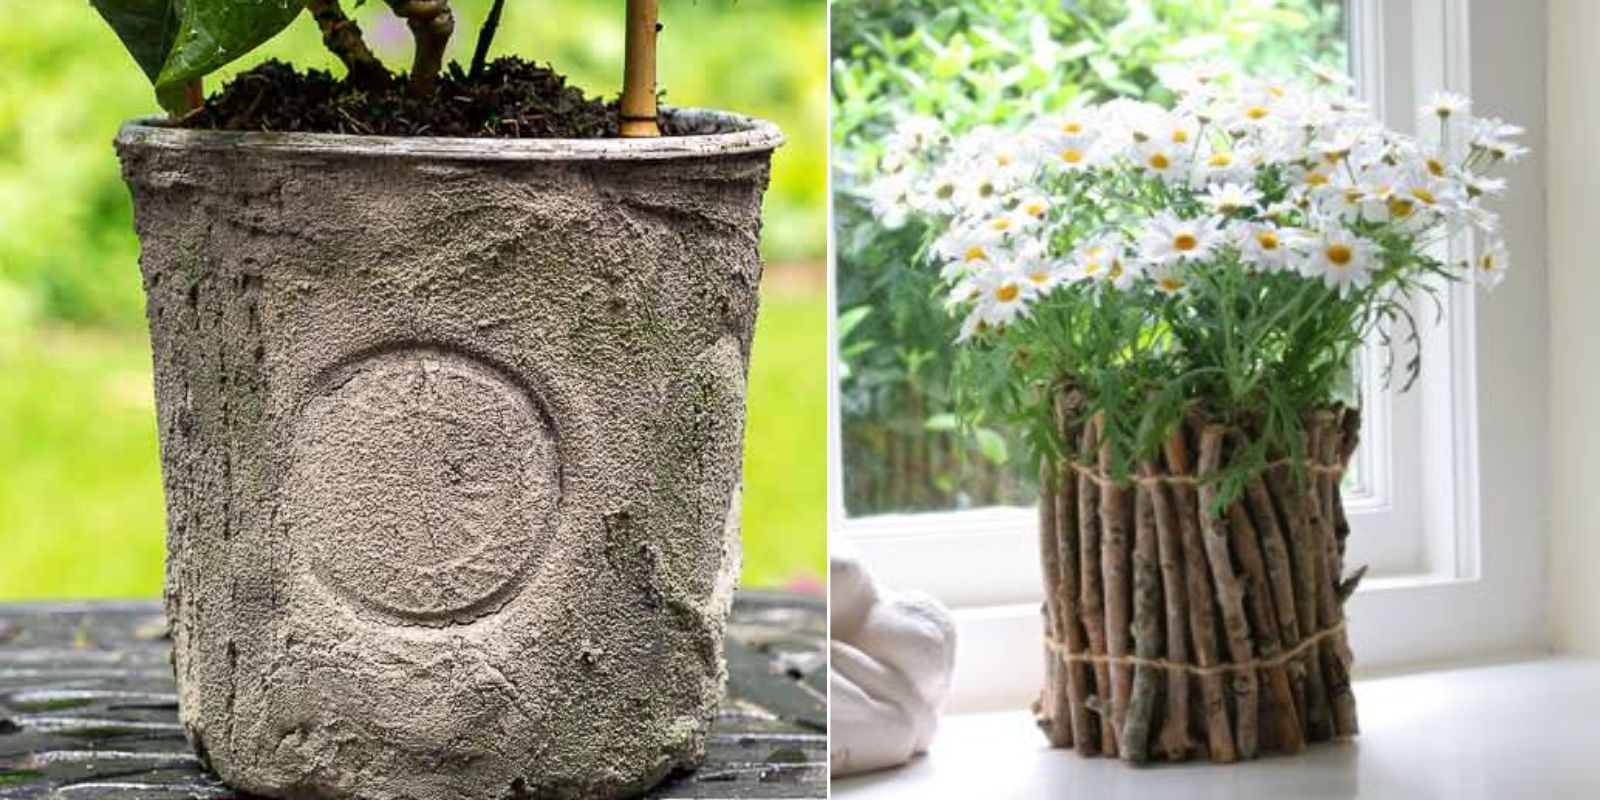
- Fabric Wrap: If you love a cozy, rustic look, wrap the bottom of the pot in fabric. Use hot glue to secure the fabric, and choose a fabric that complements the color of the paint. Burlap, linen, or cotton fabric works great for a rustic vibe, while floral or patterned fabrics can add a more vibrant touch.
- Twine or Rope: Wrap twine or thick rope around the top rim of the pot for a farmhouse-chic look. You can glue the twine in place to ensure it stays secure, and even add a bow for extra flair.
- Decals and Stickers: If you’re looking for a simple yet effective way to decorate, add some stickers or decals to the pots. These could be floral designs, inspirational quotes, or even geometric shapes. You can find outdoor-friendly decals at most craft stores or online.
- Moss or Stones: For a natural and earthy look, consider gluing moss, pebbles, or small stones to the surface of the pot. This will give your flower pot a unique texture and a natural aesthetic.
Step 5: Display Your Newly Created Flower Pots
Once your pots are decorated and the paint is dry, it’s time to fill them with flowers or plants. Choose flowers or plants that match your aesthetic and place them in the newly dressed-up pots. You can also use them for indoor plants, succulents, or herbs, depending on the size and type of pot.
Step 6: Maintain and Care for Your New Flower Pots
To keep your newly dressed-up flower pots looking their best, make sure to take care of them properly. Here are a few tips:
- Watering: Be mindful of watering your plants carefully to avoid water damage to the paint or decorations.
- Cleaning: Gently clean the outside of the pots with a damp cloth when they get dusty.
- Repairs: If any fabric or twine starts to peel or unravel, you can easily repair it with a little hot glue or fresh adhesive.
Conclusion
Creating your own flower pots by dressing up nursery pots is a fantastic way to add personality to your garden while saving money. With just a few simple supplies, you can transform basic, boring plastic pots into stylish planters that showcase your unique creativity. Whether you’re looking for rustic, modern, or whimsical designs, the possibilities are endless. Plus, by reusing nursery pots, you’re making a more eco-friendly choice and reducing waste in the process.
So next time you’re shopping for garden supplies, consider skipping the expensive decorative pots and instead, repurpose the ones you already have. With a little paint, fabric, or twine, you’ll have beautiful flower pots that are not only budget-friendly but also one-of-a-kind!
Happy gardening! 🌷🌿
#GardenDIY #UpcycledGardening #CheapFlowerPots #BudgetGardening #CreativePots #DIYPlanters #SustainableGardening #OutdoorDecor #EcoFriendlyGardening #RepurposeAndSave