
Roses are one of the most beloved flowers in the world, symbolizing love, beauty, and passion. While many people think growing roses is complicated, it’s surprisingly easy to propagate roses from flower buds. This method allows you to transform a single rosebud into a thriving plant. In this article, we’ll take you through the entire process, from selecting the right rosebud to nurturing it into a blooming plant.
Why Grow Roses from Buds?
Growing roses from flower buds is an inexpensive and rewarding way to expand your garden. Here are a few reasons to try it:
- Preserve Favorite Varieties: If you have a rose that holds sentimental value or is a rare variety, propagating it from a flower bud helps you preserve its beauty.
- Budget-Friendly Gardening: Instead of buying new rose plants, you can create your own from cuttings, saving money while cultivating your garden.
- A Fun DIY Project: Watching a simple cutting grow into a vibrant rose bush is a fulfilling experience for gardeners of all levels.
Materials Needed:
Before starting, gather the following materials to ensure a smooth propagation process:
- A healthy red rosebud with a sturdy stem
- Pruning shears or a sharp knife
- Rooting hormone powder (optional but recommended)
- A small pot with drainage holes
- Well-draining potting soil
- A clear plastic bag or bottle
- Water
Step-by-Step Guide to Growing Roses from Flower Buds
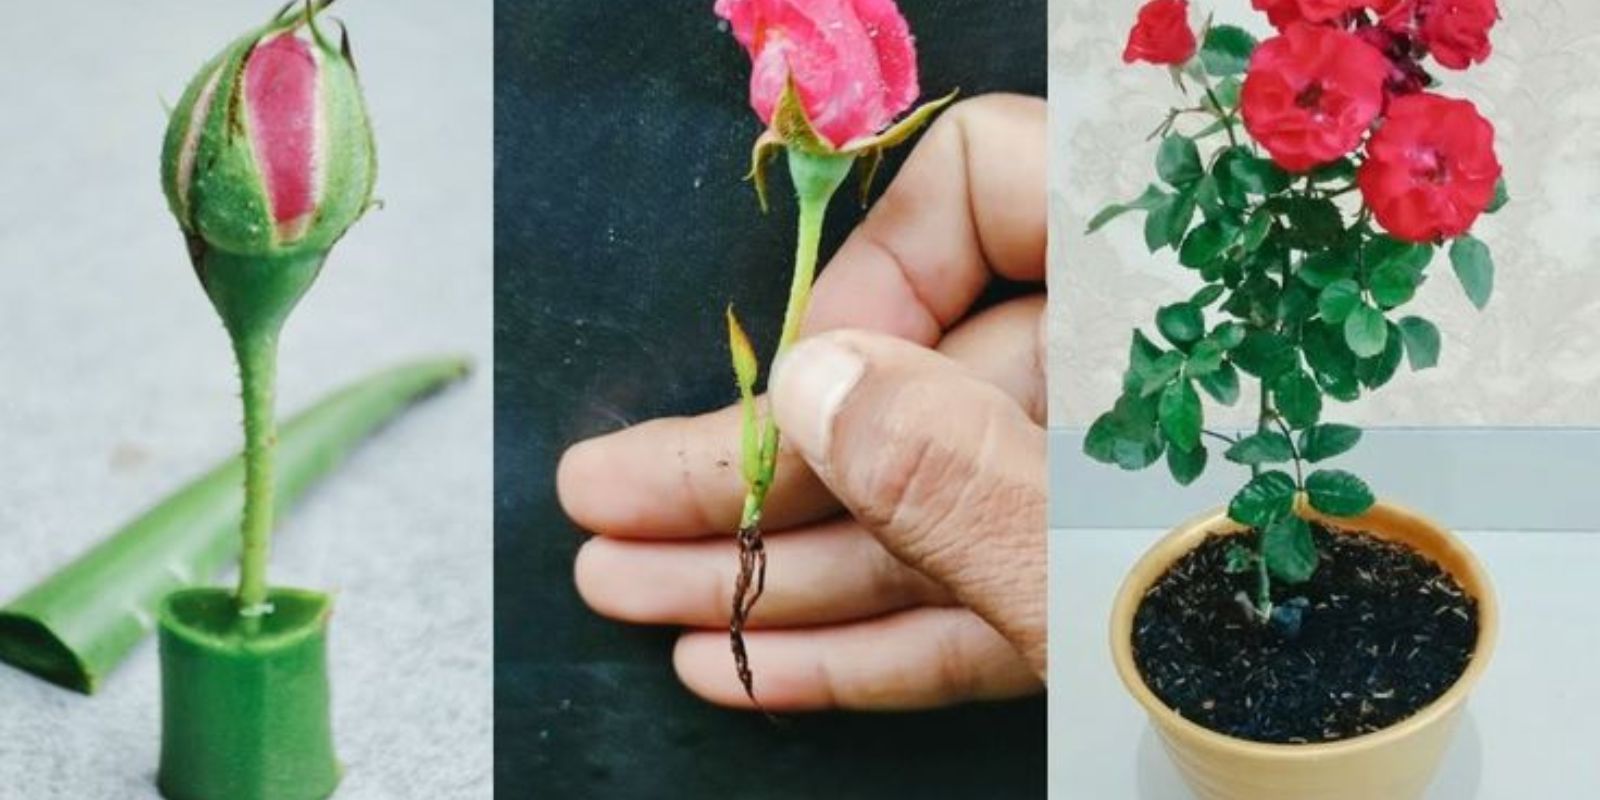
1. Select a Healthy Rosebud
Choose a fresh red rose with a firm, green stem. Avoid roses that are wilting or have brown or black spots, as these may not propagate successfully. Look for a bud with a medium-thick stem, as thinner or woody stems may struggle to root.
2. Prepare the Cutting
Using pruning shears or a sharp knife, cut the stem about 6–8 inches long, ensuring the cut is clean and at a 45-degree angle. Remove the flower and any leaves from the lower half of the stem, leaving a few leaves on the top. Removing excess foliage reduces water loss and encourages root growth.
3. Apply Rooting Hormone
Dip the cut end of the stem into rooting hormone powder. While this step is optional, it significantly improves the chances of successful rooting. Rooting hormone encourages faster and stronger root development.
4. Prepare the Planting Pot
Fill a small pot with well-draining potting soil. Roses prefer slightly acidic soil with a pH between 6.0 and 6.5. Mix in some compost or organic matter to provide nutrients for the growing cutting.
5. Plant the Cutting
Insert the prepared stem into the soil, burying the bottom node (where the leaves were removed) about 2 inches deep. Firmly press the soil around the stem to hold it in place.
6. Water and Create a Humid Environment
Water the soil thoroughly to ensure the cutting has ample moisture. To maintain high humidity, cover the cutting with a clear plastic bag or a cut plastic bottle. This creates a mini greenhouse effect, which prevents the cutting from drying out.
7. Place in Indirect Sunlight
Position the pot in a location with bright but indirect sunlight. Avoid direct sunlight, as it can overheat the cutting and cause stress. A windowsill or shaded spot in the garden works well.
8. Monitor Growth
Check the cutting regularly to ensure the soil remains moist but not waterlogged. Within 3–4 weeks, you should notice new leaf growth, a sign that roots are developing.
9. Transplant to a Larger Space
Once the cutting has established a healthy root system, it’s time to transplant it into a larger pot or directly into your garden. Choose a sunny location with good air circulation, and ensure the soil is nutrient-rich.
Tips for Success
- Timing is Key: The best time to propagate roses is in spring or early summer when the weather is warm, but not too hot.
- Use Sterilized Tools: Always use clean, sharp tools to make your cuts. This reduces the risk of introducing diseases to the cutting.
- Protect from Pests: Watch out for common pests like aphids or spider mites. Use natural remedies like neem oil to keep them at bay.
- Be Patient: Not all cuttings will take root on the first attempt. Don’t get discouraged—practice makes perfect!
Caring for Your New Rose Plant
Once your rose cutting has been transplanted, proper care is essential to ensure its growth and blooming success.
- Watering: Water the plant deeply but infrequently. Roses prefer moist soil but dislike being waterlogged.
- Fertilizing: Feed the plant with a balanced rose fertilizer every 4–6 weeks during the growing season to encourage healthy growth and vibrant blooms.
- Pruning: Regularly prune your rose bush to remove dead or diseased branches and encourage new growth.
Benefits of Growing Red Roses
Red roses are not just beautiful; they also offer several benefits:
- Symbolic Value: Red roses symbolize love and passion, making them a meaningful addition to any garden.
- Attract Pollinators: Roses attract bees and other pollinators, which benefit the overall health of your garden.
- Versatile Use: Freshly cut roses can be used in bouquets, as decorations, or even for making rosewater.
Why You Should Try This Method
Growing roses from flower buds is a fun and rewarding experience that connects you to nature in a unique way. By starting your roses from cuttings, you can create a garden filled with blooms that hold sentimental value, all while saving money and learning valuable gardening skills.
Call to Action
Ready to turn a single rosebud into a flourishing plant? Start your rose propagation journey today and add a touch of elegance to your garden. Share your progress, ask questions, or show off your results—let’s grow together!
🌹 #GrowRoses #DIYGardening #RosePropagation #RedRoses #GardenLovers #PlantParent #HomeGardening #GardeningHacks #FlowerPower #BloomWithLove 🌹