
Growing roses from cuttings is a fantastic way to propagate your favorite rose varieties and expand your garden. This method is not only cost-effective but also ensures that you get an exact clone of the parent plant, preserving its unique characteristics. Whether you’re a seasoned gardener or a beginner, this guide will walk you through the easy steps to grow roses from cuttings, allowing you to enjoy the beauty of roses year after year.
Introduction
Roses are one of the most beloved flowers in the world, known for their stunning blooms and delightful fragrance. Propagating roses from cuttings is a simple yet rewarding process that allows you to create new plants from your existing rose bushes. This technique is particularly useful if you want to replicate a rose that has special significance or one that thrives particularly well in your garden. Let’s delve into the step-by-step process of growing roses from cuttings.
Materials You Will Need:
- Pruning shears
- A healthy rose bush
- Rooting hormone powder
- Small pots or containers
- Well-draining potting mix
- A clear plastic bag or container
- A sharp knife
- A pencil or stick
- Water
Step-by-Step Guide:
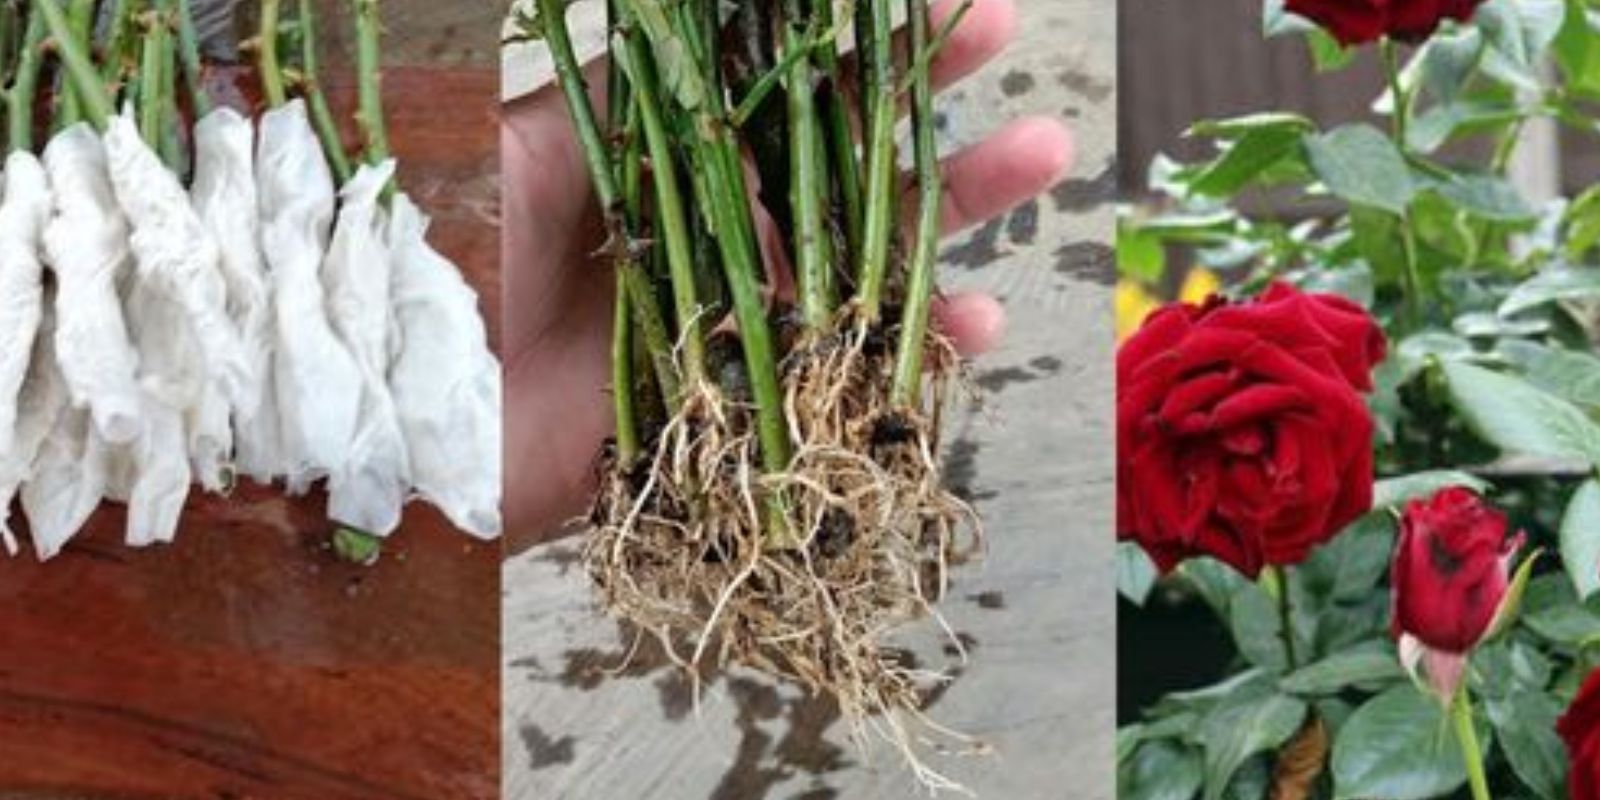
1. Select Healthy Cuttings:
- Choose a healthy, vigorous rose stem from a mature rose bush. The ideal cutting is about 6-8 inches long and taken from a stem that has recently bloomed. The best time to take cuttings is in late spring or early summer when the rose is actively growing.
2. Prepare the Cuttings:
- Using a sharp knife or pruning shears, make a clean cut just below a node (the point where a leaf attaches to the stem). Remove any flowers, buds, and lower leaves from the stem, leaving only a few top leaves. This will help the cutting focus its energy on root development rather than maintaining foliage.
3. Dip in Rooting Hormone:
- Dipping the cut end of the stem into rooting hormone powder can significantly increase the chances of successful rooting. Rooting hormone encourages root growth and helps prevent the cutting from rotting. Simply dip the cut end into the powder, making sure it is evenly coated.
4. Plant the Cuttings:
- Fill a small pot or container with well-draining potting mix. Using a pencil or stick, make a hole in the soil for the cutting. Insert the cutting into the hole, ensuring that at least one or two nodes are buried beneath the soil surface. Firm the soil around the cutting to provide support.
5. Water and Cover:
- Water the cutting thoroughly to settle the soil and eliminate air pockets. Cover the pot with a clear plastic bag or a clear container to create a humid environment, which is crucial for the cutting to develop roots. Ensure the plastic does not touch the leaves by using sticks or stakes to hold it up.
6. Place in a Suitable Location:
- Place the pot in a warm, bright location where it will receive indirect sunlight. Avoid placing the cutting in direct sunlight as it can cause the cutting to dry out and fail to root. A temperature of around 70°F (21°C) is ideal for root development.
7. Monitor and Care:
- Keep the soil consistently moist but not waterlogged. Check the cutting regularly to ensure it is not drying out. After a few weeks, gently tug on the cutting to check for resistance, indicating that roots are developing. This process can take anywhere from four to eight weeks.
8. Transplant the New Rose Plant:
- Once the cutting has developed a healthy root system, it is ready to be transplanted. Prepare a larger pot or a spot in your garden with well-draining soil. Carefully remove the cutting from its original pot, being gentle to avoid damaging the new roots. Plant it in its new location and water thoroughly.
Additional Tips for Success:
- Timing: The best time to take rose cuttings is during the growing season, typically late spring to early summer. However, hardwood cuttings taken in late autumn can also be successful.
- Sanitation: Ensure your tools and pots are clean to prevent the spread of disease.
- Climate: If you live in a colder climate, you might need to bring your cuttings indoors during the winter or provide additional protection.
- Fertilization: Once the new plant is established and actively growing, you can start feeding it with a balanced rose fertilizer to encourage strong growth and abundant blooms.
- Pest Control: Keep an eye out for pests and diseases, especially in the early stages of growth. Treat any issues promptly to ensure your new rose plant stays healthy.
Conclusion
Propagating roses from cuttings is an accessible and enjoyable way to multiply your rose collection and share your favorite varieties with friends and family. By following these simple steps, you can successfully grow new rose plants that will enhance your garden’s beauty and fragrance. The process requires patience and care, but the results are well worth the effort.
Join the community of rose enthusiasts and share your progress! Post photos of your cuttings and new plants, exchange tips, and celebrate the joy of growing roses from cuttings. Happy gardening!