
Growing rice at home might sound like a daunting task, but with the right knowledge and tools, it’s a surprisingly simple and rewarding experience. Whether you’re looking to cultivate your own food or just want to try something new, growing rice in containers is a great way to bring this ancient staple crop into your backyard. In this article, we will walk you through the steps to successfully grow rice in containers at home. By following these steps, you’ll be able to enjoy the process and reap the benefits of your own home-grown rice!
Introduction: Why Grow Rice at Home?
Rice is one of the most important crops in the world, providing sustenance for billions of people. While traditionally grown in large fields flooded with water (called paddies), rice can also be grown in smaller, controlled environments like containers. Growing rice at home not only provides a unique gardening challenge but also offers the opportunity to experience the process of producing your own food. Container gardening makes it easier to grow rice in small spaces, such as balconies, patios, or even indoors if you have the right conditions.
By growing rice in containers, you’ll gain insight into sustainable practices, help reduce your carbon footprint, and enjoy the satisfaction of watching something you’ve cultivated from start to finish. Plus, the added benefit of having homegrown rice to cook with is a huge plus!
Benefits of Growing Rice in Containers
- Space Efficiency: Containers allow you to grow rice even if you don’t have a traditional garden or field. Perfect for urban settings or small backyards.
- Control Over Growing Conditions: With containers, you have more control over the soil, water, and sunlight, helping your rice grow healthier.
- Educational: Growing rice provides a deeper understanding of the cultivation process, offering hands-on experience with a staple crop.
- Sustainable Food Source: Growing your own rice can help reduce your reliance on store-bought food, contributing to a more self-sufficient lifestyle.
Step-by-Step Guide to Growing Rice in Containers
1. Choose the Right Container
The first step in growing rice is to choose a suitable container. Rice requires a significant amount of water to grow, so your container should be large enough to hold a decent amount of soil and water. Ideal containers include large plastic tubs, barrels, or even old bathtubs. The container should hold at least 10–15 gallons (40–56 liters) of water and have enough space for the rice plants to grow without overcrowding.
A good rule of thumb is that the container should be deep enough to hold about 6-8 inches of soil with an additional 4-6 inches of water above the soil. This ensures that the rice roots are fully submerged in water, which mimics the conditions of a traditional rice paddy.
2. Fill the Container with Soil
Once you’ve chosen your container, the next step is to fill it with soil. Rice prefers a loamy, well-drained soil mix that can hold water but also drain excess moisture. You can use a combination of garden soil, compost, and sand to create a well-draining mix. Fill the container up to about 3-4 inches from the top, leaving room for water.
Ensure the soil is level and compacted slightly to create a solid foundation for the rice seeds. Rice is sensitive to uneven soil surfaces, so it’s essential to create a smooth, even layer. If you’re planting multiple containers, make sure to space them apart so that each rice plant has plenty of room to grow.
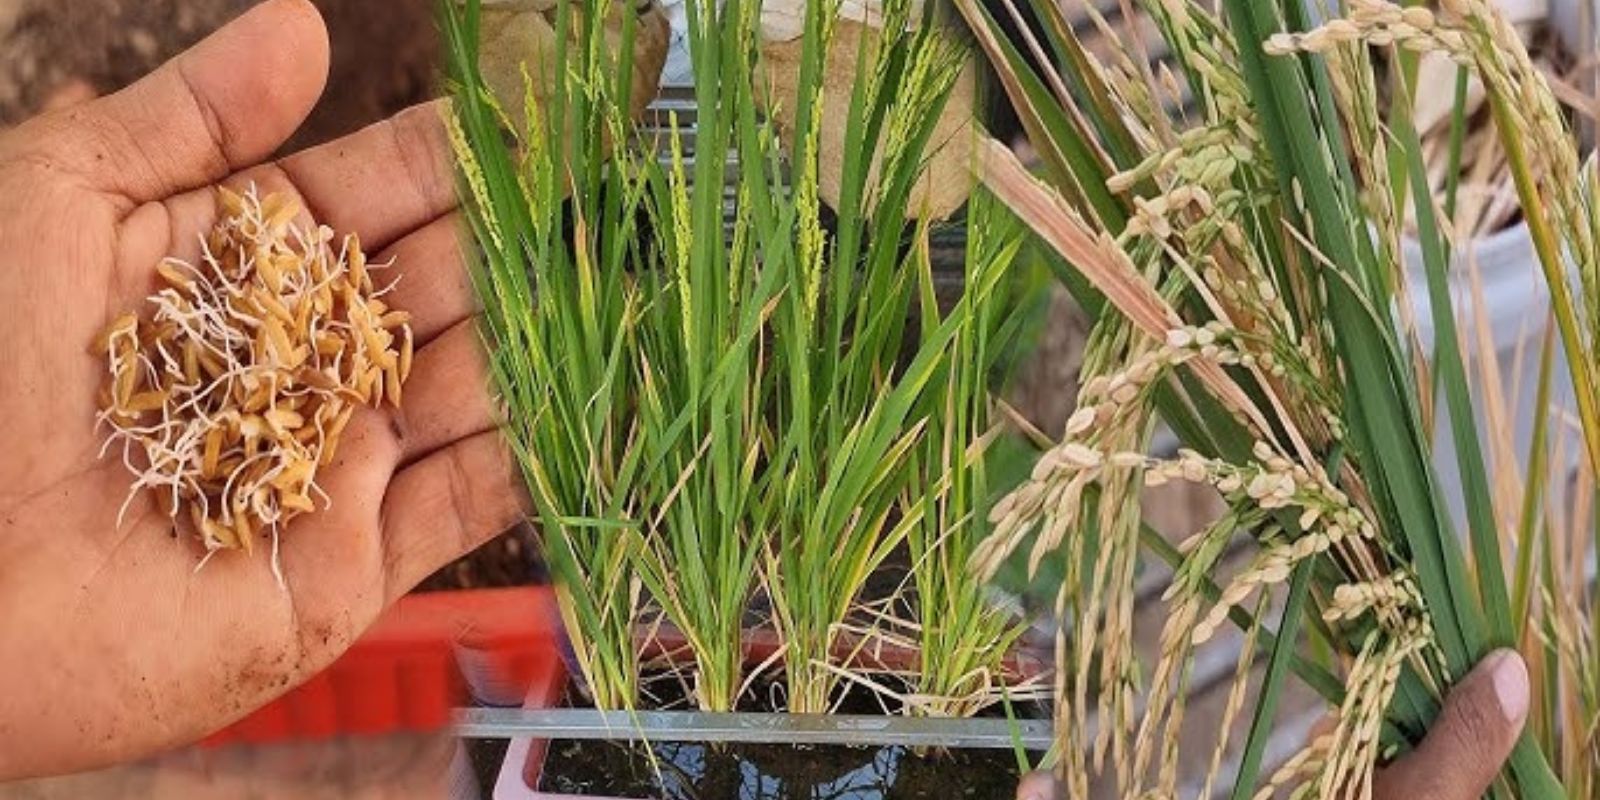
3. Soak the Rice Seeds
Before you start planting, soak your rice seeds for about 24 hours to help initiate the germination process. Soaking the seeds helps to soften the seed coat and promotes faster sprouting. You can place the seeds in a small bowl of water and let them sit for a day before planting them in the soil. This simple step can significantly increase your chances of successful germination.
While soaking, check for any seeds that float to the top. These are often empty or damaged, so it’s best to discard them before planting.
4. Plant the Rice Seeds
Once your seeds are soaked and ready to go, it’s time to plant them. Rice seeds should be planted about 1 inch (2.5 cm) deep in the soil. Use your fingers or a small stick to create small holes in the soil, and drop a few seeds into each hole. The goal is to plant the seeds in clusters, as rice plants grow better when they are spaced closer together.
You can plant multiple rows of rice in the container, making sure the seeds are evenly spaced to allow each plant to have enough space for proper growth. In larger containers, you can plant up to 4-5 rows, each spaced about 4-6 inches apart.
5. Flood the Container
Rice needs to be grown in a flooded environment, so the next step is to flood your container with water. After planting the seeds, fill the container with water to a depth of about 3-4 inches. The water level should remain constant throughout the growing season. This mimics the conditions of a traditional rice paddy and is essential for healthy rice growth.
Use a gentle watering system, such as a slow drip or a watering can with a spout, to avoid disturbing the soil and seeds. It’s important to maintain a consistent water level, so monitor the water level daily, especially during hot or dry weather.
6. Provide Sunlight
Rice is a sun-loving plant, and it requires at least 6-8 hours of direct sunlight each day to grow properly. Place your container in a sunny spot, such as on a balcony, patio, or windowsill that receives plenty of light throughout the day. If you’re growing rice indoors, ensure that the location gets enough sunlight or use grow lights to supplement natural light.
Rice plants are quite hardy and can tolerate some shading, but they perform best in full sunlight.
7. Maintain Water Levels and Care for the Plants
Once your rice seeds have germinated, continue to maintain the water levels in the container. Keep the water at a consistent depth of 3-4 inches throughout the growing season. You may need to refill the container as the water evaporates, especially during hot summer months.
Rice plants typically grow in stages. They start as small seedlings and gradually grow taller, developing thick, green stalks. As the plants grow, you may need to support them with stakes to prevent them from leaning over or falling.
Regularly check for any signs of pests or diseases, such as discolored leaves or damaged stalks. Most rice plants are quite resilient, but occasional pest control may be necessary.
8. Harvesting Your Rice
After about 3-4 months, when your rice plants have grown tall and the grains have turned golden, it’s time to harvest. The rice will be ready when the grains are firm and the plants begin to droop. Use a sharp pair of scissors or pruning shears to cut the rice stalks from the base. Be sure to leave enough of the stalks in the container to allow the remaining plants to finish maturing.
Once harvested, spread the rice stalks out in a dry, sunny area for several days to allow the grains to fully dry. This helps to prevent mold and ensures that the rice is properly stored. After drying, remove the rice grains from the stalks and store them in a cool, dry place.
Conclusion: Enjoy the Fruits of Your Labor
Growing rice in containers at home is a rewarding and fulfilling project that can help you better understand the complexities of food production. Whether you’re looking to enjoy the process of cultivating your own food or simply want to try something new, growing rice at home offers numerous benefits. From sustainable living to hands-on learning, the experience is worth every step.
By following these simple steps, you can successfully grow rice in containers and enjoy the satisfaction of having homegrown rice on your dinner plate. Happy planting!
#GrowRiceAtHome #ContainerGardening #UrbanFarming #SustainableLiving #RiceFarming #GardeningHacks #HomegrownFood #SelfSufficiency #RiceInContainers #GardeningJourney #PlantYourFood