
Garlic is not only a staple in many kitchens, adding robust flavor and aroma to a wide variety of dishes, but it is also renowned for its medicinal properties and health benefits. From boosting the immune system to offering natural antibacterial and antiviral properties, garlic is truly a wonder crop. What’s more, growing garlic at home is easier than you might think and can provide you with an ongoing supply to use in your cooking and for its health benefits.
Whether you want to grow garlic from kitchen scraps, start a garlic patch in your garden, or simply want a more sustainable and cost-effective way to enjoy fresh garlic all year long, this article will guide you through every step. Not only will we cover the basics of growing garlic, but we’ll also explore techniques for ensuring a fast, successful garlic harvest, along with tips to guarantee you have an unlimited supply.
Why You Should Grow Garlic
Before diving into the “how” of garlic planting, it’s essential to understand why growing your own garlic is so beneficial. Garlic is not just a flavorful addition to your meals—it’s also an incredibly versatile plant with various health benefits:
- Health Benefits: Garlic has been used for centuries as a natural remedy for a variety of ailments. It’s known for its immune-boosting properties, its ability to reduce blood pressure, and its antimicrobial and antioxidant properties.
- Flavorful Ingredient: Fresh garlic is packed with flavor, making it a crucial ingredient in many culinary traditions. By growing your own garlic, you always have access to this aromatic powerhouse, whether in stir-fries, soups, or even roasted as a side dish.
- Sustainability: By growing garlic at home, you reduce your dependence on store-bought produce, cutting down on food waste and unnecessary packaging. It’s a sustainable and cost-effective way to enjoy fresh garlic year-round.
- Continuous Supply: With the right care, garlic can grow and regrow, meaning you can have a never-ending supply of this indispensable kitchen ingredient.
So, if you’re ready to grow your own garlic, let’s explore how you can do so quickly and efficiently. Below are step-by-step instructions on how to plant, nurture, and harvest garlic successfully.
Steps to Grow Garlic Quickly
1. Choosing the Right Garlic Varieties
One of the first steps in growing garlic is selecting the right type of garlic. There are two main types of garlic: hardneck and softneck. Here’s what you need to know about each:
- Hardneck Garlic: This type of garlic is known for its robust flavor and thicker, harder stems. It tends to produce fewer cloves but is perfect for colder climates. Hardneck garlic is also ideal for those looking to grow garlic for both culinary and ornamental purposes, as it often produces scapes that can be used in cooking.
- Softneck Garlic: Softneck garlic has a milder flavor and produces more cloves per bulb. It’s more commonly found in grocery stores and is better suited for milder climates. Softneck garlic is also ideal for long-term storage since it typically has a longer shelf life.
When selecting garlic for planting, avoid using store-bought garlic, as it is often treated to prevent sprouting. Instead, look for garlic from a reputable source that sells bulbs specifically meant for planting.
2. Pre-chill the Garlic Bulbs
Garlic is a cold-hardy plant, and it requires a period of cold weather to grow properly. To mimic the natural winter conditions, it’s recommended that you pre-chill your garlic bulbs. Here’s how to do it:
- Place the garlic bulbs in the refrigerator for 4 to 8 weeks before planting. This cold treatment is essential for hardneck garlic, which requires it for the bulb to form properly.
- If you’re growing softneck garlic, this step is optional but still beneficial to help kick-start the growth process.
3. Preparing the Garlic Cloves
Once the garlic has been chilled, it’s time to prepare the individual cloves for planting:
- Separate the Cloves: Carefully separate the garlic bulb into individual cloves, leaving the skins intact. Be sure to handle them gently to avoid damaging the cloves.
- Soak the Cloves: Soak the cloves in a mixture of water with a few drops of hydrogen peroxide or apple cider vinegar for 30 minutes. This helps to sanitize the cloves and can help speed up the rooting process.
4. Planting the Garlic
Garlic can be planted in the fall or early spring, depending on the climate. Planting in the fall is the most common method, as it gives the garlic time to establish roots before the winter freeze.
- Soil Preparation: Garlic prefers well-drained soil that is rich in organic matter. Prepare your garden bed by loosening the soil and adding compost or organic matter to improve drainage. Garlic prefers slightly acidic to neutral soil (pH 6.0-7.0).
- Planting Depth: Plant the garlic cloves 2 to 5 centimeters deep, with the pointed end facing upward. Space the cloves about 10 to 15 centimeters apart to give them enough room to grow. The cloves should be buried under the soil, with the tips just below the surface.
- Timing: If planting in fall, aim to plant garlic about 4 to 6 weeks before the first hard frost. This gives the garlic enough time to develop roots. For spring planting, wait until the soil has warmed up.
5. Providing the Right Growing Conditions
Garlic thrives when given optimal growing conditions. Here are some key factors to consider:
- Sunlight: Garlic requires full sun to grow well. Ensure the garlic patch receives at least 6 to 8 hours of direct sunlight each day.
- Watering: Keep the soil consistently moist, especially during the initial growing phase. However, avoid overwatering, as garlic does not like to sit in soggy soil. Water regularly but make sure the soil has good drainage.
- Mulching: Applying a layer of mulch around the garlic can help retain moisture, suppress weeds, and regulate soil temperature. Straw, grass clippings, or shredded leaves work well as mulch for garlic.
6. Maintaining Your Garlic Plants
As your garlic grows, there are a few things you should do to ensure it stays healthy and productive:
- Thinning the Plants: Once the garlic shoots are a few inches tall, thin out any overcrowded plants to ensure each clove has enough room to grow. Aim for a spacing of 10 to 15 centimeters between plants.
- Fertilization: Garlic does not need heavy fertilization, but it does benefit from the addition of organic compost. You can fertilize the plants once or twice during the growing season to encourage healthy growth.
- Weeding: Keep the garlic patch free of weeds, which can compete for nutrients and water. Mulching will help to prevent most weeds, but be sure to remove any stubborn ones by hand.
7. Harvesting Garlic
Garlic typically takes 6 to 9 months to mature. The best time to harvest garlic is when the lower leaves of the plant begin to yellow and dry out, typically in mid to late summer. Follow these steps for harvesting:
- Check for Maturity: Gently pull up a few bulbs to check their size. If the garlic bulbs are fully formed and the outer skin is papery, they are ready to be harvested.
- Harvesting: Use a garden fork or shovel to lift the garlic bulbs from the soil. Be careful not to damage the bulbs as you dig them out.
- Curing: Once harvested, cure the garlic by hanging it in a cool, dry, and well-ventilated area for 2 to 3 weeks. This process allows the bulbs to dry properly and enhances their storage life.
8. Storing Your Garlic
Once your garlic has been cured, store it in a cool, dark, and dry place. You can keep the garlic bulbs intact for several months. Softneck garlic typically stores the longest, lasting up to 12 months, while hardneck garlic may last for 6 to 9 months.
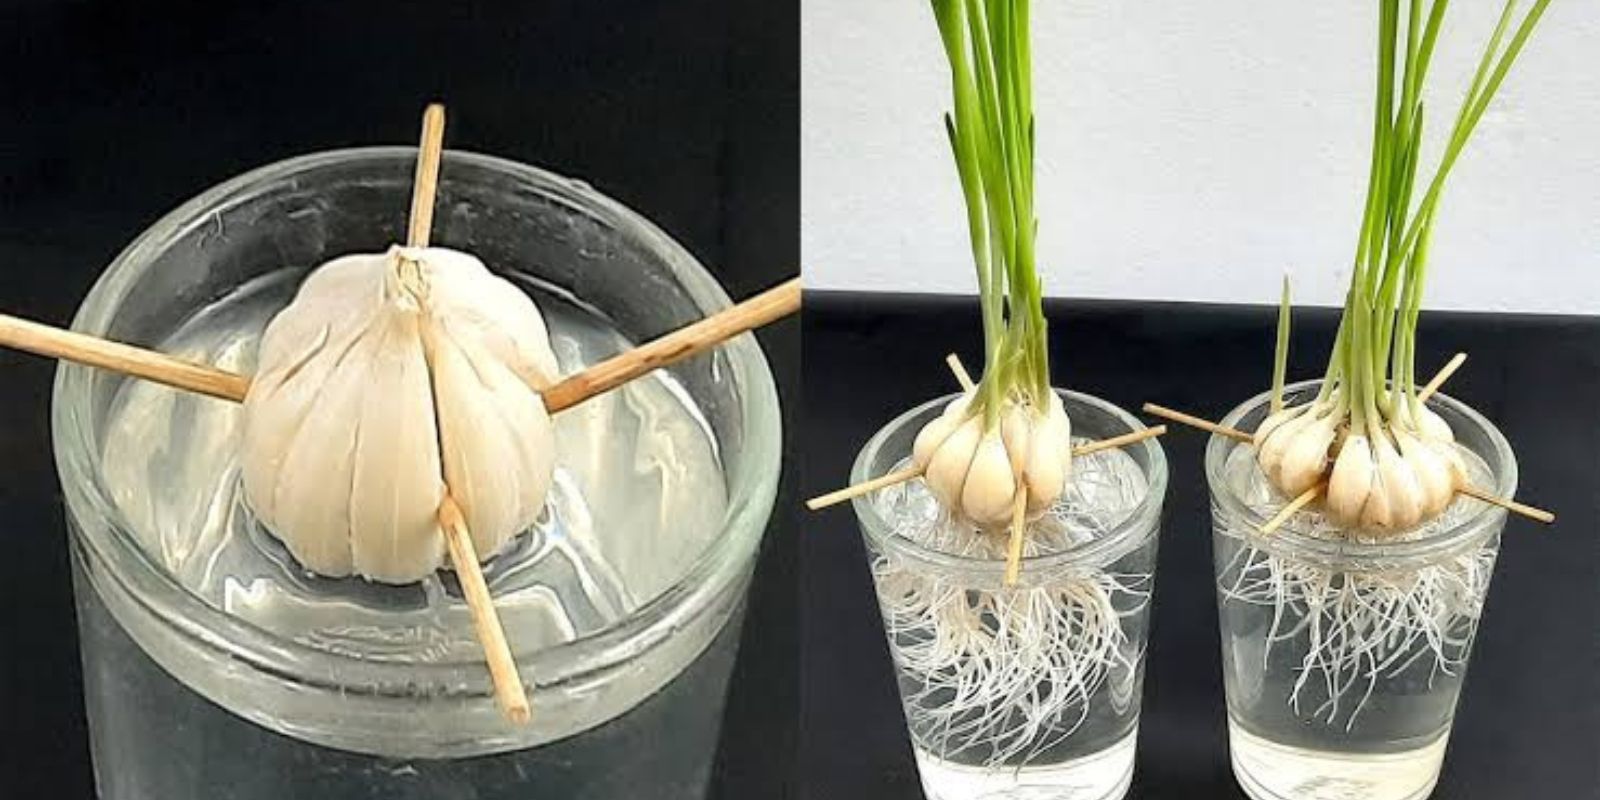
9. Regrowing Garlic from Scraps
One of the best parts of growing garlic is that you can continuously propagate it from kitchen scraps. Here’s how to regrow garlic from leftover cloves:
- Place the root end of a garlic clove in a jar of water, making sure the roots are submerged but the top of the clove remains above the waterline.
- Change the water every few days to prevent rot.
- Once roots and shoots begin to sprout, you can either plant the garlic in soil or continue growing it in a pot or container.
Conclusion
Growing garlic at home is not only easy but can provide you with a continuous and sustainable supply of this flavorful and healthy ingredient. By following the steps outlined above, you can start your own garlic patch today and enjoy fresh, homegrown garlic for cooking and medicinal purposes year-round. Plus, with the ability to regrow garlic from kitchen scraps, you’ll never have to worry about running out of this essential ingredient.
Start planting garlic today and reap the many benefits of this easy-to-grow, low-maintenance crop. With a little patience and care, you’ll have a bounty of garlic ready to harvest and enjoy in your dishes.
#GarlicGrowing #GrowYourOwnFood #HomeGardening #SustainableLiving #GardeningTips #HealthyLiving #UrbanGardening #GrowYourOwnGarlic #HomeGrownGoodness #GreenThumb