
Growing garlic in pots is a rewarding and easy way to enjoy this flavorful herb right from your home. Not only does garlic enhance the taste of countless dishes, but it also offers numerous health benefits. This guide will walk you through every step of the process, from choosing the right containers to harvesting your homegrown garlic.
Introduction
Garlic (Allium sativum) is a versatile and hardy plant that thrives in a variety of conditions, making it an ideal candidate for container gardening. Whether you have a small balcony, patio, or even a sunny windowsill, growing garlic in pots allows you to enjoy fresh bulbs while adding beauty and flavor to your culinary creations. This article provides a comprehensive guide to successfully growing garlic in pots, ensuring that you can harvest your very own bulbs with minimal effort.
Benefits of Growing Garlic in Pots
- Space-Efficient: Container gardening allows you to maximize limited space, making it perfect for urban dwellers or those with small gardens.
- Control Over Conditions: Growing garlic in pots gives you control over soil quality, watering, and light exposure, allowing for better growth conditions.
- Pest Management: Containers can reduce pest infestations, as it’s easier to monitor and manage any issues that arise.
- Aesthetic Appeal: Garlic plants can add greenery and beauty to your outdoor or indoor space, making them a lovely addition to your home.
- Freshness at Your Fingertips: Having fresh garlic readily available enhances your cooking, allowing you to enjoy its full flavor and health benefits.
Step-by-Step Guide to Growing Garlic in Pots
1. Choose the Right Container
The first step in growing garlic in pots is selecting the right container. A pot that is at least 12 inches deep and wide is ideal, as garlic needs ample space for its roots to grow. Ensure that the pot has drainage holes at the bottom to prevent waterlogging, which can lead to bulb rot. You can use clay pots, plastic containers, or even recycled buckets as long as they provide sufficient depth and drainage.
2. Select Quality Garlic Bulbs
The next step is choosing high-quality garlic bulbs for planting. You can purchase garlic bulbs from local garden centers or specialty seed suppliers. Look for firm, plump bulbs with no signs of disease or decay. When selecting varieties, consider your climate:
- Hardneck Varieties: These are better suited for colder climates and tend to produce larger bulbs with more complex flavors.
- Softneck Varieties: These are ideal for warmer regions and typically have a longer shelf life.
3. Prepare the Soil
Garlic thrives in well-draining, fertile soil. A high-quality potting mix enriched with organic matter is ideal. You can create your own mix by combining equal parts potting soil, compost, and perlite or sand to improve drainage. This combination provides the necessary nutrients while allowing excess water to escape, which is crucial for healthy garlic growth.
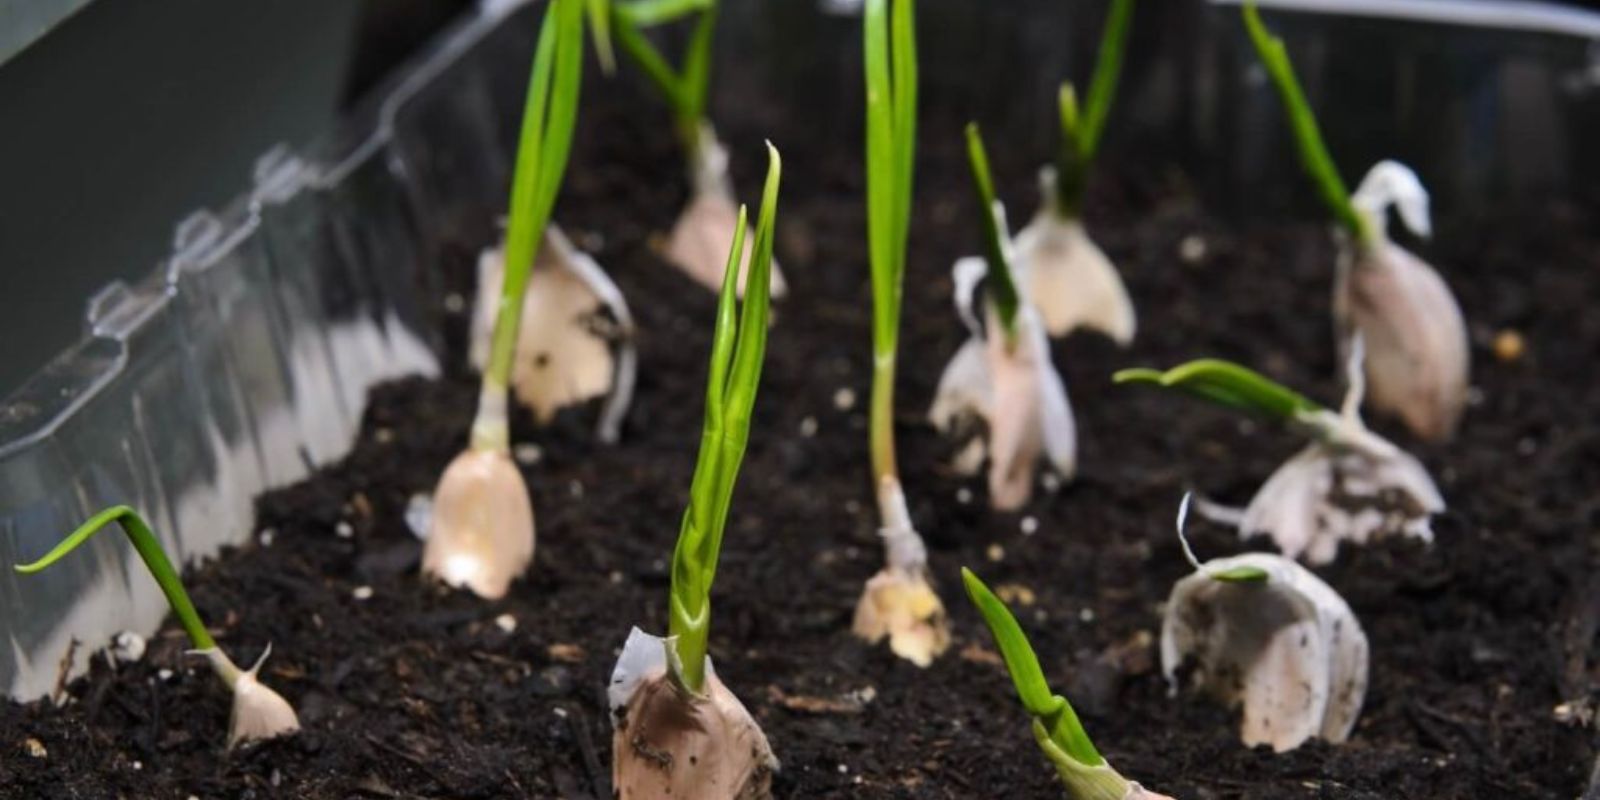
4. Break Apart the Bulbs
Before planting, you’ll need to separate the garlic bulbs into individual cloves. Gently break apart the bulbs, taking care to keep the papery skins intact. Choose the largest and healthiest cloves for planting, as they will produce the best yields. Avoid using grocery store garlic, as it may be treated with chemicals that inhibit sprouting.
5. Plant the Cloves
Now it’s time to plant the garlic cloves. Fill the pot with the prepared soil, leaving about an inch of space at the top. Plant the cloves upright, with the pointy end facing up. Space the cloves about 4-6 inches apart to allow for adequate growth. Cover the cloves with 2 inches of soil and gently press down to eliminate air pockets.
6. Water Wisely
After planting, water the soil thoroughly until it’s evenly moist but not soggy. It’s essential to keep the soil consistently moist throughout the growing season, especially during the early stages of growth. Avoid overwatering, as this can lead to root rot. Use a watering can or a gentle spray nozzle to prevent displacing the soil around the cloves.
7. Provide Adequate Sunlight
Garlic requires plenty of sunlight to thrive. Place your pots in a location that receives at least 6-8 hours of direct sunlight daily. If you’re growing garlic indoors, consider using grow lights to supplement natural light during shorter days. Position the lights about 6-12 inches above the plants and keep them on for 12-16 hours a day.
8. Mulch (Optional)
Applying a layer of mulch can help retain moisture and suppress weeds, making it easier to care for your garlic plants. Use organic materials such as straw, shredded leaves, or grass clippings. Apply a 1-2 inch layer of mulch around the plants, ensuring it doesn’t touch the stems to prevent rot.
9. Monitor for Pests and Diseases
As your garlic grows, keep an eye out for any signs of pests or diseases. Common pests that may affect garlic include aphids and thrips. You can manage these pests organically by using insecticidal soap or neem oil. If you notice any yellowing or wilting leaves, it could indicate a disease, so remove affected leaves to prevent the spread.
10. Fertilization
Garlic benefits from periodic feeding throughout the growing season. Use a balanced, slow-release fertilizer or an organic option, such as compost tea or fish emulsion, every 4-6 weeks. Follow the instructions on the fertilizer package for application rates, ensuring not to over-fertilize, which can lead to excessive leaf growth at the expense of bulb development.
11. Watering During Bulb Development
As your garlic plants grow, it’s essential to adjust your watering schedule. Garlic requires more water during the bulbing stage, typically occurring in late spring to early summer. Monitor the soil moisture and water deeply, ensuring the pots don’t dry out completely.
12. Harvesting Garlic
Garlic is usually ready to harvest when the lower leaves start to turn yellow and brown, typically in mid to late summer. Carefully dig up the bulbs using a garden fork or hand trowel, taking care not to damage them. Gently shake off excess soil, and avoid washing the bulbs at this stage, as it can lead to rot.
13. Curing Garlic
After harvesting, allow the garlic to cure for about two weeks in a cool, dry, and well-ventilated area. This process helps improve flavor and prolong storage life. You can hang the bulbs in bunches or place them on a drying rack. Once cured, trim the roots and cut the stems to about an inch above the bulbs.
14. Storing Garlic
Proper storage is crucial for maintaining the quality of your harvested garlic. Store cured bulbs in a cool, dark place with good air circulation, such as a pantry or cellar. Avoid storing garlic in the refrigerator, as the moisture can lead to sprouting. When stored correctly, garlic can last for several months.
Conclusion
Growing garlic in pots is a rewarding endeavor that provides fresh bulbs for your kitchen while adding greenery to your home. With the right container, quality seeds, and proper care, you can cultivate delicious garlic that enhances your meals and contributes to a healthy diet. So, gather your materials, follow these steps, and enjoy the satisfaction of growing your own garlic!
Start your garlic-growing journey today and savor the taste of homegrown goodness! 🌱✨
#GarlicGardening #ContainerGardening #GrowYourOwnFood #UrbanGardening #HomeGrownGarlic #GardeningTips #PlantToPlate