
Gardening enthusiasts always look for ways to extend their growing season and keep their plants flourishing, even as the temperatures drop. A cold frame is an excellent solution for achieving this, allowing you to start seeds earlier and protect your plants from harsh weather. Building a simple DIY cold frame is not only cost-effective but also a rewarding project that enhances your gardening capabilities.
In this detailed guide, we’ll walk you through the process of building a DIY cold frame, from choosing the right location to assembling the frame and using it effectively. By following these steps, you’ll create a functional and efficient cold frame that will help you grow healthy plants throughout the year.
Understanding the Benefits of a Cold Frame
Before diving into the construction, it’s essential to understand why a cold frame is beneficial:
- Extended Growing Season: Cold frames allow you to start seedlings earlier in the spring and continue growing late into the fall.
- Protection from Elements: They provide shelter from frost, wind, and heavy rain, protecting delicate plants.
- Improved Plant Growth: By trapping heat and sunlight, cold frames create a mini-greenhouse effect, which promotes faster growth and healthier plants.
Materials and Tools Needed
To build your cold frame, gather the following materials and tools:
Materials:
- Wood or PVC Pipes: For constructing the frame (wooden boards for a traditional frame or PVC pipes for a lightweight version).
- Transparent Material: For the lid, such as old windows, plexiglass, or clear plastic sheeting.
- Hinges: To attach the lid to the frame.
- Screws or Nails: For assembling the frame.
- Insulating Material (Optional): For added warmth in colder climates (e.g., foam board or bubble wrap).
Tools:
- Saw: For cutting wood or PVC pipes.
- Drill: For making holes and attaching hinges.
- Screwdriver or Hammer: For fastening screws or nails.
- Measuring Tape: For accurate measurements.
- Paintbrush: For applying paint or sealant, if desired.
Step-by-Step Instructions for Building a DIY Cold Frame
1. Choose the Right Location
Finding the Perfect Spot: Select a sunny location in your garden where the cold frame will receive maximum sunlight. Ideally, the spot should be sheltered from strong winds and have good drainage. South-facing areas are usually best for ensuring the cold frame gets ample sunlight throughout the day.
Consider Accessibility: Make sure the location allows easy access for maintenance and planting.
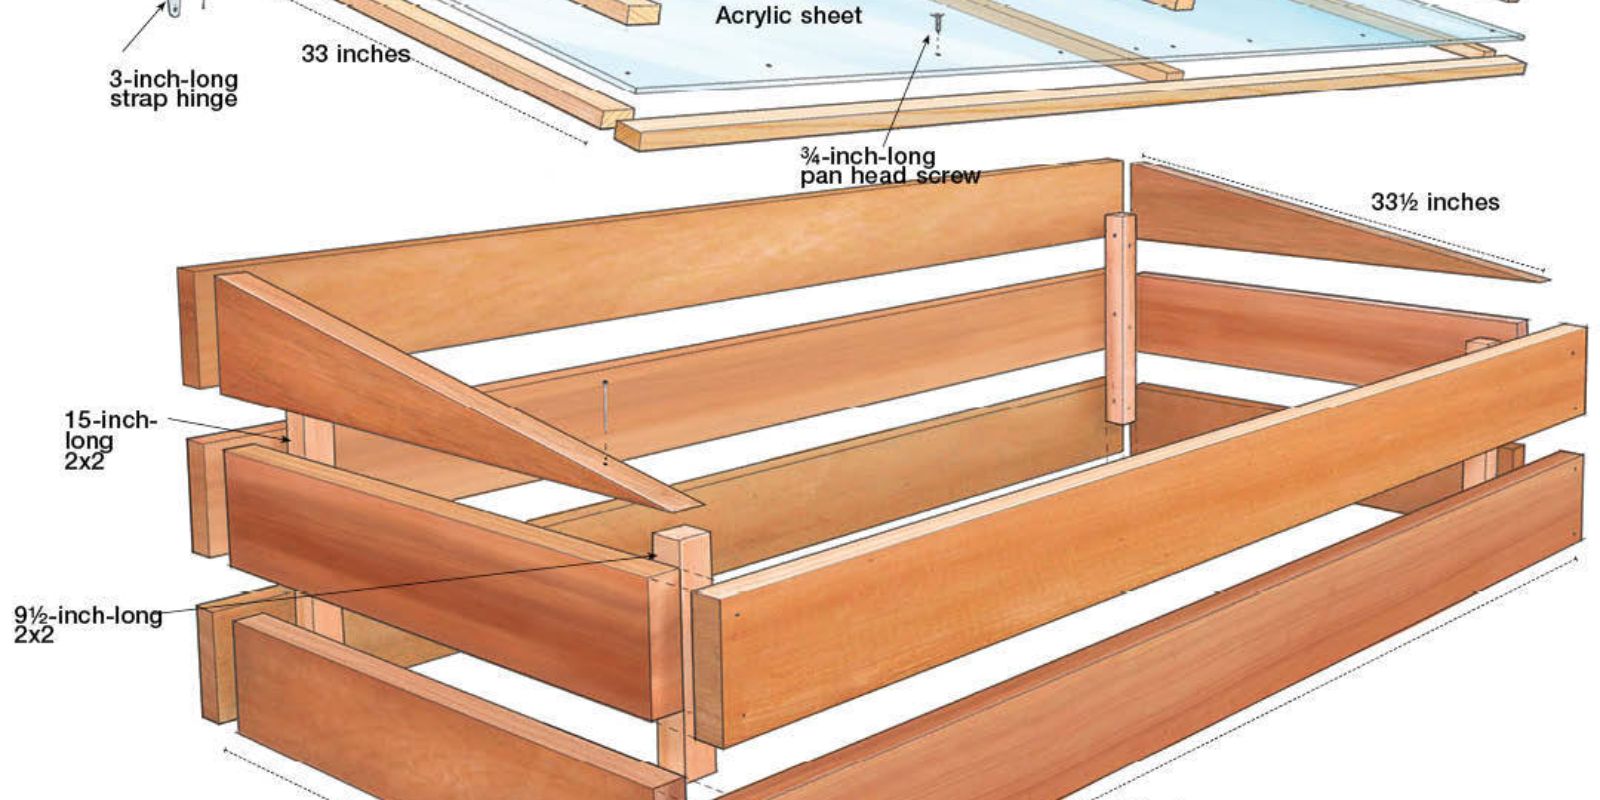
2. Construct the Frame
Building the Base: You can use either wood or PVC pipes to construct the frame. Here’s how to do it for each material:
- Wooden Frame:
- Cut the Wood: Measure and cut the wooden boards to create a rectangular base. Standard dimensions are around 4 feet long, 3 feet wide, and 12 inches high.
- Assemble the Frame: Join the boards together using screws or nails to form a sturdy rectangular base. Reinforce the corners with additional wood for stability.
- Add Support: Include cross braces if needed to ensure the frame’s strength and durability.
- PVC Frame:
- Cut the PVC Pipes: Cut the PVC pipes to the desired lengths for the frame. The same dimensions as the wooden frame can be used.
- Assemble the Frame: Use PVC connectors to join the pipes together, forming a rectangular base. PVC frames are lighter and easier to handle but may require additional support for stability.
3. Add Hinges and a Lid
Creating the Lid: The lid is crucial for allowing light and heat to enter the cold frame while providing easy access for planting and maintenance.
- Select the Lid Material: You can use old windows, plexiglass sheets, or clear plastic sheeting. Ensure the material is transparent to let sunlight through.
- Attach the Hinges: Fix the hinges to one side of the frame and the lid. This setup allows you to lift the lid for ventilation and access. If using old windows, ensure they are securely attached and can be easily opened.
Ensure Proper Sealing: Check for gaps or leaks where cold air might enter. You can use weather stripping or sealant to improve insulation.
4. Insulate the Cold Frame (Optional)
Adding Insulation: If you live in a particularly cold climate, adding insulation can help maintain a more stable temperature inside the cold frame.
- Apply Insulating Material: Line the interior of the frame with foam board or bubble wrap. This additional layer helps retain heat and protects plants from freezing temperatures.
- Cover the Cold Frame: Ensure the insulating material is well-sealed and does not interfere with the lid’s operation.
5. Position and Use the Cold Frame
Setting Up: Once your cold frame is assembled and insulated (if necessary), place it in the chosen location. Ensure it is level and stable.
Using the Cold Frame:
- Planting: Start seeds or transplant seedlings into the cold frame. Be mindful of the temperature inside; you may need to open the lid on sunny days to prevent overheating.
- Ventilation: Regularly open the lid to provide ventilation and prevent the buildup of excessive heat and humidity.
- Monitoring: Keep an eye on the weather and adjust the cold frame’s ventilation and insulation as needed to maintain an optimal environment for your plants.
Maintenance and Care
Maintaining your cold frame is essential for ensuring its longevity and effectiveness:
- Clean the Lid: Regularly clean the transparent lid to allow maximum sunlight to penetrate.
- Inspect for Damage: Check for any cracks or damage to the frame and repair them promptly.
- Adjust Insulation: Update or replace insulation as needed based on seasonal temperature changes.
Conclusion
Building a DIY cold frame is a rewarding project that offers numerous benefits for extending your gardening season and protecting your plants. By following these steps and incorporating thoughtful design and materials, you can create a functional and efficient cold frame that supports your gardening goals.
Whether you use it to start seedlings earlier in the spring or keep your plants growing through the fall, a cold frame enhances your garden’s productivity and resilience. Ready to build your own? Start the project today and share your progress with the gardening community using #DIYColdFrame #WinterGardening #GardenHacks #ExtendYourSeason. Embrace the opportunity to grow year-round and enjoy the fruits of your labor in every season!