
Gardening is an incredibly rewarding hobby, but it does come with its set of challenges. One of the most frustrating issues gardeners face is the unpredictability of weather. A sudden cold snap can ruin a crop, and a hot summer day can cause your delicate plants to wilt. However, there’s a simple, affordable solution to mitigate this: creating a mini greenhouse using hula hoops.
Building your own mini greenhouse doesn’t require expensive tools or complex building skills. Instead, by utilizing a few basic materials, you can create a sturdy and efficient greenhouse that will keep your plants warm and protected. Using hula hoops is a budget-friendly option that can help you create a fun and functional mini greenhouse for your garden or balcony.
In this article, we will guide you step-by-step on how to build a DIY mini greenhouse with hula hoops, so you can extend your growing season, protect your plants, and enjoy a flourishing garden all year round.
Why Build a Mini Greenhouse?
Before diving into the process of building the greenhouse, it’s essential to understand why this structure is so beneficial. A mini greenhouse is essentially a small, enclosed structure designed to create a controlled environment for plants. It provides warmth, protection from pests, and shields your plants from harsh weather conditions such as frost, wind, and excessive heat.
Some of the primary benefits of a mini greenhouse include:
- Extended Growing Season: A mini greenhouse helps keep plants warm and protected during the cooler months, allowing you to start your plants early and extend the harvest season.
- Protection from Frost: During the colder months, a mini greenhouse can provide an essential barrier to prevent frost from damaging your delicate crops, especially for plants like tomatoes, peppers, and leafy greens.
- Pest Protection: A mini greenhouse can keep insects and critters away from your plants, reducing the need for pesticides and giving your crops a healthier environment to grow in.
- Affordable and Customizable: The materials required for this greenhouse are inexpensive, and you can easily adjust the design to fit the needs of your garden.
Now that we’ve established why you should build one, let’s dive into how you can construct your very own DIY mini greenhouse with hula hoops.
Materials You’ll Need
Building a mini greenhouse with hula hoops is incredibly simple and requires just a few basic materials. Here’s a list of what you’ll need:
- Hula Hoops: The hula hoops serve as the primary frame for your greenhouse. They’re flexible, lightweight, and easy to work with.
- PVC Pipes or Rebar: These will act as anchors to hold the hula hoops in place.
- Clear Plastic Sheeting: This is essential for covering the hula hoops to create the greenhouse effect.
- Zip Ties or Twine: You’ll use these to secure the hula hoops to the frame and keep the plastic sheeting in place.
- Stakes: These will help keep the PVC pipes or rebar stable in the ground.
- Scissors or a Utility Knife: To cut the plastic sheeting to size.
Once you have all your materials, you’re ready to get started.
Step-by-Step Instructions for Building a DIY Mini Greenhouse with Hula Hoops
Step 1: Set Up the Base Frame
Begin by determining where you want to place your mini greenhouse. It can be in your garden, on your balcony, or even in your yard. The location should receive plenty of sunlight for your plants to thrive.
Using the PVC pipes or rebar, create the base structure of your greenhouse. The pipes will serve as the anchor points for the hula hoops. If you’re using PVC pipes, drive them deep into the ground (approximately 12–18 inches) to ensure that they are secure. If you’re using rebar, hammer the rebar stakes into the ground.
The base frame should be wide enough to accommodate your plants, but not too large that the structure becomes unstable. A width of 3 to 4 feet should suffice for most home gardening needs.
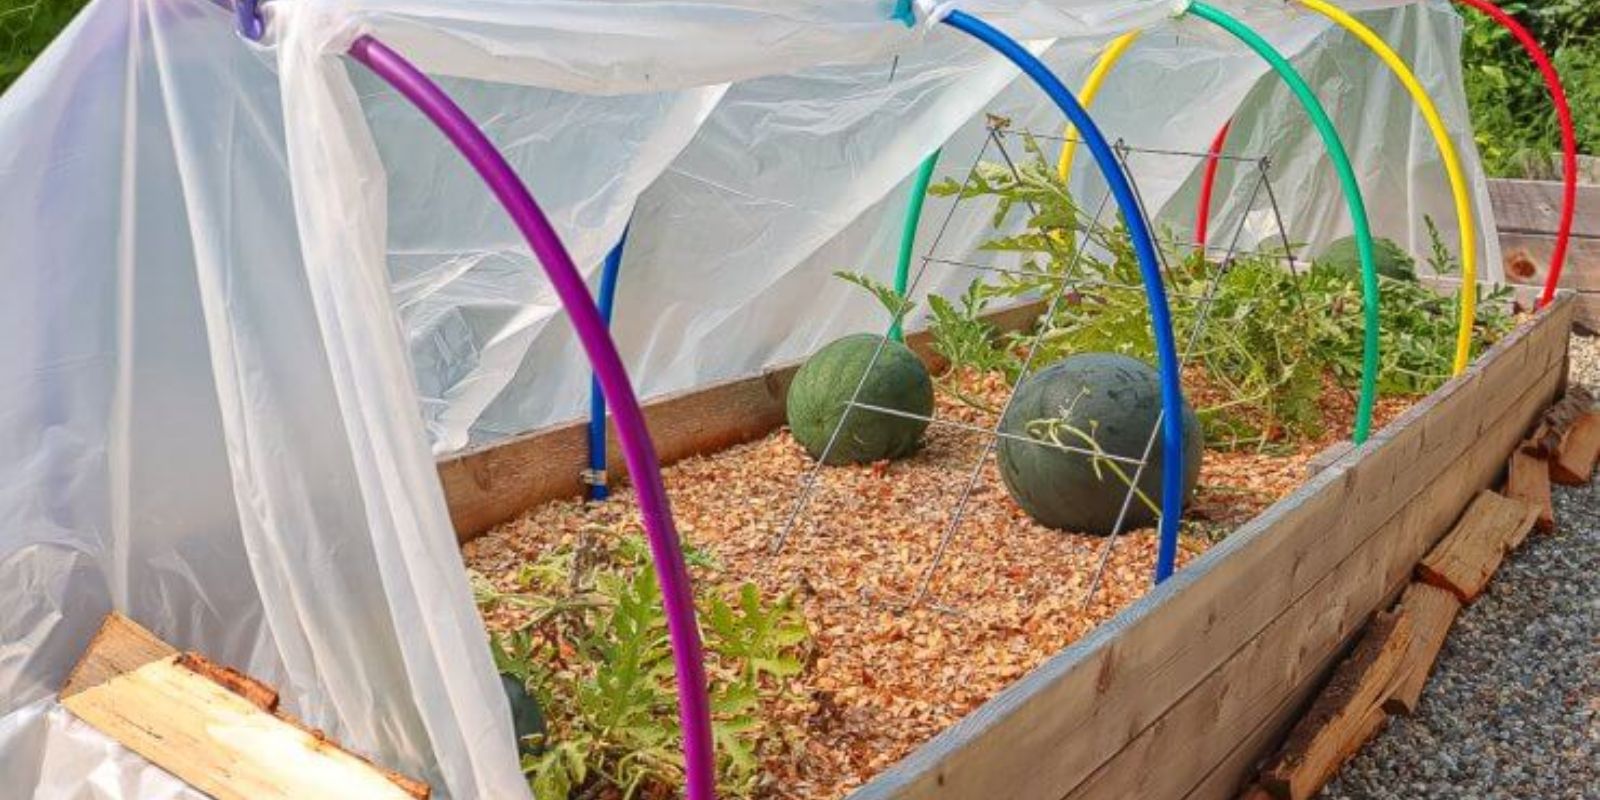
Step 2: Place the Hula Hoops
Now that the base frame is set up, it’s time to add the hula hoops. These will form the arching structure of your greenhouse.
Take each hula hoop and place it over the PVC pipes or rebar. The hula hoops should arch naturally and cover the entire length of the frame. The number of hula hoops you need will depend on the width and length of your greenhouse. Usually, 4 to 6 hula hoops will suffice for a medium-sized greenhouse.
Secure each hula hoop to the frame using zip ties or twine. Ensure they are tightly fastened so they don’t shift or fall out of place.
Step 3: Cover with Plastic Sheeting
Once your hula hoops are securely in place, it’s time to cover the frame with plastic sheeting. This clear plastic will allow sunlight to pass through, creating a warm environment inside the greenhouse while also trapping moisture to keep the plants hydrated.
Start by rolling out your clear plastic sheeting over the entire structure. Be sure the plastic drapes down both sides of the frame to provide full coverage. Cut the plastic to fit the width and length of the greenhouse, leaving a little extra material on each end to secure it.
Use zip ties or twine to attach the plastic sheeting to the hula hoops, making sure it’s taut and secure. If you prefer, you can also add clips or clothespins to hold the plastic in place.
Step 4: Secure the Sides
Once the plastic sheeting is attached to the hula hoops, secure the edges of the plastic to the ground to keep it from blowing away or shifting. You can use rocks, bricks, or even additional stakes to weigh down the plastic. If you want easy access to your plants, you can leave one side of the plastic unsecured so you can roll it up or down depending on the weather.
For better ventilation, consider adding a flap or a removable section of plastic on either side to allow for airflow. Ventilation is crucial to prevent overheating on warm days.
Step 5: Enjoy Your Mini Greenhouse
With your DIY mini greenhouse complete, you’re ready to start planting! Whether you’re growing seedlings or trying to extend your growing season, this simple greenhouse will provide the perfect environment for your plants to thrive. You’ll have protection from the elements, longer growing seasons, and healthier crops!
Tips for Success
- Sunlight: Ensure that your mini greenhouse is placed in a spot that receives adequate sunlight. Without enough light, your plants may not thrive.
- Watering: Keep the soil in your mini greenhouse moist, but not waterlogged. Be mindful of how the plastic affects moisture levels, as the greenhouse effect can cause the soil to dry out faster than expected.
- Temperature Regulation: On particularly sunny days, your greenhouse may get very hot. Ventilate it by rolling up the sides of the plastic to let some air in and cool things down.
- Plant Selection: Ideal plants for a mini greenhouse include leafy greens like lettuce and spinach, herbs, and seedlings that need protection from the elements.
Conclusion
Building a DIY mini greenhouse with hula hoops is a cost-effective and easy way to protect your plants and improve your gardening experience. With just a few materials, you can create a stable and functional greenhouse that will keep your plants warm and thriving all year round.
This project is perfect for beginner gardeners or those who want to try their hand at season extension without breaking the bank. Not only does it offer a practical solution for growing in challenging climates, but it also provides a creative way to get more from your garden.
Start building your hula hoop greenhouse today, and watch your plants flourish like never before!
#GreenhouseDIY #HulaHoopGreenhouse #HomeGardening #UrbanGardening #PlantProtection #SeasonExtension #GardeningOnABudget #DIYGarden