
One of the most common challenges for plant owners is ensuring that their plants are well-watered when they’re away on vacation or business trips. It’s easy to get lost in the excitement of travel, but the stress of leaving your precious plants unattended can often dampen the joy of your getaway. Fortunately, there’s a simple, cost-effective solution—creating your own automatic watering system at home. Not only does this ensure your plants stay hydrated, but it also eliminates the need for a costly professional watering service.
This guide walks you through an easy step-by-step process for building your own homemade irrigation system using materials you probably already have lying around the house. With just a few simple supplies, you can build a reliable system to keep your plants thriving while you’re away for days or even weeks. Let’s get started!
Why Use an Automatic Watering System?
Before jumping into the how-to, let’s quickly explore why an automatic watering system is such a good idea for your plants:
- Convenience: You won’t have to rely on friends or neighbors to water your plants while you’re away. Plus, no need to worry about forgetting to water them yourself.
- Consistency: Automatic systems provide your plants with a steady, controlled amount of water, ensuring they don’t get too dry or overwatered.
- Stress-Free Travel: No more worrying about whether your plants are receiving the care they need. You can enjoy your vacation knowing your plants are being taken care of.
- Cost-Effective: Creating your own system at home is incredibly cheap, and you can customize it based on your needs.
Now, let’s walk through the steps to make your own simple and effective watering system for your indoor or outdoor plants.
Materials You’ll Need
To build your automatic watering system, gather the following materials:
- Plastic Bottle – Any size bottle will do, but larger ones (1-2 liters) are ideal for providing longer watering time.
- Plastic Straw – A standard drinking straw works well, but a plastic tube or a longer piece of plastic tubing can be used depending on your design.
- Syringe Needle or Needle (Optional) – This is used for controlling the water flow.
- Scissors – For cutting the straw and the bottle.
- Glue – You’ll need a strong adhesive to seal the straw in place and ensure there are no leaks.
- Drill or Small Nail – To create a small hole in the bottle cap.
- Water – Obviously, you’ll need water to fill the system!
- Plants – The system is useless without plants to water!
Now that you have your materials ready, let’s begin building the system.
Step-by-Step Instructions to Build Your DIY Automatic Watering System
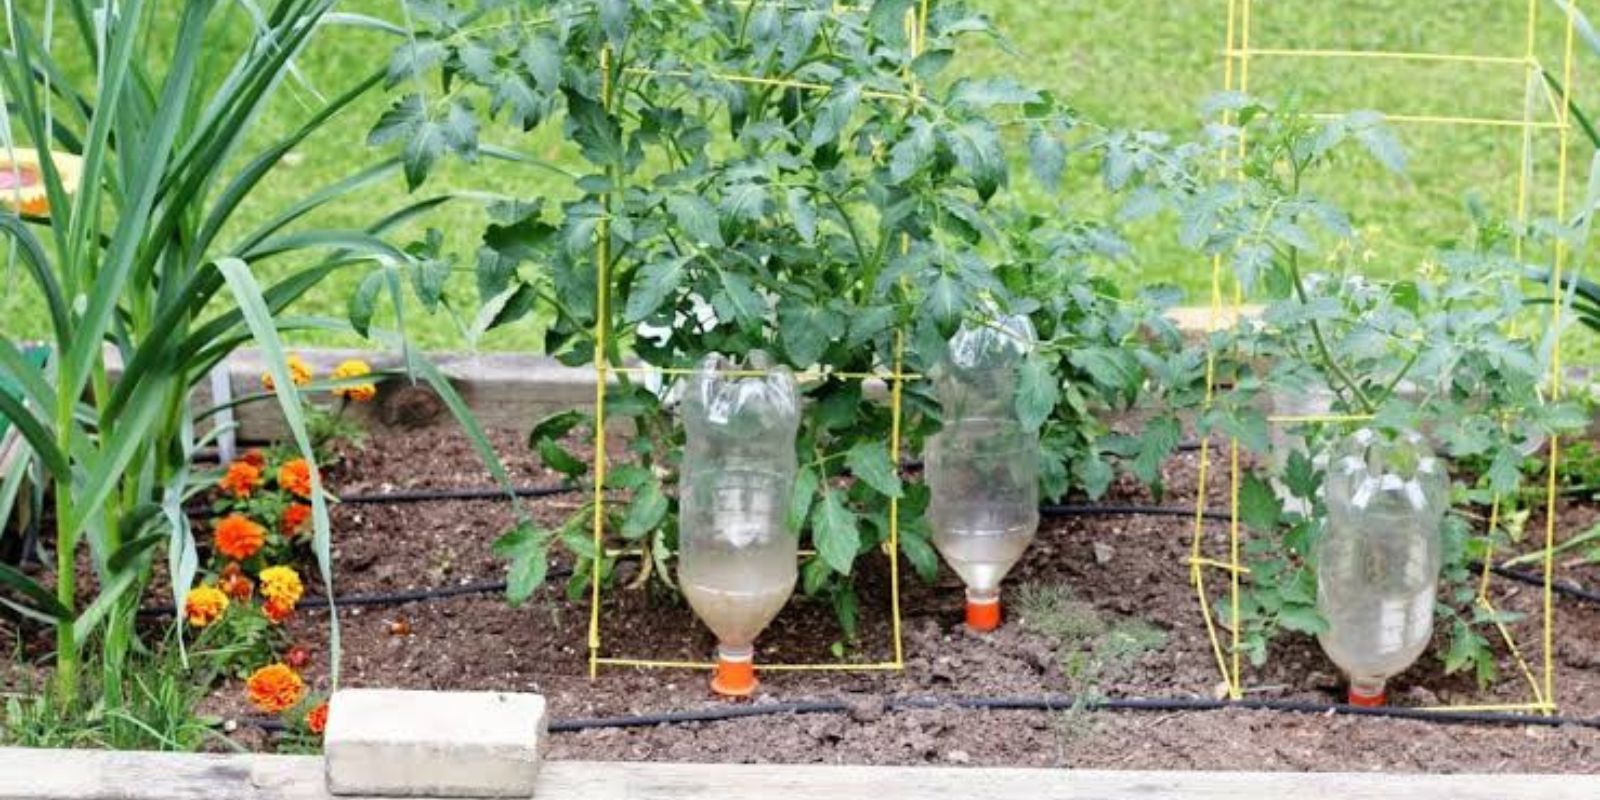
Step 1: Prepare the Plastic Bottle
Start by cutting one end of the plastic straw. You want to ensure that the straw is hollow so it can regulate the air and water flow within the bottle. Cut the straw to your desired length, but generally, a piece between 6-10 inches is sufficient for most plants. You will insert this piece into the bottle to allow air regulation.
Step 2: Create a Hole for the Straw in the Bottle Cap
Next, take the cap of your plastic bottle and pierce a small hole in the center. Use a drill, small nail, or another sharp tool to create the hole. The size of the hole should be just big enough to snugly fit the cut end of your plastic straw.
Make sure the hole is centered to ensure that your system is balanced. You can test the size by gently inserting the straw into the hole before proceeding to the next step. If it’s too loose, you can enlarge the hole a little; if it’s too tight, you can adjust the size with your tool.
Step 3: Attach the Straw to the Bottle Cap
Once the hole is ready, insert the cut end of the straw through the hole in the cap. Secure the straw in place using glue to prevent any water from leaking. It’s important that the connection between the straw and the cap is tight and waterproof to avoid spills.
Ensure that the straw stays straight and steady, as any tilting could affect the water flow. Let the glue dry for a few minutes to ensure that the connection is stable.
Step 4: Insert the Syringe Needle for Water Flow Control
This step is optional but highly recommended if you want precise control over the water flow. Insert a syringe needle near the bottom of the bottle, ensuring the sharp end is facing inside the bottle. This will serve as the water outlet of your system, regulating how much water is released at a time.
The syringe needle can be placed directly into the plastic bottle’s side or, if you have a longer piece of tubing, it can be connected to the straw at the other end. The sharp end will ensure that the water is slowly released in a steady drip, perfect for your plants.
Step 5: Fill the Bottle with Water
Now that your system is assembled, it’s time to fill the bottle with water. The amount of water you use will depend on how long you plan to be away and how much water your plants need. For a short trip, a 1-liter bottle will work, but for longer vacations, you might want to go with a larger bottle to provide consistent hydration for your plants.
Make sure the water is clean and fresh, and pour it into the bottle slowly to avoid splashing. Once filled, screw the cap (with the straw attached) back on tightly.
Step 6: Position the Bottle Near the Plant
Now that your system is ready, place the bottle near the plant you want to water. Position the syringe needle or straw in such a way that the water drips directly onto the soil. You can place the bottle on the soil surface, making sure the needle is near the base of the plant where it can deliver water to the roots.
If you are using multiple bottles for multiple plants, ensure each bottle is placed in the right location for each specific plant.
Step 7: Test the System
Before you leave, it’s essential to test the system to ensure everything is working as expected. Leave the system running for a full day or two, and observe the water flow. Adjust the syringe needle or straw to control the drip rate if necessary.
The water should be flowing slowly but consistently, ensuring your plants are hydrated without over-watering them.
Step 8: Enjoy Your Stress-Free Vacation!
Once the system is running smoothly, you can now head off on your vacation without worrying about your plants. The system will continue to release water gradually, keeping your plants hydrated and happy while you’re away.
Tips for Customizing Your DIY Watering System
- Adjust the Flow Rate: If you have larger plants or a larger garden, you might need to increase the water flow. You can adjust the syringe needle size or use a larger straw for bigger plants.
- Multiple Bottles: For multiple plants, simply repeat the process and use more bottles. You can even connect several bottles together using tubing to water a larger area.
- Temperature Considerations: Keep in mind that higher temperatures will cause the water to evaporate faster, so plan accordingly.
- Indoor vs. Outdoor: If you’re using this system outdoors, ensure that the bottles are placed somewhere protected from the wind and extreme sunlight.
Conclusion
This DIY automatic watering system is an incredibly practical and affordable way to keep your plants hydrated while you’re away. By following these simple steps, you can build a system tailored to your needs and enjoy peace of mind while traveling. Whether you’re going on a short weekend getaway or a longer vacation, your plants will remain nourished and happy.
So, next time you’re preparing for a trip, don’t fret about your plants—just set up this easy watering system and enjoy your time away without any stress!
Gardening is a joy that can be enjoyed anywhere, even when you’re away! Try out this DIY system and share your gardening hacks with us!