
If you’re passionate about growing chillies and want to take your gardening game to the next level, then grafting might be just the technique you need. Grafting is a horticultural method where you join parts of two different plants to grow as one. By grafting a chilli plant onto another, you can combine the best traits of both plants, resulting in more vigorous growth, higher resistance to diseases, and better fruit production. This guide will take you step-by-step through the chilli plant grafting method, ensuring you can master this technique and enjoy a bountiful harvest of strong, healthy chillies.
What is Chilli Plant Grafting?
Grafting is the process of joining a part of one plant, called the scion, onto another plant, known as the rootstock. The rootstock is responsible for providing the root system and water, while the scion contributes the desired fruiting characteristics. In the case of chilli plants, grafting allows you to combine the best of two different varieties, creating a hybrid plant that benefits from the strengths of both.
For instance, the rootstock may be a chilli plant that is particularly resilient to soil-borne diseases or pests, while the scion could be a variety known for its exceptional fruit yield and flavor. Grafting allows gardeners to optimize plant health and maximize yields in a controlled environment, making it especially useful for those growing chillies in areas with challenging conditions.
Why Graft Chilli Plants?
While grafting might seem like an advanced technique, it offers several compelling benefits:
- Improved Disease Resistance: Grafting can help your chilli plants resist common diseases and pests that affect their roots, which is especially beneficial in areas prone to soil-borne diseases like root rot and nematodes.
- Stronger Root System: By grafting onto a more robust rootstock, the scion benefits from a healthier and more vigorous root system, resulting in more resilient plants.
- Better Growth in Poor Soil: Some rootstocks are more tolerant of poor or compacted soils, enabling your chilli plants to thrive even in less-than-ideal conditions.
- Increased Fruit Yield: Grafting allows you to choose a scion that is known for its high-yielding potential, while benefiting from the strong root system of the rootstock.
- Adaptation to Climate: By selecting rootstocks that are better suited to the local climate or environmental conditions, you can improve the overall success of your chilli plant.
When Should You Graft Chilli Plants?
The ideal time to graft chilli plants is during their early growth stage, ideally when the plants are about 4–6 weeks old. At this stage, the plants are mature enough to handle the grafting process, but still young enough to be flexible and take to the grafting technique. For best results, grafting should be done in a controlled environment where the temperature is warm, and the plants have access to adequate humidity and light.
The Chilli Plant Grafting Process: Step-by-Step
While grafting may seem like a complicated process, with the right tools and a little patience, you can easily graft your own chilli plants. Follow this detailed step-by-step guide to ensure success.
Step 1: Choose Your Rootstock and Scion
The first step in the grafting process is to select the appropriate plants for the rootstock and scion. For the rootstock, choose a chilli variety that is known for strong roots and good disease resistance. This can be a chilli plant that has been bred specifically for these traits or a hardy, well-established variety.
For the scion, select a variety with the characteristics you want to see in your fruit, such as high yield, flavor, or specific heat levels (like the heat of a habanero or the sweet flavor of a bell pepper).
Step 2: Prepare Your Tools and Workspace
Before you begin grafting, gather all the necessary tools and prepare your workspace. Here’s what you’ll need:
- Sharp knife or grafting tool: A clean, sharp knife or grafting tool will make clean cuts and reduce the risk of damaging the plants.
- Grafting tape or rubber bands: You’ll need something to bind the graft together and hold the scion and rootstock in place.
- Sterilizing solution: Ensure your tools are sanitized before use to prevent transferring diseases.
- A clean cutting surface: Work on a clean surface to ensure there is no contamination.
- Plastic grafting clip or a small plastic bag: This helps to seal the graft and maintain humidity as the graft heals.
- Warm, shaded area: Keep the grafted plants in a warm, shaded location to promote healing without direct sunlight.
Step 3: Make the Grafting Cut
Once your rootstock and scion are ready, it’s time to make the grafting cut. Here are the steps for cutting both parts:
- Cut the rootstock: Use a sharp knife to cut the rootstock just above the soil line. The cut should be made at a slight angle to increase the surface area where the graft will join.
- Cut the scion: Similarly, cut the scion at a matching angle, making sure the cuts are clean and even. The scion should be a healthy, strong cutting with a few leaves or buds, as these will eventually grow into the fruiting branches of the plant.
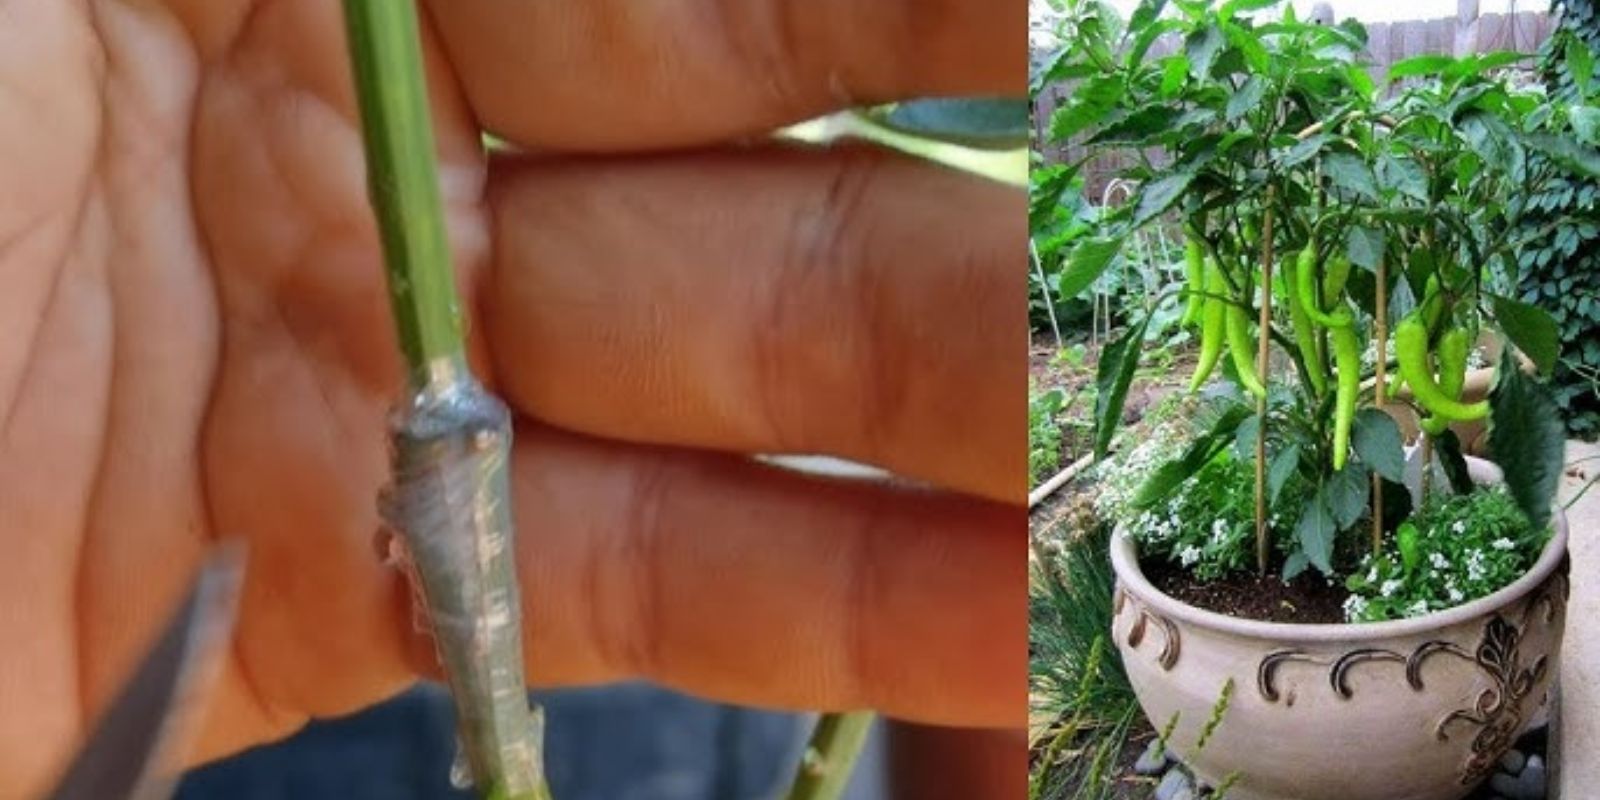
The key to successful grafting is ensuring the cut surfaces of both the scion and the rootstock match up perfectly. The cambium layer (just beneath the bark) of both parts needs to be in direct contact for successful grafting.
Step 4: Join the Scion and Rootstock
Once the cuts are made, place the scion and rootstock together so the cut surfaces align and make contact. Ensure that the cambium layers (the living part of the stem) are touching. This is crucial for the graft to heal and form a connection.
Step 5: Secure the Graft
To keep the scion and rootstock together, use grafting tape or rubber bands to hold the two parts in place. Wrap the tape or band tightly around the graft but not so tight that it cuts into the plant tissues. The goal is to secure the graft until the plant heals and the union becomes strong.
If you have a grafting clip, place it over the graft to secure it in place. You can also cover the graft with a small plastic bag or plastic dome to help retain moisture and humidity while the graft heals.
Step 6: Care for the Grafted Plant
After grafting, place the plant in a warm, shaded spot to allow the graft to heal. During the healing process, it’s crucial to maintain high humidity and warmth. Water the plant carefully, ensuring that it doesn’t dry out. The graft should heal in 1–2 weeks, depending on environmental conditions.
Once the graft has healed and the scion begins to grow, remove the grafting tape or bands gently to avoid damaging the plant. At this point, the plant is ready to be transplanted into a larger pot or your garden, depending on its size and growth.
Tips for Successful Chilli Plant Grafting
- Keep everything sterile: Cleanliness is crucial to prevent infection. Sterilize your tools before use and work in a clean environment.
- Choose compatible plants: While you can graft different types of chillies onto each other, make sure that the rootstock and scion are compatible. They should belong to the same plant family to ensure successful grafting.
- Maintain moisture levels: Grafting can be stressful for plants, so it’s essential to keep them well-watered, especially in the early stages after grafting.
- Avoid direct sunlight: After grafting, keep the plant in a shaded location to reduce stress and encourage healing.
- Practice patience: Grafting takes time, and it may take a few tries to perfect the technique. Don’t be discouraged if your first attempt doesn’t work out.
Conclusion
Grafting chilli plants is a highly effective method for enhancing plant health, improving yields, and making the most of your gardening space. By combining the best characteristics of different chilli varieties, grafting gives you the power to grow stronger, more productive plants. Whether you’re a seasoned gardener or just starting, the process of grafting can be a fun and rewarding experience. With a little practice and the right approach, you can graft your way to a more abundant chilli harvest!
Get ready to experiment with grafting in your garden, and don’t forget to share your success stories with fellow gardening enthusiasts!