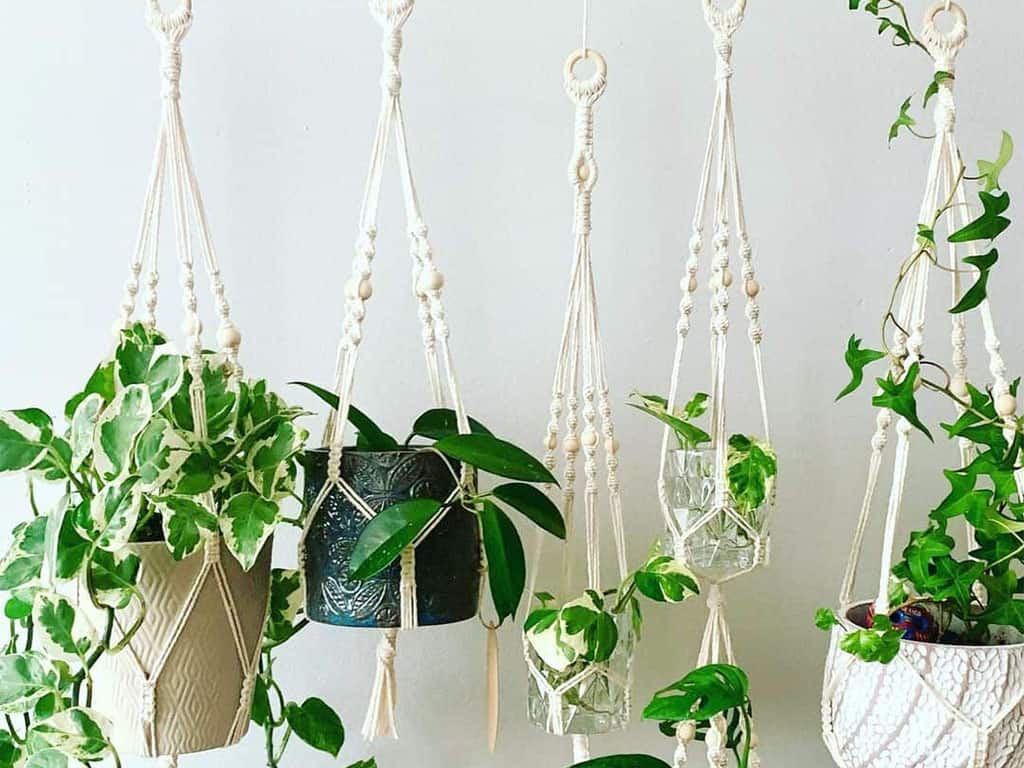
Hanging plants are a fantastic way to add greenery to your home without taking up floor space. They bring life, color, and a sense of nature into any room, balcony, or patio. If you’ve ever wanted to incorporate hanging plants but didn’t know where to start, this guide is perfect for you. Your ultimate guide to how to make a hanging plant holder! will walk you through everything—from choosing materials and styles to crafting and hanging your holder safely.Whether you live in the United States, the United Kingdom, or Canada, creating a hanging plant holder is an achievable and rewarding DIY project. With a little creativity and guidance, you can transform your indoor or outdoor space into a lush, vibrant oasis.Why Make a Hanging Plant Holder?Hanging plant holders are not just decorative—they offer practical benefits too:Space-saving: Ideal for apartments or small rooms.Aesthetic appeal: Adds layers, texture, and color to your decor.Plant health: Improves light access for certain plants.Creative expression: Customize materials, patterns, and styles.By learning how to make a hanging plant holder, you can combine functionality with personal style.Materials You’ll NeedThe materials depend on the type of holder you want, but here are common options:Basic MaterialsRope, jute, or macrame cordWooden or metal ring (for top support)Plant pot (with or without drainage holes)ScissorsMeasuring tapeOptional EnhancementsBeads or decorative knotsPaint or stain for wooden elementsHooks for ceiling or wall mountingChoosing the right materials ensures your holder is both sturdy and stylish.Step-by-Step Guide: Making a Hanging Plant HolderStep 1: Measure and Cut the CordDetermine the height you want your plant to hang.Cut four to six pieces of cord, each about 4–5 times the desired hanging length.Extra length allows for knots and adjustments.Step 2: Secure the Top RingGather all cords and fold them in half.Loop the midpoint through the ring using a lark’s head knot.Pull tight so the cords are securely attached.This forms the top anchor point of your hanging plant holder.Step 3: Create the Basket SectionDivide cords into pairs.Tie square knots about 4–5 inches down from the top.Repeat with each pair at the same distance.This crisscross pattern forms the structure to hold the pot securely.Step 4: Form the BaseGather all cords about 4–5 inches below the last set of knots.Tie them together with a strong overhand knot.Trim excess cord, leaving a small fringe if desired.Your base now cradles the pot safely.Step 5: Insert the PlantChoose a pot that fits snugly into the holder.Place the plant inside carefully.Adjust knots and spacing to ensure the pot is level.Step 6: Hang Your Plant HolderUse a ceiling hook or wall bracket rated for the weight of your plant.Double-check that knots and cord are secure before adding the plant.Ensure the plant has adequate sunlight and water access.Tips for a Beautiful and Safe Hanging Plant HolderChoose the right cord thickness: Thicker cords support heavier plants.Even spacing: Keep knots evenly spaced for a balanced appearance.Pot weight: Consider soil and plant weight when selecting materials.Indoor vs. outdoor: Some materials withstand weather better than others.These tips make your holder both practical and visually appealing.Creative Ideas for Customizing Your HolderMacrame patterns: Experiment with intricate knots for texture.Decorative beads: Add wood or glass beads along the cords.Painted pots or rings: Match your decor or create a contrasting pop of color.Multiple tiers: Hang smaller holders from one main hook for a cascading effect.Personalizing your project makes it uniquely yours.Common Mistakes to AvoidUsing cords that are too thin or weakHanging from a ceiling hook not rated for weightNeglecting to adjust knots for a level holdIgnoring pot drainage, which can lead to water damageAvoiding these ensures safety and longevity for your plants.Best Plants for Hanging HoldersIndoor favorites: Pothos, spider plant, philodendron, fernsOutdoor options: Petunias, ivy, trailing succulents, fuchsiaFlowering varieties: Orchids, begonias, or miniature rosesSelect plants suited to your environment and light conditions.Maintenance TipsWater according to plant needs—some may need drip trays to catch excess water.Trim trailing vines to maintain shape.Dust leaves occasionally to allow proper photosynthesis.Check knots and cords periodically for wear.Proper care keeps your hanging garden thriving for years.Why This DIY Project Works in the US, UK, and CanadaMaterials are widely available in craft stores or online.The project adapts to small apartments, balconies, or outdoor spaces.Suitable for all seasons and climates with proper plant selection.No matter where you live, this DIY is accessible and highly rewarding.ConclusionCreating your own hanging plant holder is a fun, creative, and practical way to bring greenery into your home. With this step-by-step guide, you now have your ultimate guide to how to make a hanging plant holder! at your fingertips. From selecting materials to knotting the perfect macrame pattern, you can craft a piece that’s functional, stylish, and perfectly tailored to your space.Whether you’re an experienced DIYer or trying this for the first time, a handmade hanging plant holder adds charm, life, and personality to any room, patio, or balcony. Start your project today and elevate your home with the beauty of suspended greenery. 🌿✨