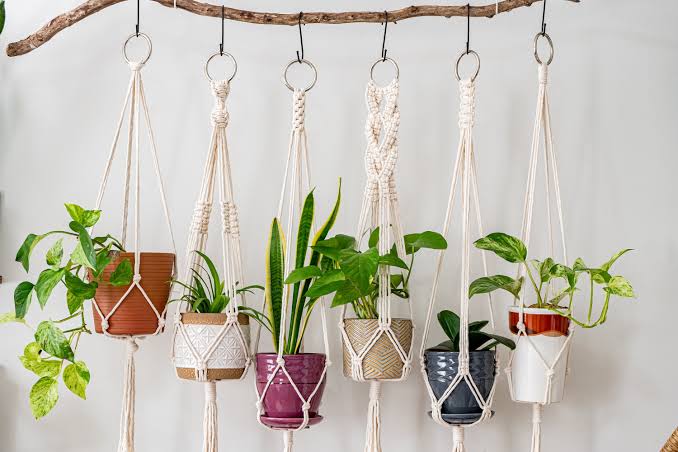
If you love adding greenery to your home but feel limited by floor or shelf space, hanging plant holders are the perfect solution. They add beauty, depth, and a touch of creativity to any indoor or outdoor space. Whether you’re a DIY beginner or a plant lover looking to expand your decorating skills, Your ultimate guide to How to make a hanging plant holder! will show you everything you need to know. This step-by-step resource blends easy instructions, practical tips, and stylish ideas to help you craft a plant holder that’s unique, sturdy, and tailored to your space.Hanging plant holders have become a growing trend in the United States, United Kingdom, and Canada—especially in apartments, small homes, and gardens where floor space is at a premium. With a bit of creativity and simple tools, you can design a holder that elevates your plants and your décor at the same time.Why Create Your Own Hanging Plant Holder?Before diving into the crafting process, it’s helpful to understand why DIY designs are so popular. Making your own plant hanger offers several benefits:Customization — Choose materials, lengths, colors, and stylesAffordability — DIY versions cost much less than store-bought holdersSustainability — Use recycled or natural materialsCreativity — Add your personality to your plant displayThese advantages make DIY projects rewarding, giving even beginners the confidence to start experimenting. That’s why Your ultimate guide to How to make a hanging plant holder! is perfect for plant lovers of all skill levels.H2: Materials You Can Use to Make a Hanging Plant HolderCrafting a plant hanger doesn’t require expensive supplies. In fact, some of the best designs use common household items. Below are several popular materials to consider.H3: Cotton Rope or TwineCotton rope is the classic choice for macramé-style holders. It’s soft, durable, and easy to knot.Benefits:Natural lookGreat for boho, rustic, or minimalist stylesAvailable in many thicknessesH3: Leather StripsFor a modern and sleek design, leather makes an excellent material.Benefits:Strong and long-lastingIdeal for Scandinavian or industrial aestheticsWorks well with neutral-toned potsH3: Recycled Fabric or T-ShirtsIf you want an eco-friendly option, braided fabric strips are an excellent alternative.Benefits:Budget-friendlyAdds soft textureAllows fun color combinationsH3: Wooden Rings and BeadsThese accessories help enhance your hanger’s look and make it more functional.Benefits:Easy to threadAdds decorative detailHelps secure the plant holder in placeUsing any of these materials aligns perfectly with Your ultimate guide to How to make a hanging plant holder!, allowing you to tailor the design to your style and space.H2: Step-by-Step Instructions to Make a Simple Hanging Plant HolderThis guide makes it easy for DIY beginners to start and finish their first plant hanger quickly and confidently.H3: Step 1 – Measure and Cut Your RopeFor a standard plant hanger, you’ll need about 4 lengths of rope measuring 6–8 feet each.Tip: Longer ropes give you more flexibility for knotting. You can trim extras later.H3: Step 2 – Secure the Top KnotGather all rope pieces together and tie a single large knot at one end. This knot will form the hanging loop.Tip: Use a wooden ring at the top for a professional finish.H3: Step 3 – Create the Upper KnotsLay the ropes in pairs and tie a knot in each pair about 6 inches below the top.This forms the first level of your plant holder’s structure.H3: Step 4 – Form the Basket AreaNow comes the magic. Take one strand from each pair and knot it with a strand from the neighboring pair.Do this until four knots create a symmetrical diamond pattern. This will be the area where your pot rests.Tip: Make sure the spacing of this second layer matches the size of your pot. Too loose, and the pot may slip; too tight, and inserting the pot may be difficult.H3: Step 5 – Tie the Bottom KnotOnce the basket knots are finished, gather all the rope ends together and tie a secure knot several inches beneath the basket area.This creates the bottom cradle for your pot.H3: Step 6 – Trim and Style the TailsCut the ends of the rope cleanly or unravel them for a fringed look.Tip: For a polished style, add beads before tying the final knot.H2: Decorating Your Hanging Plant HolderBeyond functionality, the fun part of Your ultimate guide to How to make a hanging plant holder! is customizing your final look.H3: Optional Design ElementsAdd ColorDye the rope or alternate colorful strands for a vibrant, artistic touch.Include Natural ElementsIncorporate wooden beads, bamboo rings, or natural shells for a tropical or coastal vibe.Use Multiple LayersCreate two or three levels of hanging platforms for a cascading plant display.Try Different KnotsLearn macramé patterns like the square knot or spiral knot for advanced styles.H2: Choosing the Right Plants for Your Hanging HolderEven the best plant hanger needs the right plant to shine. Consider plants with trailing or compact growth habits.H3: Best Indoor Plants for Hanging HoldersPothos — Low maintenance and fast-growingSpider plant — Hardy and air-purifyingString of pearls — Beautiful trailing succulentsBoston fern — Lush and dramaticH3: Best Outdoor Plants for Hanging HoldersIvyTrailing petuniasStrawberriesCreeping JennyChoosing plants that drape beautifully adds charm to your project and supports the purpose of Your ultimate guide to How to make a hanging plant holder!H2: Practical Tips for SuccessTo ensure your project looks great and lasts long, keep these expert tips in mind.H3: Use Strong MaterialsAlways choose cords or ropes that can support the weight of ceramic pots and soil.H3: Check the Ceiling HookMake sure your ceiling hook is rated to hold the combined weight of the pot, soil, water, and plant.H3: Keep Watering in MindUse pots with saucers or self-watering inserts to prevent drips, especially for indoor hangers.H3: Test the Balance Before HangingPlace the pot into your holder and test its balance before mounting it permanently.H3: Start Simple Before Attempting Complex DesignsMastering basic hanging holders will make advanced macramé patterns easier in the future.ConclusionAfter exploring Your ultimate guide to How to make a hanging plant holder!, you’re now equipped with the skills and creativity to design your own beautiful, functional hanging planters. These DIY decorations are perfect for small spaces, stylish interiors, and outdoor gardens. They also make thoughtful gifts for plant lovers.Whether you choose a simple rope design, a macramé masterpiece, or an upcycled fabric project, crafting your own hanging plant holder is rewarding, fun, and surprisingly easy. With the right materials, a bit of patience, and the practical tips provided here, you’ll be able to elevate your greenery in a whole new way.