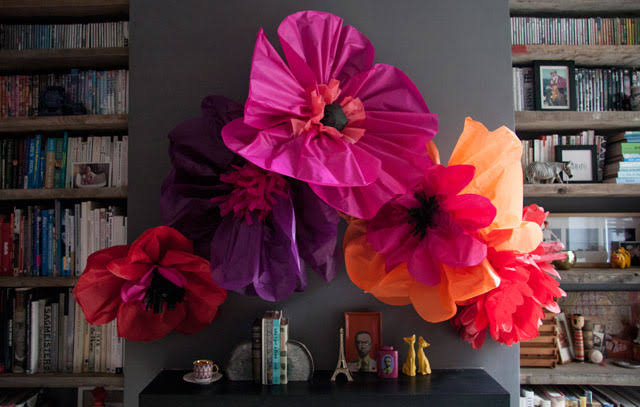
If you’ve ever dreamed of bringing your garden, party, or home decor to life with eye-catching, larger-than-life blooms, you’re in the right place! Giant flowers DIY is a creative and fun way to transform any space. Whether you’re planning a garden party, wedding, or simply want a stunning piece of wall art, giant flowers are sure to steal the show. In this guide, we’ll walk you through everything you need to know to make your very own oversized floral creations, from materials to step-by-step instructions. Let’s dive in and create something spectacular!Why Make Giant Flowers DIY?Before we jump into the DIY process, let’s talk about why giant flowers DIY is such a popular and fun project:Instant Statement Pieces: Giant flowers can instantly transform a room, garden, or event into something unique and breathtaking.Cost-Effective: Making your own giant flowers is much more affordable than purchasing them. Plus, you can customize them to suit your style or theme.Customizable: You can choose the type of flower, the colors, and the materials to fit your exact vision, whether you’re looking for something whimsical, bold, or elegant.Perfect for Any Occasion: From home decor to party decorations, giant flowers are versatile and suitable for various occasions, including birthdays, weddings, or even just brightening up a dull space.Materials You’ll Need for Giant Flowers DIYDepending on the type of flower you want to create, your materials may vary slightly, but here’s a basic list for most giant flower projects:Basic Materials:Large sheets of colored paper: Tissue paper, crepe paper, or card stock work great. For more durability, you can even use foam sheets or felt.Scissors: To cut the petals, leaves, and other parts of the flower.Glue gun and glue sticks: A hot glue gun is essential for sticking the flower together quickly and securely.Florist wire: This is used to create the flower stem or structure.Floral tape: Helps wrap and secure the wire together for a clean finish.Paint (optional): For adding details, shading, or creating gradient effects on the petals.Wooden dowels or PVC pipes (optional): If you want to create a freestanding flower, these can be used as the flower’s stem.For a Realistic Look:Yellow center (for some flowers like sunflowers): Use a piece of yellow foam, felt, or a circular piece of paper for the center.Green paper: For the leaves and stems.Craft foam sheets: For added texture to petals or leaves.Step-by-Step: How to Make Giant Flowers DIYMaking your own giant flowers is simpler than it sounds! Follow these steps for creating a giant flower DIY that will steal the spotlight.Step 1: Choose Your Flower DesignThe first step in your giant flower DIY journey is deciding which flower you want to make. Here are some popular choices:Sunflowers: Big, bright, and perfect for any occasion.Roses: Classic and elegant, these are great for weddings or romantic events.Daisies: Simple and charming, they are perfect for a cheerful vibe.Peonies: Soft, layered, and beautiful for more delicate decor.Tulips: Elegant, with a smooth shape and vibrant colors.Once you’ve decided on the flower, think about the color scheme. You can go with bold colors or choose softer pastels—it’s entirely up to your style.Step 2: Cut Your PetalsMeasure and Cut the Petal Shapes:For most flowers, you’ll need to cut large petal shapes from your colored paper.Sunflowers: Cut long, elongated petals that have a slight curve to them.Roses: Cut petal shapes in a more rounded form, creating layers that will overlap.You can use stencils for perfectly uniform petals or freehand cut them for a more natural look.Shape the Petals:Once the petals are cut, gently curl the edges using your fingers or a pencil to give them a more realistic look.For roses, consider giving the petals a slight wave to mimic natural curling.Step 3: Create the Center of the FlowerSunflower Centers:Cut a small circle from yellow foam or paper and glue it in the center of your flower.To make it more realistic, you can create texture by using yellow yarn or tiny pom-poms for the center.Rose Centers:For roses, take small, tight curls of petals and layer them around the center to create the spiral-like effect. Glue each layer securely.Other Flower Types:For flowers like daisies, you can create a simple circular center from paper or foam, then glue it in the center of your petals.Step 4: Assemble the FlowerLayer the Petals:Start by gluing your first petal layer around the center. Gradually add more layers, making each layer of petals slightly larger than the previous one to create a blooming effect.For sunflowers, you might need 6-8 layers of petals.For roses, aim for 3-4 layers, tightly wound around the center.Be sure to overlap each petal slightly for a more natural look. For a more dramatic effect, consider curling the petals outward for a wide bloom.Secure the Petals:As you go, use your hot glue gun to stick each petal in place, making sure to press down for a few seconds to secure them.Step 5: Create the Stem and LeavesMake the Stem:Take florist wire and wrap it in green floral tape to create a sturdy, flexible stem.For a stronger stem, you can use a wooden dowel or PVC pipe as the base and wrap it with floral tape or green paper.Add Leaves:For leaves, cut simple leaf shapes from green paper or felt.Attach them to the base of your flower using hot glue, and wrap the stem with more floral tape for a clean finish.Step 6: Mount Your Flower (Optional)If you’re planning to use your giant flower for a specific event or want it to stand on its own, here’s how to make it freestanding:Attach the stem to a base:If you’re using a wooden dowel, simply attach the bottom of the stem to a weighted base like a flower pot or decorative vase.Make it a Bouquet:If you want a more compact look, group several giant flowers together and tie the stems with a ribbon to create a stunning bouquet or centerpiece.Practical Tips for Giant Flower DIYHere are a few tips to help you make your giant flowers DIY even easier and more effective:1. Use Thick Paper for DurabilityFor long-lasting flowers, consider using crepe paper or foam sheets, which are more durable and flexible than standard tissue paper.2. Mix Colors for RealismDon’t hesitate to mix different shades of the same color for depth. For example, layer dark red and light pink paper for a more realistic rose.3. Choose the Right ToolsUse a scoring tool to make folding or shaping petals easier. This will help achieve clean edges and sharp creases.4. Add Glitter or Paint for Extra DetailIf you want your flowers to stand out even more, use glitter or acrylic paint on the edges of the petals. This adds an extra touch of magic and sparkle.5. Get Creative with SizeDepending on your space or event, you can make giant flowers as big as you want! Play around with different sizes to match your vision.Conclusion: Create Stunning Giant Flowers DIY!Making giant flowers DIY is a fantastic way to bring your creative vision to life. Whether you’re decorating for a special event, enhancing your garden, or simply creating beautiful decor for your home, these oversized blooms will always steal the show.To recap:Choose your flower, whether it’s a sunflower, rose, or peony.Cut and shape your petals, layering them for a natural look.Assemble the flower, making sure to glue the petals tightly and securely.Create the stem and leaves, and mount the flower to display it beautifully.With just a few materials, you can create stunning, large flowers that are sure to impress. Ready to get started? Try a giant flower DIY today and watch your creative project bloom!