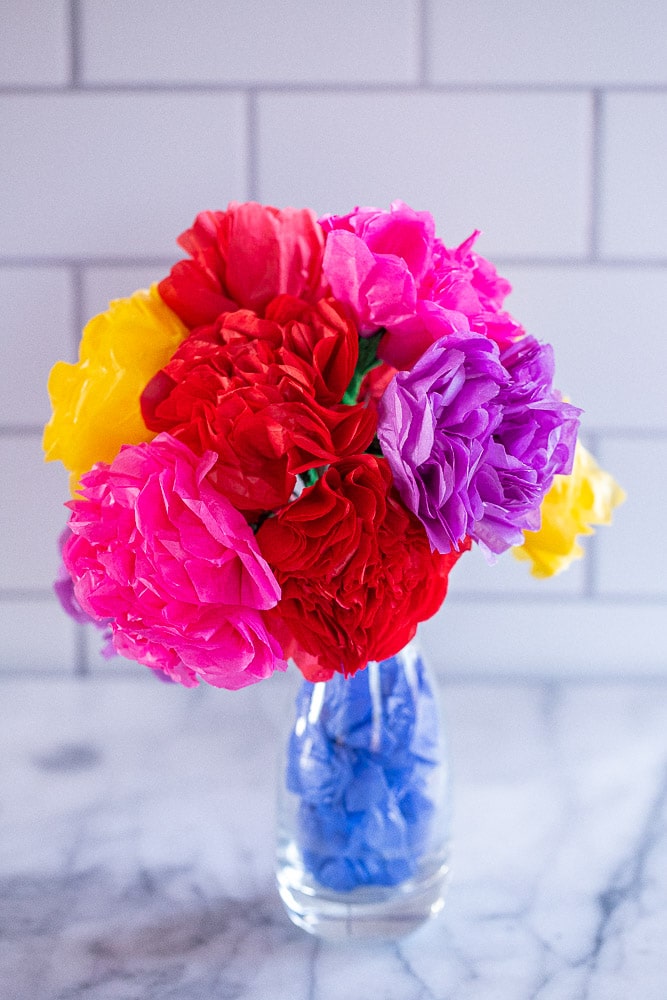
If you’ve ever admired beautiful floral decorations but didn’t want to spend a fortune on fresh flowers, tissue paper flowers DIY projects are your new best friend! Affordable, colorful, and surprisingly easy to make, these handmade blooms can brighten up any space — from a cozy living room to a festive party table.It’s no wonder that everyone loves tissue paper flowers DIY crafts! They’re fun, kid-friendly, and versatile enough to fit weddings, birthdays, or even home décor. Whether you live in the United States, the United Kingdom, or Canada, this creative project is the perfect way to bring beauty and color into your life — no green thumb required. 🌸What Makes Tissue Paper Flowers So Popular?1. Budget-Friendly and AccessibleAll you need is tissue paper, scissors, and string — materials you can find at any dollar store or craft shop. For less than the cost of a single bouquet, you can create dozens of stunning paper flowers.2. Endlessly CustomizableWant pastel peonies, bold sunflowers, or delicate roses? With tissue paper, you can easily experiment with colors, shapes, and sizes to match your theme or mood.3. Perfect for Any OccasionWeddings: Create elegant centerpieces or backdrops.Birthday Parties: Brighten up tables and photo booths.Classrooms & Nurseries: Add cheerful, safe decorations that never wilt.Home Décor: Hang from ceilings or place in vases for long-lasting beauty.How to Make Tissue Paper Flowers DIY 🌷Materials You’ll NeedTissue paper (any color you like)ScissorsFloral wire, twist ties, or stringGreen paper or tape (optional for stems)Step-by-Step InstructionsStep 1: Stack and FoldStack 6–8 sheets of tissue paper on top of each other. Fold them accordion-style (like a fan), about 1 inch wide per fold.Step 2: Secure the MiddleWrap a piece of floral wire or string tightly around the center of the folded paper. Twist to secure.Step 3: Trim the EndsUse scissors to round the edges for a soft, petal-like look — or cut them into points for a spiky flower.Step 4: Fan Out and FluffGently separate each layer of tissue paper toward the center. Fluff and shape until your flower looks full and beautiful.Step 5: Add Stems (Optional)Wrap the wire with green floral tape or paper to create a stem. Display in a vase, or hang your flowers for a floating garden effect.Practical Tips for Perfect DIY Tissue Paper Flowers💡 Tip 1: Mix different shades of the same color for a realistic ombré effect.💡 Tip 2: Use metallic or patterned tissue paper for a modern twist.💡 Tip 3: Make mini versions for gift wrapping or party favors.💡 Tip 4: For outdoor events, spray a light coat of acrylic sealer to help them resist humidity.Fun Variations You’ll Love🌹 Tissue Paper RosesCut the paper into rounded petal shapes and curl the edges around a pencil for a romantic, lifelike rose.🌻 Tissue Paper SunflowersUse bright yellow tissue paper for petals and a dark brown paper circle in the middle — perfect for summer parties!🌸 Giant Wall FlowersCreate oversized blooms for backdrops, weddings, or photo booths — the ultimate wow factor on a budget.Why Everyone Loves Tissue Paper Flowers DIY (and You Will Too!)No Experience Needed: Even beginners can create beautiful results on their first try.Fun for All Ages: A great craft for families, kids, and friends to enjoy together.Eco-Friendly: Made from recyclable materials and reusable for multiple occasions.Instant Gratification: Takes only minutes to create something stunning and decorative.It’s the perfect mix of creativity, affordability, and charm — which is why the tissue paper flowers DIY trend just keeps blooming year after year. 🌼Decorating IdeasHang strings of tissue flowers above your dining table.Use them in garlands or wreaths for seasonal décor.Mix them with fairy lights for a dreamy night-time display.Attach to gift boxes or cards for a personalized touch.Whether it’s springtime celebrations, summer garden parties, or cozy winter get-togethers, tissue paper flowers bring endless possibilities for creativity.Common Mistakes to Avoid❌ Using too few layers: Your flower will look flat — always use at least 6 sheets.❌ Pulling too hard: Tissue paper tears easily; fluff gently.❌ Ignoring proportions: Match flower size to the space — giant flowers for backdrops, small ones for table décor.ConclusionIt’s easy to see why everyone loves tissue paper flowers DIY projects — they’re quick, beautiful, affordable, and endlessly customizable. With just a few folds and a bit of imagination, you can create an entire garden that never fades!So grab some tissue paper, put on your favorite music, and start crafting your own bouquet of colorful joy. Whether you’re decorating a party, surprising a friend, or simply brightening your home, this DIY project is proof that creativity blossoms in the simplest of ways. 🌸💖