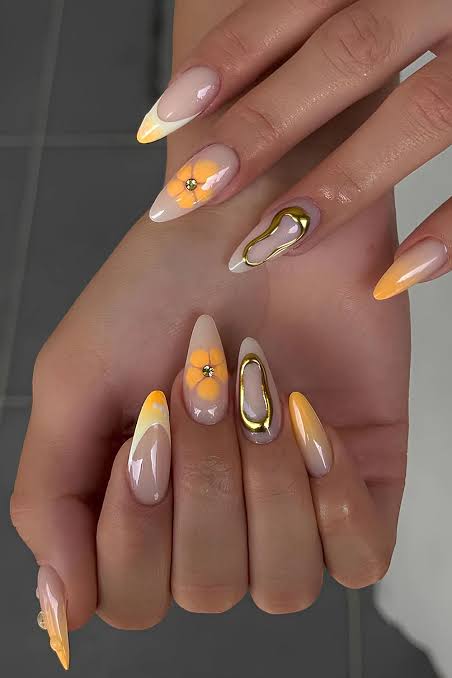
If you’ve been scrolling through social media lately, chances are you’ve seen the mesmerizing beauty of blooming gel flowers. These intricate, 3D floral nail designs have taken the nail art world by storm — and for good reason! Created using a special blooming gel polish that spreads colors into petal-like shapes, blooming gel flowers bring artistry, creativity, and elegance right to your fingertips.Whether you’re a professional nail artist or someone who simply loves doing their nails at home, it’s easy to see why everyone loves blooming gel flowers. They’re fun to make, incredibly customizable, and perfect for any occasion — from casual weekends to weddings.Let’s dive into what makes this nail art trend so popular and how you can create your own blooming gel flower designs effortlessly.What Are Blooming Gel Flowers?Blooming gel flowers are a type of 3D or watercolor-like nail art created using blooming gel polish. The blooming gel acts as a base that helps regular gel colors “bloom” or spread naturally when applied, forming organic petal and leaf shapes without much effort.You simply apply a layer of blooming gel to your nail, then dot or line other colored gels on top — the polish instantly spreads, creating beautiful floral effects. Think of it like watercolor painting, but on your nails!That’s the magic behind why everyone loves blooming gel flowers — they look sophisticated, but they’re surprisingly easy to create.Why Everyone Loves Blooming Gel Flowers1. Effortless BeautyUnlike detailed nail art that requires hours of precision, blooming gel does most of the work for you. You don’t need to be an expert artist — just a few dabs of color, and your nails transform into delicate flowers that look hand-painted.2. Limitless CreativityBlooming gel flowers can be designed in countless ways. You can mix multiple colors, add glitter, or incorporate rhinestones for extra sparkle. Each nail becomes a tiny canvas — perfect for expressing your mood or style.3. Perfect for Every SeasonFrom soft pastels in spring to bold reds and golds in winter, blooming gel flowers fit any season. You can match them with holiday themes, outfits, or even your favorite lipstick.4. Salon Quality at HomeYou don’t have to book an appointment to enjoy this trend. With a few simple tools, you can create salon-level blooming gel nails right from your home — saving both time and money.5. Long-Lasting & DurableBlooming gel manicures can last up to three weeks without chipping when properly sealed with a top coat. That’s another reason why everyone loves blooming gel flowers — they look fresh and flawless for days on end.Tools & Products You’ll NeedBefore creating your own blooming gel flowers, make sure you have these essentials:Base coat – for nail protectionBlooming gel polish – the key ingredientColored gel polishes – for the petals and detailsDotting tool or fine brush – to apply and shape the designsUV or LED nail lamp – to cure each layerTop coat – to seal and add shineOptional additions: rhinestones, glitter gels, foil accents, or chrome powder for extra flair.How to Create Blooming Gel Flowers Step-by-StepStep 1: Prep Your NailsStart with clean, shaped nails. Push back cuticles, buff lightly, and clean with alcohol to remove oils. Apply your base coat and cure under a UV/LED lamp according to the product’s instructions.Step 2: Apply Blooming GelApply a thin, even layer of blooming gel polish. Don’t cure it yet — this uncured layer is what allows the color to “bloom.”Step 3: Add Color for Flower PetalsUsing a dotting tool or thin brush, lightly dot your chosen gel colors on top of the blooming gel. Watch as the colors begin to spread outward like petals opening in bloom — it’s mesmerizing!For a realistic flower effect, place 4–5 dots in a circle to form petals. Add a contrasting color in the center for dimension.Step 4: Cure and SealOnce you’re happy with your design, cure the nail under the lamp for about 60 seconds. Then, apply a top coat for shine and durability, and cure again.That’s it — you’ve just made your own blooming gel flowers that look like they were done by a professional artist!Practical Tips for Perfect Blooming Gel Flowers💅 Tip 1: Work quickly. Blooming gel spreads fast, so apply your color dots right after brushing it on.💅 Tip 2: Don’t overload the brush. Too much color can cause the gel to over-bloom or blur.💅 Tip 3: Experiment with colors. Try blending pinks, purples, and whites for soft florals, or go bold with blues and oranges for tropical vibes.💅 Tip 4: Use thin layers. This keeps your design neat and ensures proper curing.💅 Tip 5: Practice on a nail tip first. It helps you understand how your specific gels react together before applying to your actual nails.Popular Blooming Gel Flower Styles🌸 1. Classic Rose BloomSoft pink petals on a nude base create an elegant, timeless manicure perfect for weddings or date nights.🌼 2. Daisy DelightWhite petals with yellow centers — cheerful and perfect for spring!🌹 3. Romantic Red BloomsDeep reds and burgundies paired with gold accents give a bold, romantic look ideal for fall or Valentine’s Day.🌷 4. Watercolor FloralsMix pastel hues for a dreamy, watercolor-like finish — subtle yet artistic.🌻 5. Tropical ParadiseBright orange, fuchsia, and turquoise designs bring vacation energy straight to your nails.These variations show exactly why everyone loves blooming gel flowers — they can match any mood, event, or season!Blooming Gel vs. Regular Nail ArtFeature Blooming Gel Flowers Regular Nail ArtSkill Level Beginner-friendly Often requires precisionTime Fast (10–15 min per hand) Longer (30+ min)Look Soft, fluid, artistic Sharp, detailed linesTools Needed Simple kit Multiple brushes/toolsDurability Long-lasting with top coat Varies by techniqueIt’s easy to see why blooming gel nail art has become a top trend — it’s efficient, creative, and practically foolproof.Caring for Your Blooming Gel NailsTo keep your nails looking stunning:Avoid using your nails as tools (open cans with caution!).Apply cuticle oil daily for hydration.Wear gloves when cleaning or washing dishes.Reapply a top coat every week for extra shine and protection.Following these steps will make your blooming gel flowers last even longer — often up to three weeks of glossy perfection!Where to Find Blooming Gel ProductsYou can find blooming gel and compatible polishes online or in beauty supply stores. Trusted brands include:Beetles Gel PolishModelonesBorn PrettyMakarttGelishAlways choose UV/LED-safe products and read reviews before purchasing.ConclusionIt’s easy to see why everyone loves blooming gel flowers — they’re elegant, fun to make, and perfect for nail art lovers of all skill levels. With minimal effort, you can create salon-quality designs that look hand-painted and professional.From delicate pastel roses to bold tropical blooms, blooming gel flowers are more than just a trend — they’re a celebration of creativity and self-expression. So grab your gels, turn on your lamp, and let your imagination bloom! 🌸💅