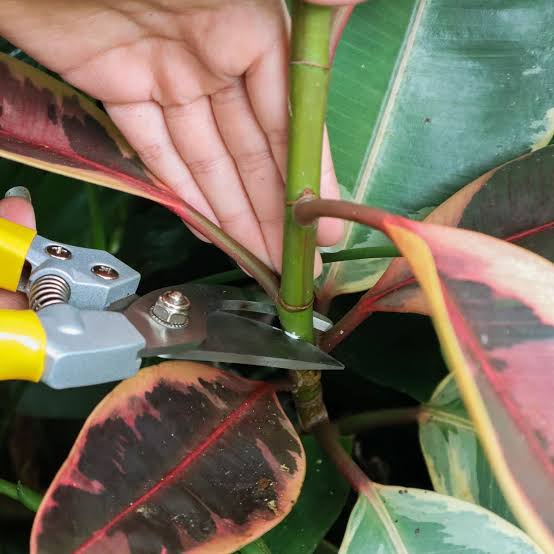
If you’re looking to grow new plants without spending extra money, learning how to propagate a rubber plant is an absolute game-changer! The rubber plant (Ficus elastica) — with its large, glossy leaves and easy-care nature — is one of the most popular indoor plants across the United States, United Kingdom, and Canada. What many plant lovers don’t realize is that it’s also incredibly simple to multiply!In this guide, you’ll discover the unbelievable ways to propagate your rubber plant successfully, whether you’re using cuttings, water propagation, or air layering. With the right care and patience, you can turn one plant into many thriving green beauties! 🌱🌸 Why Propagate a Rubber Plant?Propagating a rubber plant isn’t just fun — it’s rewarding! Here’s why plant lovers adore this process:🌿 Cost-effective: No need to buy new plants.💚 Sustainable: Perfect for eco-friendly gardening.🪴 Gift-worthy: Share your homegrown cuttings with friends.🌞 Satisfying: Watching new roots form is pure plant magic!Whether you want to fill your home with lush foliage or create thoughtful green gifts, rubber plant propagation is the perfect project.🌱 Unbelievable Ways to Propagate Rubber PlantThere are a few tried-and-true methods to multiply your rubber plant, and each works wonderfully if done with care. Let’s explore them one by one.🌿 1. Propagate Rubber Plant from Stem CuttingsThis is the most popular and easiest way to propagate.What You’ll Need:Sharp, clean pruning shearsA small container or jarWater or potting soilRooting hormone (optional but helpful)Steps:Choose a healthy stem: Pick a stem with at least two leaves.Cut below a node: Make a clean cut about 4–6 inches long.Remove lower leaves: Keep one or two leaves at the top.Optional: Dip the cut end in rooting hormone to encourage growth.Place in water or soil:Water method: Place the cutting in a glass of water, ensuring the node is submerged. Change the water every few days.Soil method: Plant directly in moist, well-draining potting mix.Provide bright, indirect light: Keep it warm and humid.In 3–6 weeks, you’ll see roots starting to form. Once the roots are about an inch long, you can pot the cutting in fresh soil.🌿 2. Air Layering – The Secret Pro MethodAir layering sounds complicated, but it’s surprisingly easy and produces strong, established plants.What You’ll Need:A sharp knifeSphagnum mossPlastic wrapTwine or stringSteps:Select a healthy branch: Look for a mature, sturdy stem.Make a small cut: Slice about one-third into the stem, just below a leaf node.Insert a toothpick to keep the cut slightly open.Wrap with damp moss: Soak sphagnum moss in water, squeeze out excess, and wrap it around the cut.Cover with plastic wrap: Secure it with twine or tape to keep moisture in.Wait for roots: In 4–8 weeks, roots should appear inside the moss.Cut below the new roots and pot your new rubber plant!💡 Tip: This method works best during spring or early summer when the plant is actively growing.🌿 3. Leaf Cuttings (Less Common, but Fun to Try!)While full leaves won’t grow new plants, a leaf with a piece of stem (node) attached can sometimes root. Simply treat it like a small cutting — keep it in water or soil and be patient. This method takes longer but can work with persistence and the right conditions.🌞 Caring for Newly Propagated Rubber PlantsOnce your rubber plant cuttings start to root, proper care ensures they thrive.🌱 Light:Place them in bright, indirect sunlight. Avoid harsh direct rays that can scorch tender leaves.💧 Water:Keep soil slightly moist but never soggy. Overwatering is a common mistake!🌿 Humidity:Rubber plants love humidity. Mist the leaves occasionally or use a humidity tray.🪴 Transplanting:Once roots are well established (usually 2–3 inches long), transplant into a pot with well-draining indoor soil and good airflow.🌸 Fertilizer:Feed your young plants with a diluted balanced fertilizer every 4–6 weeks during the growing season.💡 Pro Tips for Propagating Rubber Plants✅ Use sharp tools: Always use sterilized shears to prevent infection.✅ Timing matters: Late spring to early summer is the best time for propagation.✅ Warmth = growth: Maintain a consistent temperature of 70–80°F (21–27°C).✅ Be patient: Rooting takes time — avoid disturbing the cuttings too often.✅ Use rooting hormone: It speeds up root formation, especially in soil propagation.🌼 Common Problems & SolutionsProblem Cause SolutionCutting wilts Too much sun or dry air Move to bright, indirect light and mist regularlyNo roots forming Temperature too low Keep the environment warm and humidRotting cutting Overwatering Reduce water and ensure good drainageYellow leaves Poor light or stress Provide consistent light and gentle care🌺 Why This Method is Unbelievable!What makes rubber plant propagation so incredible is how simple yet rewarding it is. Watching a single cutting grow into a full, glossy plant is pure joy — and it’s something any plant lover can do. Whether you’re an experienced gardener or a beginner, you’ll be amazed at how quickly your home fills with thriving new plants! 🌿✨🌿 Conclusion: Unbelievable How to Propagate Rubber Plant!Propagating a rubber plant is not only easy but also deeply satisfying. With just a few tools, a bit of patience, and the right method, you can multiply your collection and bring more greenery into your life.From simple stem cuttings to professional air layering, every step in the process is a small miracle of nature. So grab your shears, pick your favorite stem, and start your propagation journey today — you’ll soon see just how unbelievable growing new rubber plants can be! 🌱💚