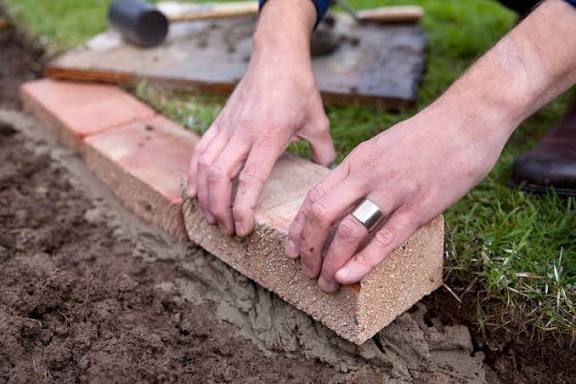
If you’re dreaming of a garden that looks clean, elegant, and beautifully defined — it’s time to try this amazing brick garden edging idea! Whether you have flower beds, pathways, or a lush lawn, brick edging adds structure and style that lasts for years.The best part? It’s budget-friendly, low-maintenance, and DIY-friendly — perfect for beginners and seasoned gardeners alike. In this guide, you’ll learn how to install brick garden edging easily, plus smart design tips to give your yard a polished, professional look.🌸 Why Choose Brick Garden Edging?Before you grab your gloves, let’s talk about why this idea is so popular.✅ Classic and timeless: Bricks add a traditional charm that never goes out of style.✅ Durable: Brick edging stands up to weather, lawnmowers, and time.✅ Versatile: Works with all garden types — modern, rustic, or cottage-style.✅ Functional: Keeps mulch, soil, and gravel neatly in place.✅ DIY-friendly: No heavy equipment or professional help needed!From creating crisp lawn borders to highlighting flower beds, brick garden edging is both practical and decorative — the perfect finishing touch for any outdoor space.🧱 Tools and Materials You’ll NeedBefore starting, gather these simple supplies:Bricks (choose the color and size that suits your garden)Shovel or spadeRubber malletLevelGarden hose or string (for outlining)Sand or gravel for the baseLandscape fabric (optional for weed control)Gardening gloves🌿 Step-by-Step Guide to Building Brick Garden EdgingLet’s make your garden edging project simple and satisfying!Step 1: Plan Your DesignDecide where you want your brick edging — around flower beds, along the driveway, or framing your walkway.Use a garden hose or string to mark the outline. This gives you a visual guide before digging.💡 Tip: Curved edges look natural and soft, while straight lines create a modern, clean look.Step 2: Prepare the TrenchUsing a spade, dig a shallow trench along your marked line.Aim for a depth of 4–6 inches (depending on brick height) and a width slightly wider than your bricks.Remove any grass, roots, or rocks to create a smooth foundation.Step 3: Add the Base LayerPour 1–2 inches of sand or gravel into the trench.Level it out with your hands or a small board to create a stable base.⚒️ This layer helps with drainage and keeps bricks from shifting over time.Step 4: Lay the BricksStart placing your bricks in the trench, one at a time.Use a rubber mallet to tap each brick gently into place so it’s level and snug against the next one.You can lay them:Flat for a subtle edgeAngled (diagonal) for a decorative lookStanding upright for a raised border💡 Tip: Alternate brick patterns (like herringbone or basket weave) add a creative touch to your garden design.Step 5: Check AlignmentUse a level every few bricks to make sure your line stays even.Adjust as needed by adding or removing a little sand underneath.Step 6: Fill the GapsOnce all the bricks are in place, fill the gaps with sand or soil.Brush it into the spaces between bricks to lock them securely.Then water lightly to help the sand settle — repeat if necessary.🌺 Design Ideas for Brick Garden EdgingHere are a few creative ways to customize your garden edging and make it stand out:🌼 Rustic Charm: Use weathered or reclaimed bricks for a cozy, vintage feel.🌸 Bold Contrast: Pair red bricks with green grass or white gravel for a striking border.🌿 Curved Flower Beds: Create gentle arcs around shrubs and flower clusters.🌻 Layered Look: Combine brick edging with stones or pavers for extra texture.🌹 Cottage Garden: Let plants spill slightly over the brick edge for a romantic, natural vibe.💧 Maintenance TipsOne of the best things about brick garden edging is how easy it is to maintain:✔️ Occasionally brush off dirt or debris.✔️ Pull out any weeds growing between bricks.✔️ Refill sand between joints if it settles over time.✔️ Rinse with water occasionally to keep the color vibrant.With minimal effort, your edging can look fresh and flawless year after year.🌿 Benefits for Your LandscapeInstalling brick edging does more than just make your garden pretty. It also helps your plants and lawn thrive!🌱 Prevents soil erosion: Keeps mulch and soil neatly contained.🌸 Improves garden definition: Visually separates lawn areas from beds and pathways.🌼 Reduces maintenance: Fewer weeds and less trimming needed along borders.🌺 Adds value: Professional-looking edging can boost your home’s curb appeal.💡 Eco-Friendly Brick Garden Edging TipsIf sustainability matters to you, here’s how to make your project greener:♻️ Use reclaimed bricks from old walls or paths.🌍 Avoid cement if you want your edging to be easily adjustable.🌿 Choose locally sourced materials to reduce carbon footprint.🌸 Plant native flowers along the edge to attract pollinators.🏆 Final ThoughtsIt’s time to roll up your sleeves and try this amazing brick garden edging idea!Simple yet stunning, brick edging gives your garden structure, style, and long-lasting beauty — all while being an easy weekend project you can proudly say you built yourself.Whether you’re framing flower beds, outlining a pathway, or redefining your lawn, this timeless idea will instantly upgrade your outdoor space.So grab your tools, get creative, and transform your garden into a masterpiece of color and craftsmanship — one brick at a time! 🧱🌷