
In a world where sustainability and resourcefulness are increasingly valued, growing vegetables from kitchen scraps has emerged as a brilliant way to reduce waste and enjoy fresh produce at little to no cost. This article delves into the art of regrowing vegetables from scraps, offering a step-by-step guide to turn your kitchen waste into a thriving vegetable garden.
Introduction: The Joy of Regrowing Vegetables
Imagine having a steady supply of fresh vegetables with minimal effort and expense. By leveraging kitchen scraps that would otherwise be discarded, you can create a vibrant, productive garden. This practice not only benefits the environment but also offers a sense of satisfaction as you watch discarded items flourish into healthy plants.
1. Choosing the Right Scraps
Not all kitchen scraps are suitable for regrowing, so selecting the right ones is crucial for success. Here’s a list of some common vegetables that can be regrown from scraps:
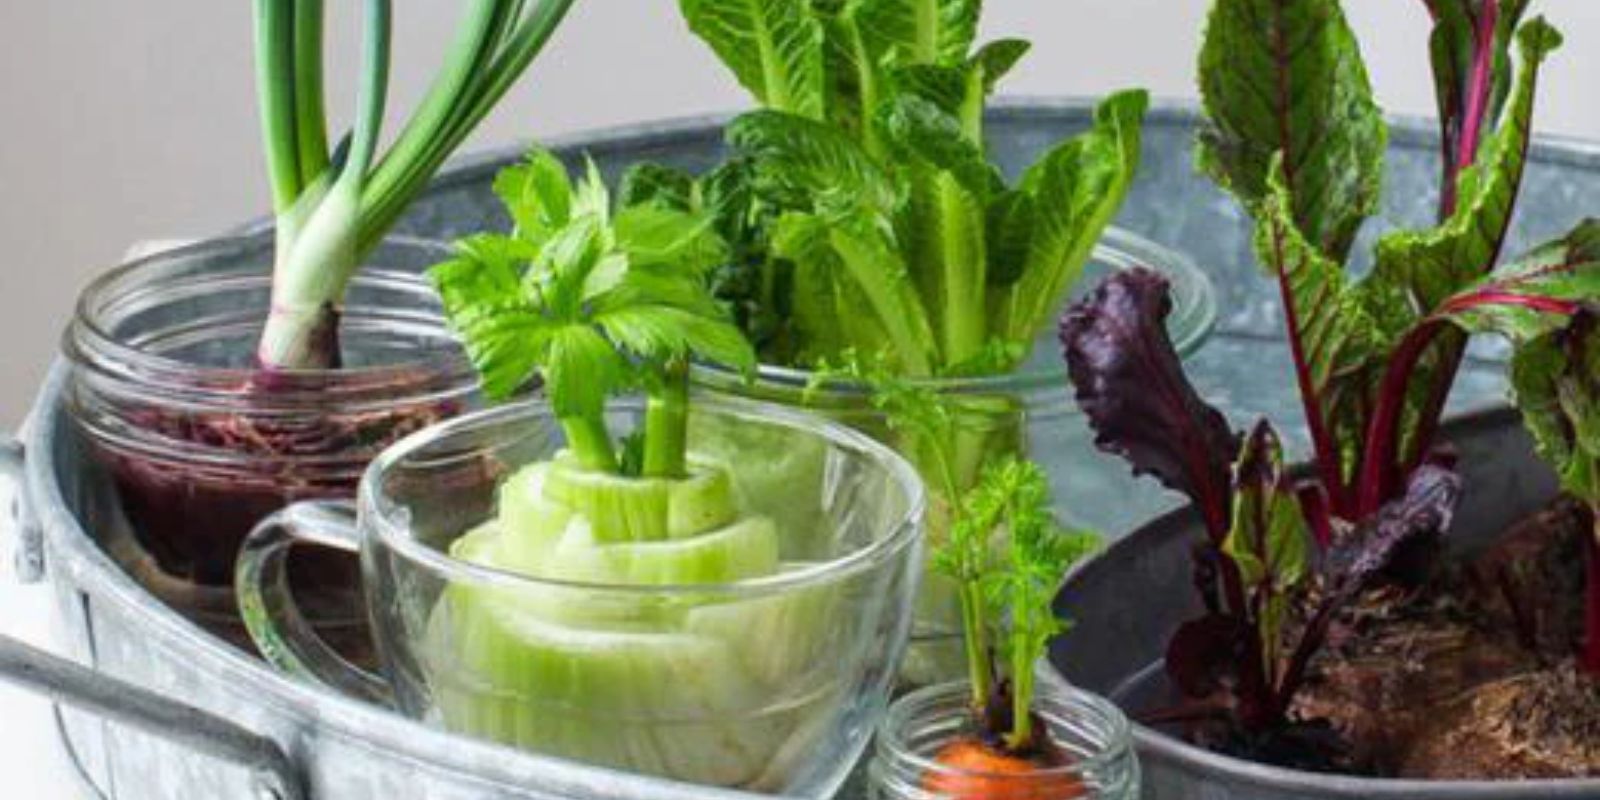
- Potatoes: Use potato scraps with visible “eyes” or sprouts.
- Celery: The base of celery stalks can be regrown.
- Carrots: Carrot tops can sprout new greens.
- Green Onions: The roots of green onions can be regrown.
- Lettuce: The base of a lettuce head can regenerate.
2. Preparing Your Scraps
Preparation is key to ensuring successful regrowth. Follow these steps based on the type of scrap:
- Potatoes: Choose scraps with at least one eye or sprout. Cut them into chunks with at least one eye per piece, allowing them to dry for a day before planting to prevent rot.
- Celery: Trim the base of the celery stalk, leaving about an inch of the root.
- Carrots: Trim the tops, leaving about an inch of the root.
- Green Onions: Save the roots and cut off the green tops, leaving about an inch of the white base.
- Lettuce: Cut the base of the lettuce head, leaving about an inch of the root.
3. Starting the Regrowth Process
Different vegetables require different regrowth methods. Here’s how to start the process for each:
- Potatoes: Plant the potato scraps in a sunny spot in your garden or in a large container. Bury them about 4 inches deep. Water them regularly, keeping the soil moist but not waterlogged. Sprouts will appear within a few weeks.
- Celery: Place the celery base in a shallow dish filled with water. Ensure the base is submerged about halfway. Change the water every couple of days. After a few weeks, roots and new stalks will start to grow.
- Carrots: Place the carrot tops in a shallow dish of water, making sure the base is submerged. Change the water every few days. Once new greens appear, transplant them into soil or a larger pot.
- Green Onions: Place the root ends in a small jar or glass with enough water to cover the roots. Place the jar in a sunny spot. Change the water every few days. New shoots will grow from the tops.
- Lettuce: Place the base in a dish with a small amount of water, ensuring the base is submerged but the leaves are dry. Change the water daily. Once new leaves appear, transplant the lettuce base into soil.
4. Transplanting and Care
Once your vegetable scraps have developed roots or new shoots, it’s time to transplant them into soil or larger pots:
- Potatoes: Move the sprouted potato pieces into a garden bed or container filled with well-draining soil. Space them about 12 inches apart. Continue to water regularly and add mulch to keep the soil moist.
- Celery: Transplant the rooted celery base into a larger container or garden bed with rich, well-draining soil. Space plants about 6 inches apart. Water frequently to keep the soil consistently moist.
- Carrots: Plant the rooted carrot tops in a container or garden bed with loose, well-draining soil. Space them about 3 inches apart. Keep the soil moist and ensure the tops are not buried too deeply.
- Green Onions: Transplant the green onions into a container or garden bed with well-draining soil. Space them about 2 inches apart. Water regularly and ensure they receive plenty of sunlight.
- Lettuce: Move the regenerated lettuce base into a larger container or garden bed with rich, well-draining soil. Space them about 6 inches apart. Water frequently and provide some shade if the weather is very hot.
5. Harvesting and Enjoying
As your vegetables grow, monitor their progress and harvest when they reach maturity:
- Potatoes: Harvest potatoes when the plants start to yellow and die back. Gently dig up the tubers, being careful not to damage them.
- Celery: Harvest celery stalks when they are thick and crunchy. Cut the outer stalks first, allowing the inner stalks to continue growing.
- Carrots: Harvest carrots when they reach a good size and have vibrant orange color. Gently pull them from the soil.
- Green Onions: Harvest green onions when they reach the desired size. Cut them at the base, just above the soil level.
- Lettuce: Harvest lettuce leaves as needed. Cut the outer leaves, allowing the inner leaves to continue growing.
Conclusion: The Satisfaction of Sustainable Gardening
Transforming kitchen scraps into thriving vegetables is not only a rewarding practice but also an excellent way to contribute to a sustainable lifestyle. By following these simple steps, you can reduce waste, save money, and enjoy the freshest produce possible.
Motivational Sentence: Embrace the joy of sustainable gardening by regrowing vegetables from kitchen scraps. Discover the satisfaction of nurturing plants from what would otherwise be discarded, and enjoy the fresh, homegrown produce as a testament to your green thumb.