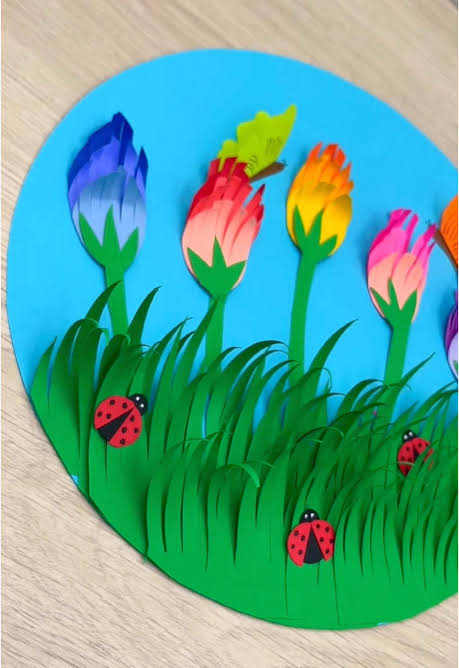
A vibrant garden full of blooms is every gardener’s dream, but seasonal changes, pests, and weather can make it difficult to maintain that colorful paradise year-round. What if you could enjoy everlasting flowers that never wilt, require no watering, and add a splash of creativity to your garden?Welcome to “Transform your garden with Handmade flowers paper!” — a simple, imaginative way to bring endless beauty to your outdoor space. From DIY enthusiasts to garden lovers, this guide will show you how to craft stunning paper flowers and incorporate them into your garden for a whimsical, artistic touch.Why Choose Handmade Paper Flowers for Your Garden?Handmade paper flowers are more than just decoration — they’re a creative, eco-friendly, and practical solution for sprucing up your garden.1. Long-Lasting BeautyUnlike real flowers, paper flowers don’t fade or wilt. Your garden stays colorful throughout the year, regardless of season or weather.2. Cost-EffectiveA few sheets of craft paper, glue, and wire can create dozens of flowers — perfect for gardeners on a budget.3. Fully CustomizableChoose any color, pattern, or size to match your garden theme. You can mimic roses, daisies, peonies, or even create completely fantastical blooms.4. Fun and TherapeuticCrafting paper flowers is a relaxing, rewarding hobby. It’s also a great way to involve kids or friends in your garden projects.5. Eco-Friendly OptionsUse recycled or scrap paper to make your flowers, reducing waste while adding charm to your garden.Materials You’ll Need for Handmade Paper FlowersTo transform your garden with Handmade flowers paper!, gather a few basic supplies:Colored craft paper or recycled paperScissors (for precision cuts)Glue (hot glue or craft glue works well)Floral wire or pipe cleaners for stemsFloral tape (optional, to wrap stems)Pencil or pen (for drawing petals and leaves)Ruler (for measuring petals)Optional items for extra flair:Glitter or paint for highlightsBeads for flower centersPaper punches or dies for consistent shapesStep-by-Step Guide to Making Paper FlowersStep 1: Choose Your Flower DesignDecide on the type of flower you want to create. Roses, daisies, and tulips are simple and popular options for beginners. Sketch the shape of petals and leaves on your paper.Step 2: Cut Out Petals and LeavesCarefully cut out each petal and leaf using scissors or a craft knife. For a more realistic look, cut petals in slightly different sizes and shapes.Step 3: Shape the PetalsGently curl or fold petals using a pencil or your fingers to give them a natural, three-dimensional appearance.Step 4: Assemble the FlowerStart by gluing the smallest petals around a central bud (can be a rolled paper piece or a small bead).Gradually layer larger petals around the center, overlapping slightly for fullness.Allow glue to dry for stability.Step 5: Attach the StemWrap a floral wire or pipe cleaner with floral tape, then attach the flower securely to the top. You can also wrap the base of petals with tape to reinforce them.Step 6: Add LeavesGlue paper leaves onto the stem for a realistic touch. Bend them slightly outward to create dimension.Creative Ways to Display Paper Flowers in Your GardenOnce your handmade paper flowers are ready, you can showcase them in various ways:1. Garden BedsStick paper flowers among real plants for an eye-catching mix of textures and colors.2. Hanging GardensUse string or fishing line to hang flowers from tree branches or pergolas, creating a floating floral canopy.3. Decorative BordersLine walkways or garden edges with paper flowers in stakes or small pots for a playful, whimsical look.4. Flower BouquetsArrange paper flowers in mason jars or vases and place them on garden tables, benches, or patios.5. Seasonal DecorEasily switch out colors and styles for different seasons or holidays — think pastels for spring or deep reds for autumn.Tips for Long-Lasting Paper Flowers in the GardenUse water-resistant paper or sealant: Spray with a clear acrylic or craft sealant to protect against rain or humidity.Avoid direct sun exposure for delicate colors: This prevents fading over time.Secure stems firmly: Anchor flowers in soil or pots with rocks or floral foam to keep them upright.Mix with greenery: Combining paper flowers with live plants enhances realism and visual appeal.Fun Variations and IdeasMini Paper Succulents: Craft small succulents for a unique touch that mimics trendy garden designs.Paper Flower Garlands: String several flowers together to create pathways or archways.Layered Paper Rosettes: Make oversized flowers as statement pieces in your garden.Paper Flower Wreaths: Hang colorful wreaths on fences, doors, or garden walls.The possibilities are endless, limited only by your imagination.Benefits of Using Paper Flowers in Your Garden🌸 All-season vibrancy without worrying about watering or pests🎨 Customizable for any theme or event♻️ Eco-conscious craft using recycled materials👨👩👧 Engaging activity for family or community projects✨ Enhances garden aesthetics creatively and affordablyHandmade paper flowers turn ordinary outdoor spaces into whimsical, artistic displays that bring joy year-round.ConclusionIf you’re looking to add color, creativity, and charm to your garden without the hassle of constant upkeep, transform your garden with Handmade flowers paper! is the perfect solution.From simple daisies to elaborate roses, paper flowers offer endless possibilities for personalization and style. With a few basic materials, some patience, and a touch of imagination, your garden can become a vibrant, magical space that delights you and your visitors every day.So grab your scissors, glue, and colorful paper, and start crafting — your dream garden of everlasting blooms is just a few steps away!