
Creating a brick pathway in your garden is a fantastic way to elevate its aesthetic appeal and functionality. Whether you aim to guide visitors through lush landscapes or provide a practical route through your backyard, a well-designed brick pathway blends charm and durability. In this guide, we’ll explore step-by-step instructions, essential tips, and design ideas to help you craft a pathway that complements your outdoor space.
Why Choose a Brick Pathway?
Brick pathways have been a timeless choice for gardeners and landscapers for many reasons:
- Durability: Bricks are weather-resistant and long-lasting.
- Versatility: They offer endless design possibilities, from classic to modern.
- Eco-Friendly: Many bricks are made from natural materials, and recycled bricks can add a unique vintage look.
- Low Maintenance: Once installed, they require minimal upkeep.
Step-by-Step Guide to Building Your Brick Pathway
1. Plan Your Pathway
A clear plan is essential for a successful pathway project.
- Decide the Purpose: Is it a decorative garden feature or a functional walkway?
- Choose a Layout: Straight paths are easier to build, but curves add elegance.
- Measure the Area: Mark the desired pathway dimensions with stakes and string. This ensures accuracy and prevents over-purchasing materials.
- Select a Pattern: Popular brick-laying patterns include:
- Running Bond: Simple rows of bricks.
- Herringbone: A V-shaped design for extra visual interest.
- Basketweave: Alternating pairs of bricks for a timeless look.
2. Gather Materials and Tools
Here’s what you’ll need for your project:
- Materials:
- Bricks (standard or reclaimed)
- Gravel (for the base)
- Sand (for leveling and gaps)
- Edging materials (metal strips or bricks)
- Tools:
- Shovel
- Rake
- Rubber mallet
- Level
- Tamper (manual or mechanical)
- Broom
3. Prepare the Ground
Proper ground preparation is crucial for stability.
- Excavate: Dig out the marked pathway area to a depth of 4–6 inches. This depth accommodates the gravel base, sand layer, and bricks.
- Clear the Area: Remove roots, rocks, and debris to ensure a smooth surface.
- Compact the Soil: Use a tamper to compact the soil. A stable base prevents bricks from shifting over time.
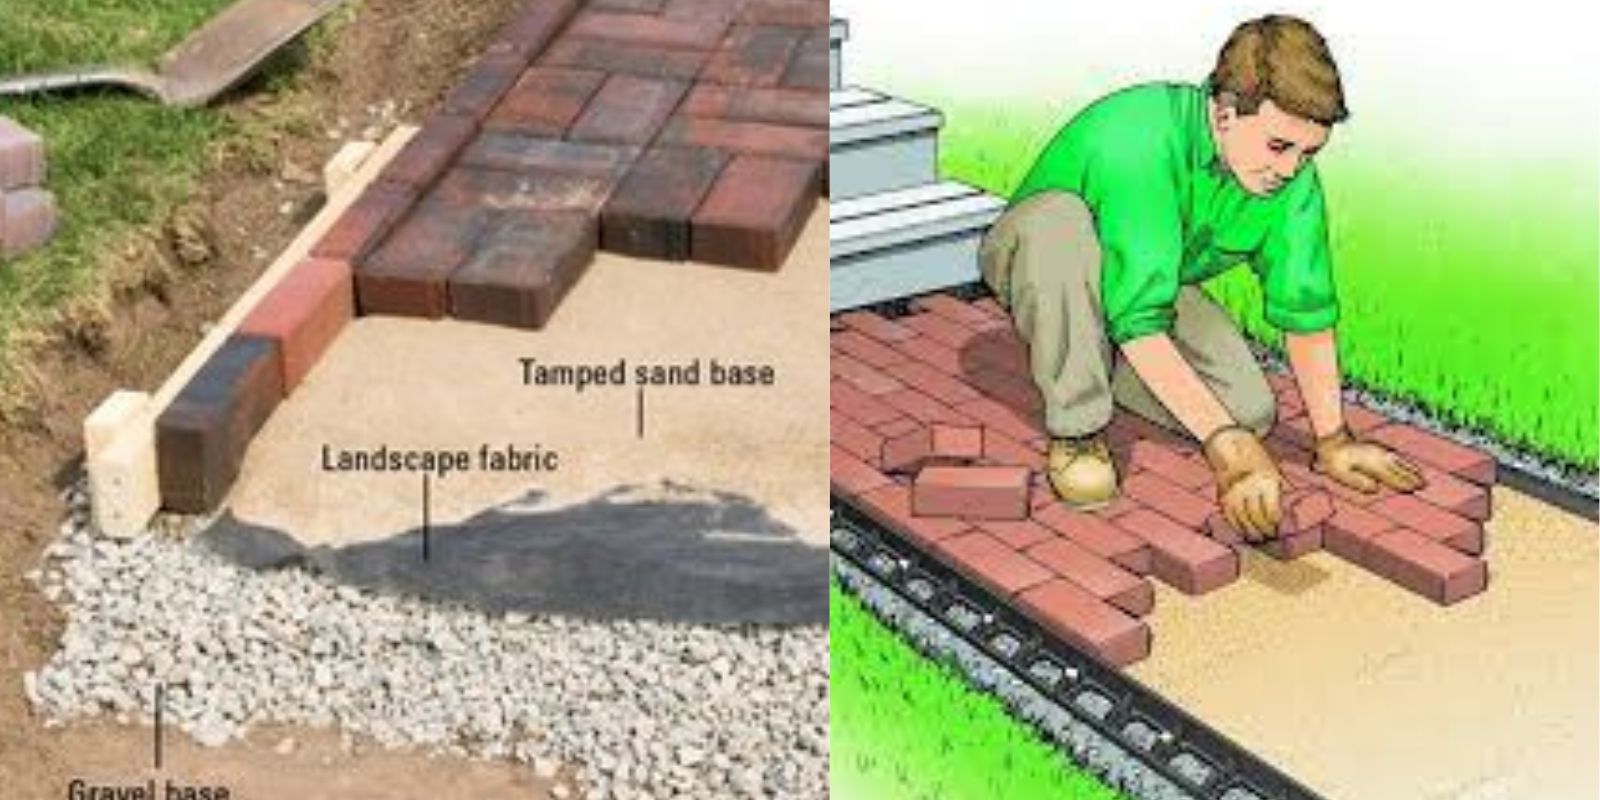
4. Add the Base Layers
A solid foundation ensures durability and proper drainage.
- Gravel Base: Spread a 2–3 inch layer of gravel across the excavated area. Compact the gravel using the tamper.
- Sand Layer: Add a 1–2 inch layer of sand over the gravel. Use a rake to level the sand evenly.
5. Lay the Bricks
Now it’s time to bring your pathway to life!
- Start at One End: Begin placing bricks in your chosen pattern, starting from one end of the pathway.
- Align and Level: Use a level to ensure the bricks are even. Tap them gently into place with a rubber mallet.
- Cut Bricks as Needed: For curved paths or tight edges, use a brick chisel or saw to cut bricks to fit.
6. Fill the Gaps
Filling the gaps stabilizes the pathway and prevents weeds.
- Spread Sand: Sprinkle sand over the entire surface.
- Sweep It In: Use a broom to sweep the sand into the gaps between the bricks.
- Wet the Surface: Lightly spray the pathway with water to help the sand settle. Repeat this process until the gaps are fully filled.
7. Secure the Edges
Edge support keeps your pathway intact and prevents bricks from shifting.
- Install Edging: Use metal strips, plastic edging, or edge bricks to secure the pathway’s borders.
- Anchor the Edging: Ensure it’s firmly installed to withstand pressure and time.
8. Add Final Touches
Make your pathway even more inviting.
- Clean the Surface: Sweep away excess sand or debris.
- Decorate: Line the pathway with plants, flowers, or solar lights for added charm.
- Seal the Bricks: Optional, but applying a sealant can protect bricks from stains and weathering.
Design Inspiration for Brick Pathways
- Rustic Garden Charm: Use reclaimed bricks for a vintage, weathered look. Pair it with lush greenery for a cottage-style vibe.
- Modern Minimalist: Opt for sleek, uniformly colored bricks in a straight-running bond pattern.
- Whimsical Curves: Create winding pathways through flower beds or around trees for a magical touch.
- Bold Borders: Add contrast by using a different brick color or style for the pathway edges.
Tips for a Successful Project
- Choose Quality Bricks: High-quality bricks resist cracking and wear.
- Plan for Drainage: Slightly slope the pathway (1-2%) to avoid water pooling.
- Test Patterns First: Lay out a small section to ensure your design works before committing.
- Involve the Family: This project is a fun, collaborative activity that everyone can enjoy!
Benefits of a DIY Brick Pathway
- Cost-Effective: Save on professional labor by doing it yourself.
- Customizable: Tailor the pathway to your exact preferences.
- Satisfaction: There’s nothing like the pride of creating something beautiful with your own hands.
Conclusion
Building a brick pathway in your garden is a rewarding DIY project that enhances both functionality and beauty. Whether you’re a seasoned gardener or a DIY beginner, this project is manageable and immensely satisfying. With proper planning, quality materials, and a touch of creativity, you’ll have a stunning pathway that stands the test of time.
So grab your tools, unleash your creativity, and start building the garden pathway of your dreams. Share your progress or finished pathway with us, and let’s inspire others to transform their gardens! 🌿✨
#DIYGardenPath #BrickPathway #GardeningProjects #OutdoorLiving #BackyardIdeas #SustainableGardening