
Pruning is one of the most essential tasks in tree care. Proper pruning helps maintain the tree’s health, supports strong growth, and ensures that it remains aesthetically pleasing throughout its life. If you want to shape your tree, encourage fruit production, or simply ensure its longevity, learning how to prune correctly is vital. In this guide, we’ll walk you through the steps to effectively prune your tree, whether it’s a fruit-bearing tree, an ornamental tree, or a large shade tree.
Why is Pruning Important?
Pruning trees is not just about trimming back unruly growth or keeping things neat. There are several key reasons why pruning is essential:
- Improved Health: Removing dead, diseased, or damaged branches reduces the risk of pest infestations and disease. It allows the tree to focus its energy on healthy growth.
- Better Air Circulation: Pruning allows air to circulate freely through the canopy, which prevents fungal infections and promotes healthy photosynthesis.
- Enhanced Aesthetics: Pruning allows you to shape your tree and maintain a desired form. Whether you want a dense hedge or a tall shade tree, pruning helps achieve the desired shape.
- Increased Fruit Production: For fruit trees, pruning encourages better fruit yield. By removing excessive growth, the tree can direct its energy to the branches that bear fruit.
- Safety: Removing branches that are dead, broken, or overgrown can prevent accidents. Branches that obstruct pathways or grow too close to power lines can be hazardous.
When Should You Prune a Tree?
The timing of pruning depends on the type of tree and its growth cycle. However, general guidelines for pruning are:
- Late Winter or Early Spring: For most trees, the best time to prune is during dormancy (late winter to early spring). Pruning during this period helps reduce stress on the tree and minimizes the risk of disease. Dormant trees are also less likely to experience sap loss or bleeding from cuts.
- After Flowering: For trees that bloom in spring (like lilacs or magnolias), prune them right after they finish flowering. This allows the tree to set buds for next year.
- Summer Pruning: For specific trees or purposes (such as controlling size), summer pruning can also be done, though it’s generally more stressful on the tree than pruning during dormancy.
What You Will Need
Before you start pruning your tree, gather the necessary tools:
- Pruning Shears: Ideal for smaller branches and foliage.
- Loppers: Used for cutting branches that are thicker than those handled by shears.
- Pruning Saw: Required for larger branches that are too thick for loppers.
- Pole Pruner: For reaching high branches that are out of reach.
- Gloves: To protect your hands while working.
- Safety Glasses: To shield your eyes from falling debris.
- Disinfectant Solution: To clean your tools before and after each use to avoid spreading disease.
Step-by-Step Guide to Pruning a Tree
Step 1: Evaluate the Tree’s Needs
Before you begin pruning, take a moment to evaluate the tree’s shape and health. Consider what you’re trying to achieve with pruning:
- Do you want to shape the tree? If so, you’ll be focusing on trimming outer branches to create a rounded or pyramidal form.
- Is the tree unhealthy? In this case, you’ll want to remove dead or diseased branches.
- Are you aiming to improve fruit production? For fruit trees, removing some branches will help the tree focus its energy on bearing fruit.
Step 2: Plan the Tree’s Shape
Once you’ve assessed your tree’s needs, you can start thinking about its final shape. Trees that are meant to stand as ornamental features or provide shade should have a balanced form, with a strong central leader (the main stem) and well-placed branches. If you’re growing a hedge, keep it thick and dense, but make sure to prune regularly to maintain its shape.
Step 3: Identify the Primary Branches
When pruning, avoid cutting the main branches or the central leader (the trunk-like structure of the tree). These branches are the backbone of the tree and should be kept intact for the tree’s stability. Focus on thinning out smaller or overcrowded branches that interfere with airflow or light penetration.
Step 4: Remove Damaged or Diseased Branches
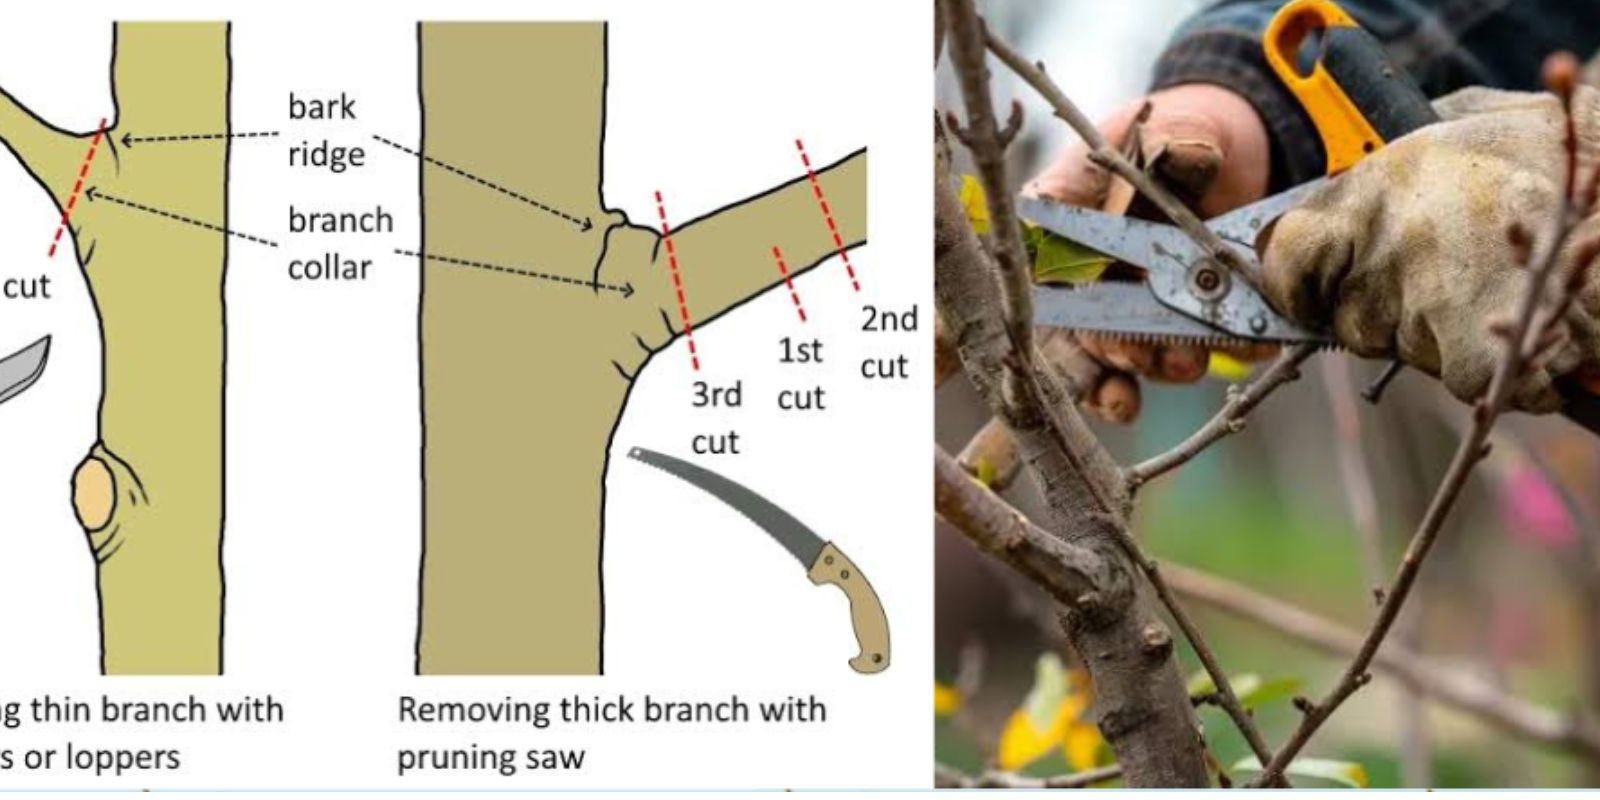
Begin by removing branches that are dead, damaged, or diseased. These branches are often weaker and more prone to attracting pests and fungi. Use clean, sharp pruning tools to make a clean cut at the base of the branch, close to the trunk, but avoid cutting into the trunk itself.
Step 5: Thin the Tree’s Interior
To improve air circulation and light penetration, thin out the interior of the tree. Look for branches that are growing inward, crossing over each other, or causing congestion in the canopy. Cutting these branches will help reduce competition for resources and will allow the tree to focus on its healthiest branches.
Step 6: Remove Suckers and Water Sprouts
Suckers and water sprouts are vigorous, vertical shoots that grow from the base of the tree or from the main trunk. These shoots divert energy away from the tree’s main branches and can cause unnecessary stress. Remove them as soon as you notice them.
Step 7: Shape the Tree
Once the tree’s interior is cleared, you can start shaping the tree to fit your desired look. For ornamental trees, this often means removing some of the outer branches to create a neat, symmetrical shape. For fruit trees, you may want to open up the canopy to allow sunlight to reach the lower branches where fruit is typically produced.
Step 8: Cut the Branches Properly
When cutting branches, make sure to use the proper technique to avoid causing damage. Make a shallow cut underneath the branch before cutting through the top. This prevents the branch from tearing as it falls. Once the branch is almost severed, make a clean cut to remove the stump.
Step 9: Don’t Over-Prune
One of the most important things to remember when pruning is not to overdo it. Removing too much of the tree at once can shock the tree and leave it vulnerable to disease and pest attacks. Avoid cutting more than 25% of the tree’s total branches at any one time.
Step 10: Clean and Disinfect Tools
After pruning, clean your tools with an alcohol-based disinfectant or a solution of water and bleach. This will help prevent the spread of diseases between trees. Always clean your tools after each use, especially if you’re pruning diseased trees.
Tips for Specific Types of Trees
- Fruit Trees: For fruit trees like apples, cherries, or peaches, pruning is vital for encouraging more fruit production. Remove any inward-growing branches and keep the tree’s canopy open to allow sunlight to penetrate. Prune fruit trees right after they bloom to give them the best chance for the next growing season.
- Shade Trees: For large shade trees, focus on creating a strong central leader and remove any weak or crossing branches. Be sure not to remove too much foliage, as this could result in a lack of shade.
- Flowering Trees: Flowering trees like magnolias or dogwoods should be pruned right after they bloom. This allows the tree to set buds for the next blooming season.
Common Pruning Mistakes to Avoid
- Pruning Too Much at Once: Over-pruning can stress the tree and leave it vulnerable to diseases. Remove no more than 25% of the tree’s total foliage at a time.
- Cutting Too Close to the Trunk: Avoid cutting branches too close to the trunk, as this can damage the tree’s cambium layer, the tissue responsible for transporting nutrients.
- Ignoring the Tree’s Growth Pattern: Every tree has its own growth pattern. Ensure that you prune in a way that supports the natural structure of the tree.
- Using Dull or Dirty Tools: Dull tools can crush the tree’s branches, and dirty tools can spread diseases. Always ensure your pruning tools are clean and sharp.
Conclusion
Pruning is an essential skill for anyone interested in tree care, whether you’re looking to maintain a healthy, aesthetically pleasing tree or you want to improve fruit production. By following the steps outlined in this guide, you’ll be able to prune your trees correctly, helping them thrive year after year. Remember to always assess the needs of the tree before starting, and don’t over-prune. With practice and care, you’ll be rewarded with a beautiful, healthy tree that adds value to your home and your garden.