
Hibiscus plants, known for their stunning and vibrant blooms, are a favorite among gardeners and plant enthusiasts alike. With a variety of species and hybrids available, these plants can be grown in various climates, making them a versatile choice for both indoor and outdoor gardens. One of the most rewarding aspects of hibiscus care is propagation, allowing you to expand your collection and share these beautiful plants with friends and family. In this comprehensive guide, we’ll explore the ins and outs of propagating hibiscus from cuttings, including tips, techniques, and care to ensure success.
Understanding Hibiscus Varieties
Before diving into propagation, it’s essential to understand the different types of hibiscus. The most common varieties include:
- Tropical Hibiscus (Hibiscus rosa-sinensis): Known for its large, showy flowers, tropical hibiscus thrives in warm climates and is often grown as an annual in cooler regions.
- Hardy Hibiscus (Hibiscus moscheutos): These plants are winter-hardy and can survive in colder climates. They produce large flowers and are typically perennial.
- Rose of Sharon (Hibiscus syriacus): A deciduous shrub that blooms in mid-summer, this variety features a range of flower colors and attracts pollinators.
Understanding these varieties will help you choose the best type for propagation based on your climate and gardening goals.
Benefits of Propagating Hibiscus
Propagating hibiscus from cuttings offers several advantages:
- Cost-Effective: Instead of purchasing new plants, you can create more from existing ones, saving money.
- Preservation of Varieties: Propagation allows you to maintain specific cultivars or hybrids that may not be available at local nurseries.
- Sharing with Friends: Propagating hibiscus is a wonderful way to share your passion for gardening with others.
Preparing for Propagation
Selecting the Right Time
The best time to propagate hibiscus is during the spring or early summer when the plant is actively growing. This time frame ensures that the cuttings have a better chance of rooting successfully.
Gathering Tools and Materials
To propagate hibiscus effectively, gather the following tools and materials:
- Sharp, Sterilized Scissors or Pruning Shears: To make clean cuts and minimize damage to the plant.
- Small Pots or Containers: Use pots with drainage holes for the cuttings.
- Potting Mix: A well-draining mix, such as a combination of perlite and peat, is ideal for rooting.
- Water: For hydrating the cuttings and keeping the potting mix moist.
- Plastic Bag or Dome: To maintain humidity around the cuttings during the rooting process.
- Rooting Hormone (Optional): While not necessary, rooting hormone can encourage faster root development.
Step-by-Step Guide to Propagating Hibiscus from Cuttings
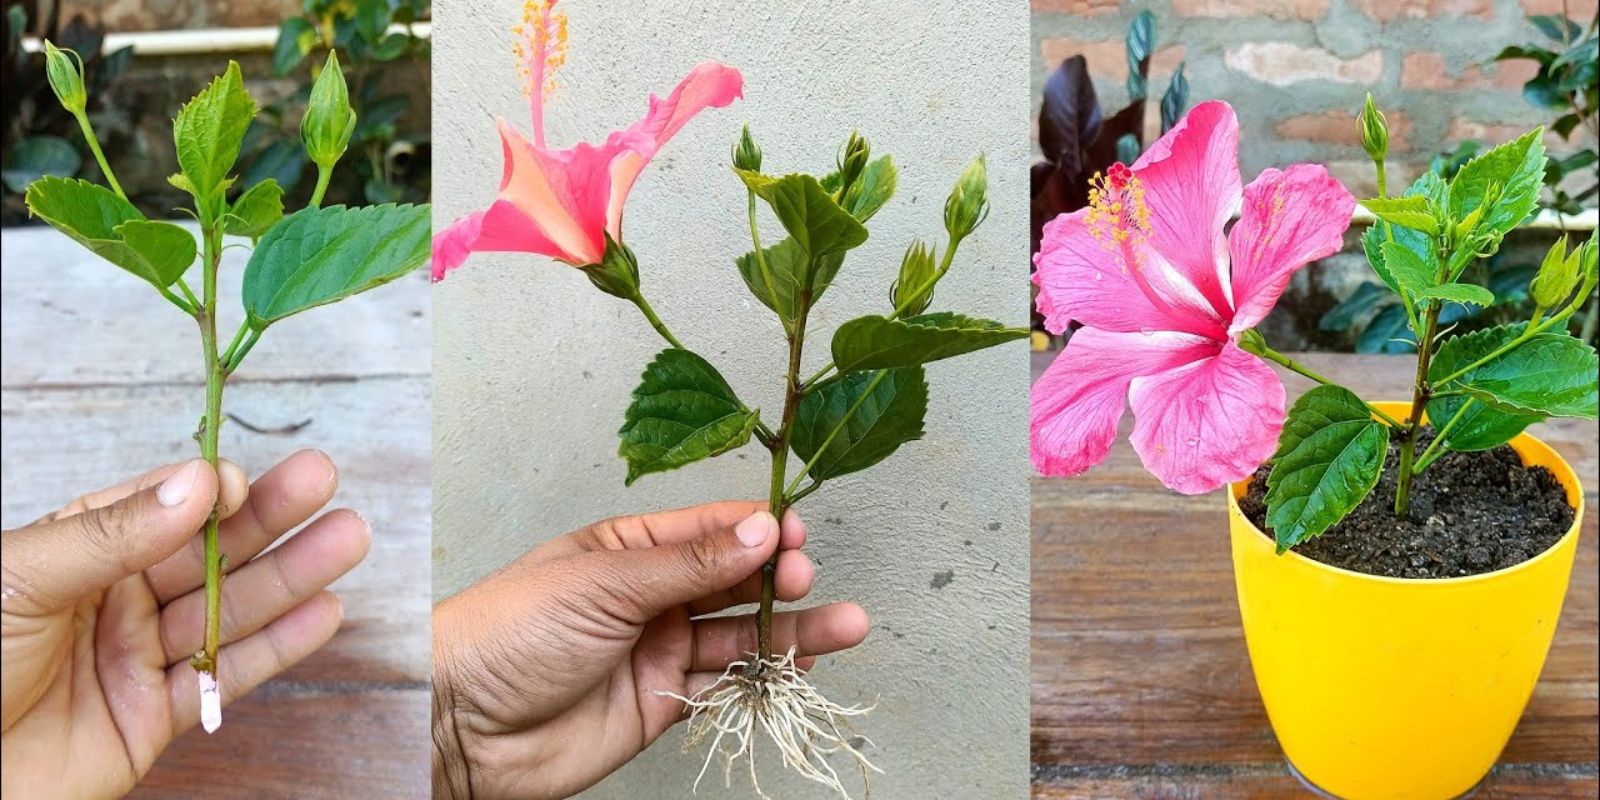
Step 1: Selecting Healthy Cuttings
Choose a healthy hibiscus plant that shows no signs of disease or pests. Look for stems that are 4-6 inches long, ideally from the current season’s growth. A healthy cutting will have vibrant leaves and a firm stem.
Step 2: Making the Cut
Using your sterilized scissors or shears, make a clean cut just below a leaf node. The leaf node is the point where leaves attach to the stem and is critical for root development.
Step 3: Preparing the Cutting
Remove the leaves from the bottom half of the cutting to prevent them from rotting in the soil. Leave two or three leaves at the top to help the cutting photosynthesize as it develops roots.
Step 4: Applying Rooting Hormone (Optional)
If you choose to use rooting hormone, dip the cut end of the hibiscus cutting into the powder, shaking off any excess. This can promote faster root growth and increase your chances of successful propagation.
Step 5: Planting the Cutting
Fill your pot with the well-draining potting mix, leaving about an inch of space at the top. Create a small hole in the soil using your finger or a pencil, then insert the cutting into the hole, ensuring the leaf node is buried in the soil. Firm the soil around the cutting to provide stability.
Step 6: Watering the Cutting
Water the cutting thoroughly until water drains from the bottom of the pot. This helps settle the soil around the cutting and provides moisture for root development.
Step 7: Creating Humidity
To maintain humidity around the cutting, cover the pot with a plastic bag or a plastic dome. This mini greenhouse effect helps retain moisture and encourages rooting. Be sure to remove the cover for a few minutes each day to allow for ventilation and prevent mold growth.
Step 8: Providing Proper Light
Place the pot in a warm location with bright, indirect light. Avoid direct sunlight, which can scorch the cutting. The ideal temperature for rooting hibiscus cuttings is between 70°F and 80°F (21°C and 27°C).
Step 9: Monitoring Progress
Check the soil regularly to ensure it remains moist but not soggy. After about 4-6 weeks, gently tug on the cutting; if you feel resistance, it has developed roots.
Step 10: Transplanting the New Hibiscus
Once the cutting has rooted and new growth appears, it’s time to transplant it into a larger pot or into the garden. Choose a location with well-draining soil and ample sunlight. If planting outdoors, wait until after the last frost to ensure the young plant has the best chance of survival.
Caring for Your New Hibiscus Plant
After transplanting, proper care will help your new hibiscus thrive:
Watering
Keep the soil consistently moist, especially during the first few weeks after transplanting. As the plant establishes itself, reduce the frequency of watering but ensure it doesn’t dry out completely.
Fertilizing
Fertilize your hibiscus plant with a balanced, water-soluble fertilizer every 4-6 weeks during the growing season (spring and summer). This will promote healthy growth and vibrant blooms.
Pruning
Regular pruning helps maintain the shape of your hibiscus plant and encourages bushier growth. Remove any dead or damaged branches, as well as spent flowers, to promote new blooms.
Pest Management
Monitor your hibiscus for common pests, such as aphids, spider mites, and whiteflies. If you notice any infestations, treat them promptly with insecticidal soap or neem oil.
Troubleshooting Common Propagation Issues
Even with the best intentions, propagation can sometimes go awry. Here are a few common issues and their solutions:
Yellowing Leaves
If the leaves of your cutting turn yellow, it may be a sign of overwatering or poor drainage. Ensure your pot has drainage holes and allow the soil to dry slightly between waterings.
Wilting Cuttings
Wilting may occur if the cutting is not receiving enough humidity. Check the plastic cover to ensure it’s retaining moisture, or mist the cutting occasionally to increase humidity.
No Root Development
If your cutting doesn’t develop roots after several weeks, it could be due to poor lighting, incorrect temperatures, or using a cutting that was too old. Ensure you’re following the steps correctly, and try propagating from a healthier cutting.
Conclusion
Propagating hibiscus from cuttings is a fulfilling and straightforward process that allows you to expand your garden while enjoying the beauty of these stunning plants. By following the steps outlined in this guide, you can successfully propagate hibiscus and share their vibrant blooms with friends and family. With a little patience and care, your hibiscus plants will thrive, providing beauty and enjoyment for years to come.
Final Thoughts
Now that you’re equipped with the knowledge to propagate hibiscus, it’s time to get started! Whether you’re a seasoned gardener or a beginner, this process can be incredibly rewarding. Don’t forget to share your propagation successes and tips with fellow plant lovers on social media! Happy gardening!