
Christmas Cactus (Schlumbergera spp.) is a beloved holiday plant known for its vibrant blooms and festive spirit. Whether you’re a seasoned gardener or just starting your plant journey, propagating your Christmas Cactus from leaf cuttings is an easy and fun way to expand your collection. Not only will you be able to share your plants with friends and family, but you’ll also learn how to grow bigger, healthier, and bushier Christmas Cactus plants. In this comprehensive guide, we’ll walk you through the steps of propagating Christmas Cactus, troubleshooting common issues, and tips for success.
Why Propagate Christmas Cactus?
Before diving into the propagation process, you may be wondering why you should propagate your Christmas Cactus in the first place. There are a few great reasons:
- Expand Your Collection: Propagating your Christmas Cactus allows you to grow new plants for your home or garden. If you already have a healthy, mature plant, you can quickly create more plants from a single cutting.
- Cost-Effective: Buying new plants can get expensive, especially for unique or rare varieties of Christmas Cactus. Propagating your own is a much more affordable option.
- Gift a Piece of Your Garden: If you have friends or family who love plants, propagated cuttings make fantastic gifts. You can share the joy of growing these beautiful plants and the festive blooms they provide.
- Encourage Better Growth: If your Christmas Cactus has become too leggy or sparse, propagating can help rejuvenate the plant. New cuttings can lead to fuller, bushier plants.
Step-by-Step Guide to Propagating Christmas Cactus from Leaf Cuttings
Now that we know why propagation is so beneficial, let’s get into the process. Follow these simple, easy-to-understand steps to successfully propagate your Christmas Cactus.
1. Choose the Right Time to Propagate
The best time to propagate your Christmas Cactus is after it has finished blooming. This is usually in late winter or early spring. At this point, the plant is resting and not actively growing, so it’s an ideal time to take cuttings.
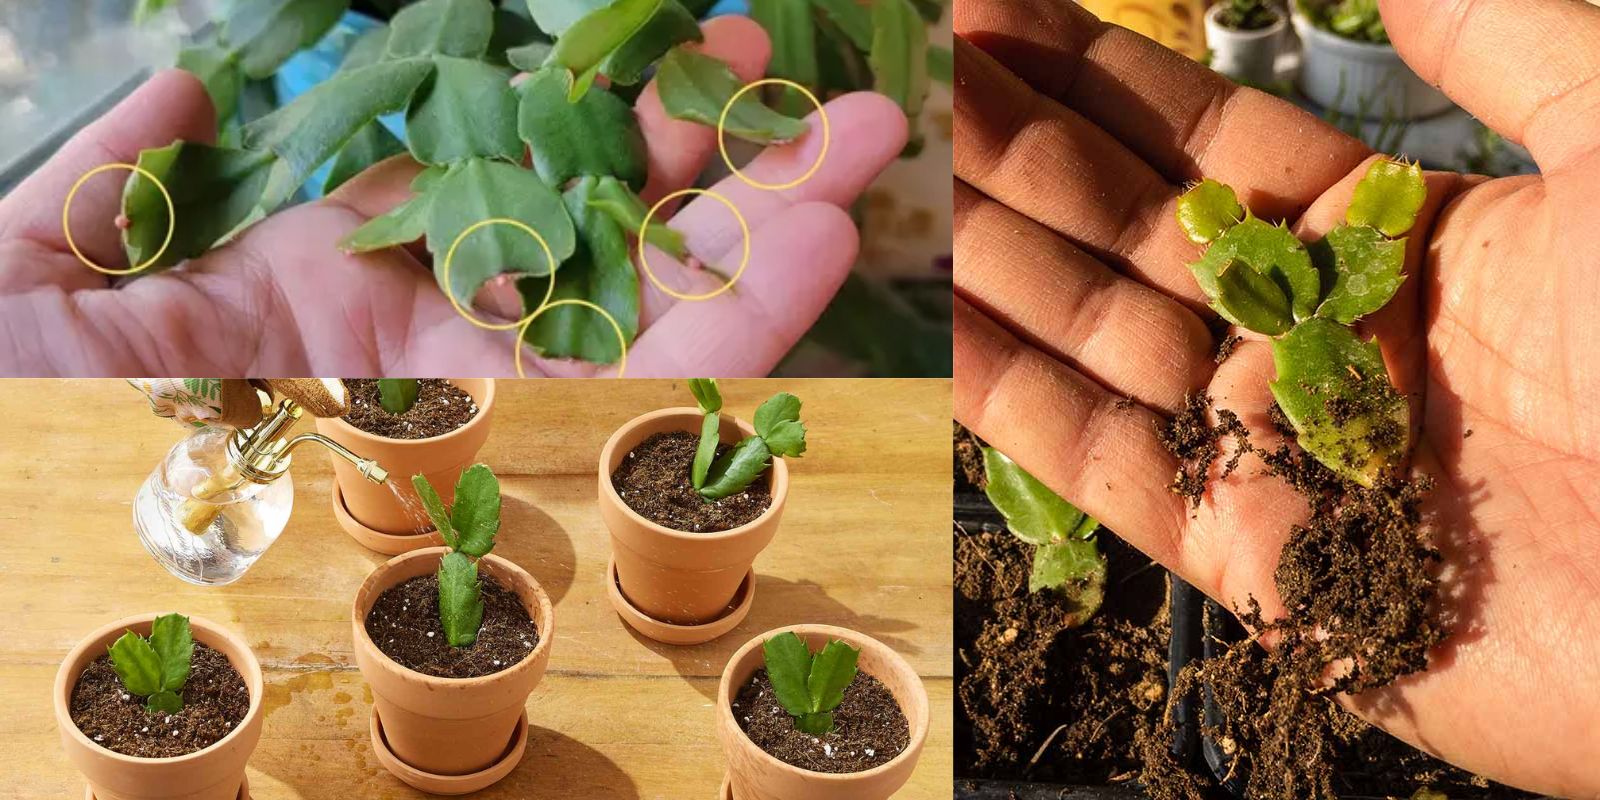
2. Select a Healthy Stem
Start by inspecting your Christmas Cactus for a healthy, mature stem. Look for a stem that’s free from any disease or damage. A good cutting will be a healthy section with a few segments (the joints where the pads connect).
Avoid cutting from stems that are too young or too old, as they may not root as well. A healthy, green segment with plump pads will give you the best chance for success.
3. Take the Cutting
Use clean, sharp scissors or pruning shears to cut the chosen stem from the plant. Cut a section that is about 3-4 inches in length, ideally with 2-3 segments. It’s important to make the cut clean and precise to avoid damaging the plant.
4. Allow the Cutting to Callus
Once you’ve taken the cutting, place it in a dry spot for 2-3 days to allow the cut end to callus over. This step is crucial to prevent rot when you plant the cutting. The callusing process helps the plant seal off the wound and prevents excess moisture from entering.
If you skip this step, the cutting may rot instead of rooting, so be patient. After a few days, you should see a slight scab or hardened area at the cut end of the cutting.
5. Prepare the Pot and Soil
While your cutting is callusing, it’s a good idea to prepare a pot and the right soil. Choose a small container with drainage holes to prevent water from accumulating at the bottom, which could lead to root rot.
For soil, use a well-draining cactus or succulent mix. If you don’t have access to cactus soil, you can create your own by mixing regular potting soil with sand or perlite to ensure good drainage. Avoid using heavy, moisture-retaining soil as this can cause your cutting to rot before it roots.
6. Plant the Cutting
Once your cutting has callused, it’s time to plant it. Gently push the cut end of the stem into the prepared pot, about 1 inch deep into the soil. Make sure the cutting is upright and well-supported in the soil.
Do not bury the cutting too deep, as this could interfere with the rooting process. Gently press the soil around the cutting to ensure it’s in place.
7. Water Lightly
After planting your cutting, water the soil lightly. The goal is to keep the soil slightly moist but not soggy. Overwatering at this stage can cause the cutting to rot, so it’s important to use a light touch.
Let the soil dry out slightly between waterings. Christmas Cactus is a succulent and doesn’t like to sit in wet soil. A good rule of thumb is to water only when the top inch of soil feels dry.
8. Create a Humid Environment
To encourage rooting, create a humid environment for your cutting. You can do this by covering the pot with a clear plastic bag or placing it inside a mini greenhouse or terrarium. This helps trap moisture and provides the cutting with the humidity it needs to take root.
Make sure the plastic doesn’t touch the cutting directly, as this can lead to mold. Instead, use a few stakes or sticks to keep the plastic away from the plant.
9. Place in Indirect Light
Place your cutting in a location with bright, indirect sunlight. Avoid direct sunlight, as this can scorch the cutting or dry it out too quickly. A windowsill with filtered light or a spot with light shade will be perfect.
Christmas Cactus prefers cooler temperatures, so avoid placing the cutting in a spot that’s too hot. A room temperature of 65-75°F (18-24°C) is ideal.
10. Wait for Roots to Form
Now, be patient! It can take anywhere from 3 to 6 weeks for the cutting to develop roots. During this time, check the cutting occasionally by gently tugging on it. If it resists being pulled out of the soil, that’s a good sign that roots have formed.
Once you feel resistance, your cutting is ready to be treated like a mature plant. At this point, you can remove the plastic cover and continue to care for the cutting as you would a regular Christmas Cactus.
11. Transplant and Care for New Plant
When your new plant has a healthy root system, it’s time to transplant it into a larger pot. Choose a pot that is about 1-2 inches wider than the current one and use the same well-draining soil mix.
Water the new plant gently and continue to provide it with bright, indirect light. As the plant grows, pinch back the growing tips to encourage a bushier, more compact plant.
Troubleshooting Common Problems
While propagating Christmas Cactus is relatively simple, you may encounter a few common issues. Here’s how to troubleshoot them:
- Rotting Cutting: If your cutting starts to rot, it’s likely due to overwatering or not allowing the cutting to callus before planting. Make sure the cutting is callused and the soil is well-draining.
- No Rooting: If your cutting isn’t rooting, it may not have enough humidity or the soil may be too wet or too dry. Ensure you’re following the recommended watering and humidity guidelines.
- Leggy Growth: If your new Christmas Cactus plant becomes leggy or sparse, it may not be getting enough light. Move it to a brighter spot or increase the light exposure.
Secret to Growing Bushy Christmas Cactus Plants
If you want to grow fuller, bushier Christmas Cactus plants, there’s a secret you should know: Pinch Back the Growing Tips! When the new plant begins to grow, regularly pinch off the tips of the stems to encourage side branching. This will make your plant grow thicker, with more blooms and a fuller appearance.
Final Thoughts
Propagating Christmas Cactus is a fun and rewarding experience that allows you to multiply your plants while enjoying the beauty of vibrant blooms. By following these simple steps, you can successfully propagate your Christmas Cactus from leaf cuttings and grow healthy, bushy plants that will bloom year after year.
Happy gardening, and don’t forget to share your propagation success stories! #ChristmasCactusPropagation #HolidayPlants #CactusLove #PlantPropagation #DIYGardening #SucculentCare #GardenTips #HouseplantCommunity #PlantParenthood #GardeningHacks