
Growing peanuts in containers is an exciting and rewarding venture for both novice and seasoned gardeners. Not only are peanuts delicious, but they also offer numerous health benefits and can be grown even in limited spaces. This comprehensive guide will walk you through everything you need to know about successfully cultivating peanuts in containers, ensuring you achieve large and abundant tubers.
Introduction to Container Gardening
Container gardening has gained popularity in recent years due to its versatility and accessibility. Whether you have a small balcony, a patio, or just a sunny window, you can grow a variety of plants, including peanuts. Peanuts (Arachis hypogaea) are unique legumes that grow underground, producing edible seeds in pods. By understanding the specific needs of peanut plants and following the right techniques, you can enjoy a fruitful harvest without the need for a traditional garden.
Why Grow Peanuts in Containers?
- Space-Efficient: Container gardening allows you to grow plants in limited spaces, making it ideal for urban gardeners or those with small yards.
- Control Over Conditions: Containers provide better control over soil quality, watering, and pest management.
- Mobility: Containers can be moved to optimize sunlight exposure or protect plants from adverse weather conditions.
- Fresh Produce: Growing your own peanuts ensures you have fresh, organic snacks right at your fingertips.
Understanding Peanut Plants
Before you start planting, it’s essential to understand the characteristics of peanut plants:
- Growth Habit: Peanuts are bushy plants that can reach heights of 12-18 inches. They produce yellow flowers above ground, but the peanut pods develop underground.
- Growing Season: Peanuts thrive in warm weather, requiring a growing season of approximately 120-150 days. They prefer full sun and well-drained soil.
- Types of Peanuts: There are four main types of peanuts: Virginia, Runner, Spanish, and Valencia. Each type has unique characteristics, but all can be grown successfully in containers.
Step-by-Step Guide to Growing Peanuts in Containers
Step 1: Selecting the Right Container
Choosing the right container is crucial for the success of your peanut-growing endeavor. Here’s what to consider:
- Size: Opt for a container that is at least 12 inches deep and wide. Larger containers can hold more soil, providing better moisture retention and root development.
- Material: Containers made from plastic, wood, or clay work well. Ensure the container has drainage holes to prevent waterlogging.
- Shape: A wide, shallow container is ideal, as peanuts grow horizontally underground.
Tip: A container with a capacity of 5-10 gallons is suitable for growing multiple peanut plants.
Step 2: Preparing the Soil
Peanuts thrive in loose, well-draining soil with a pH level between 6.0 and 7.0. Here’s how to prepare the soil:
- Mixing Soil: Combine equal parts of potting soil, compost, and sand or perlite to ensure good drainage and aeration.
- Enriching the Soil: Add organic fertilizers like bone meal or fish emulsion to boost nutrient levels.
- Moisture Retention: Incorporate a moisture-retaining gel if you live in an area with very dry conditions.
Tip: Always use sterilized soil to prevent pests and diseases from affecting your peanut plants.
Step 3: Choosing and Planting Peanut Seeds
Selecting the right seeds is vital for a successful harvest. Here’s how to choose and plant them:
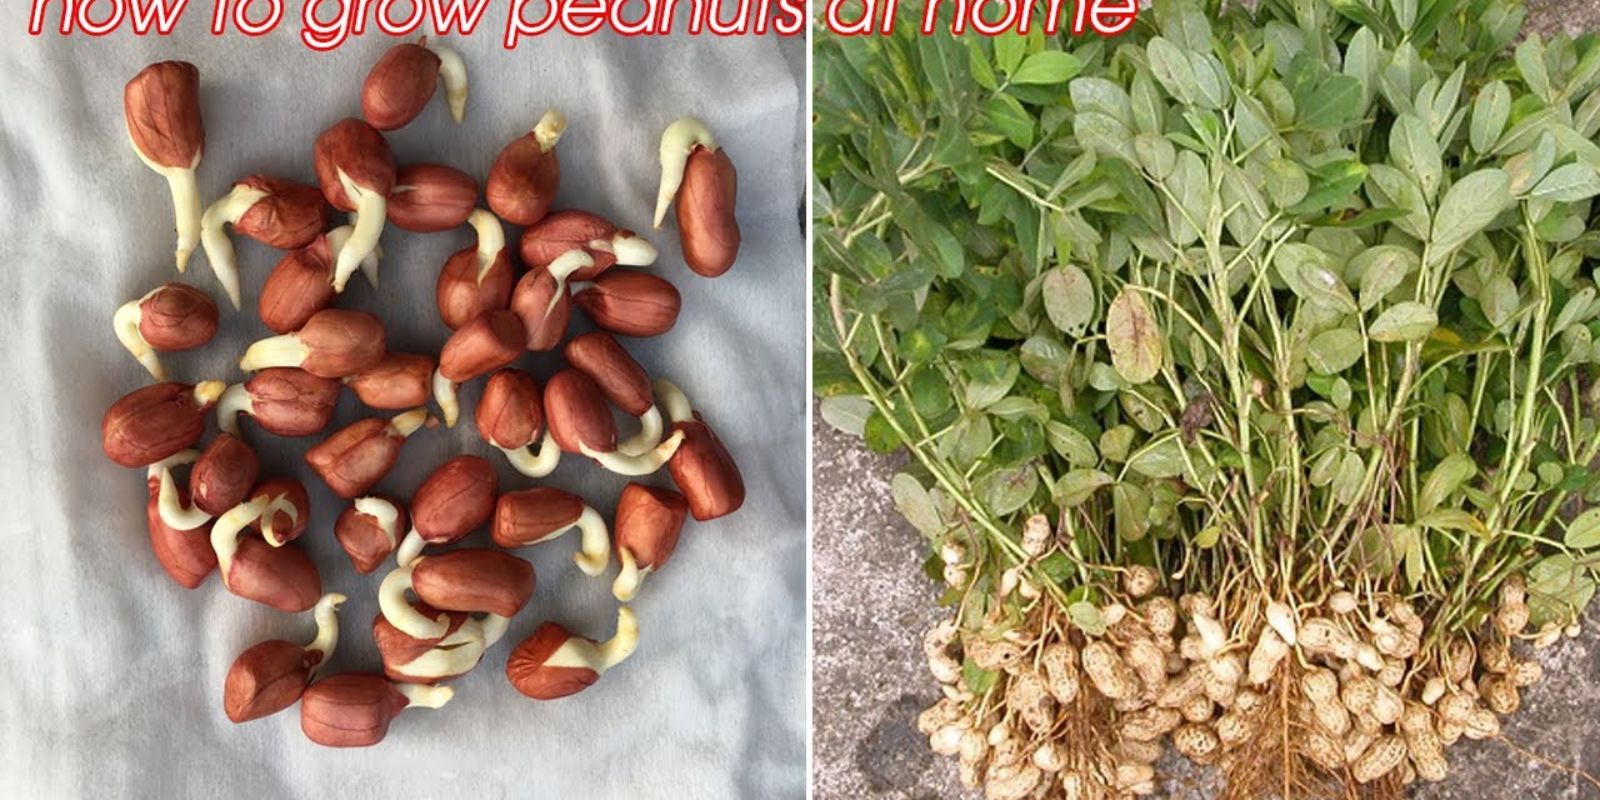
- Seed Selection: Choose raw, unsalted peanuts with the shell intact. Look for certified seeds from local garden centers or online.
- Planting Depth: Sow the seeds about 2 inches deep, spacing them 6-8 inches apart. This spacing allows for proper air circulation and root development.
- Planting Time: The best time to plant peanuts is in late spring or early summer when the soil temperature reaches at least 65°F (18°C).
Tip: Soak the seeds overnight before planting to enhance germination rates.
Step 4: Providing Ideal Growing Conditions
Creating a suitable environment is crucial for healthy peanut growth:
- Sunlight: Place the container in a location that receives full sun for at least 6-8 hours a day. Peanuts thrive in warm, sunny conditions.
- Watering: Keep the soil consistently moist but not soggy. Water the plants when the top inch of soil feels dry. Overwatering can lead to root rot, while underwatering can stunt growth.
- Fertilization: Apply a balanced fertilizer every few weeks during the growing season. Avoid high-nitrogen fertilizers, as peanuts are legumes and fix their own nitrogen.
Tip: Mulching around the plants can help retain soil moisture and suppress weeds.
Step 5: Supporting Growth and Managing Pests
As your peanut plants grow, it’s important to support their development and protect them from pests:
- Weeding: Regularly check for weeds that compete with peanuts for nutrients. Hand-pull weeds or use organic mulch to suppress them.
- Pest Control: Monitor for pests like aphids, spider mites, and whiteflies. Use insecticidal soap or neem oil as a natural pest control method.
- Companion Planting: Consider planting peanuts alongside compatible plants like corn or marigolds to deter pests and promote healthy growth.
Tip: Encourage beneficial insects like ladybugs and lacewings to control pest populations naturally.
Harvesting Peanuts
After about 120-150 days, your peanuts will be ready for harvest. Here’s how to tell when to harvest:
- Signs of Maturity: The leaves will start to yellow and fall off, signaling that the plant is nearing the end of its life cycle.
- Harvest Time: Gently dig around the base of the plant with a garden fork or shovel to unearth the tubers. Be careful not to damage the pods.
- Cleaning: Brush off the soil and rinse the pods with water. Allow them to dry in a cool, shaded area for a few days.
Tip: Harvest in dry weather to prevent mold and ensure better storage.
Storing and Enjoying Your Harvest
Once harvested, it’s time to enjoy your homegrown peanuts:
- Storage: Store the peanuts in a cool, dry place in an airtight container. They can last for several months.
- Cooking: Use your peanuts for snacking, baking, or cooking. They can be roasted, boiled, or ground into peanut butter.
Tip: Experiment with different recipes to make the most of your peanut harvest!
Common Challenges and Solutions
While growing peanuts in containers can be relatively easy, challenges may arise. Here are some common issues and how to address them:
- Poor Germination: If seeds fail to germinate, check for the right soil temperature and moisture levels. Soaking seeds before planting can also enhance germination.
- Yellowing Leaves: This could indicate nutrient deficiencies or overwatering. Test the soil and adjust your watering and fertilization practices accordingly.
- Pest Infestation: Regularly inspect your plants for pests and apply organic pest control methods as needed.
Conclusion: Start Growing Peanuts in Containers Today!
Growing peanuts in containers is an enjoyable and fulfilling gardening experience that can provide a bountiful harvest. With the right techniques, care, and patience, you can cultivate large and abundant tubers, even in limited spaces.
Embrace the joy of growing your own food and start your peanut-growing journey today. By following the steps outlined in this guide, you’ll be well on your way to enjoying fresh, homegrown peanuts right from your own backyard or patio. Happy gardening! 🥜🌱