
Gardenias, with their glossy dark green leaves and sweet, fragrant white flowers, are a garden favorite among plant lovers. Known for their striking beauty and aromatic blooms, they are often used to enhance both indoor and outdoor spaces. One of the best ways to expand your collection of these beautiful plants is by propagating them from cuttings. This not only saves money but also allows you to grow multiple plants from a single specimen.
In this guide, we’ll walk you through the process of growing gardenia plants from cuttings, step by step. Whether you’re a seasoned gardener or a beginner, this method is straightforward and rewarding. By following these simple instructions, you’ll be able to multiply your gardenia collection and enjoy the satisfaction of watching your cuttings grow into full, blooming plants.
Why Grow Gardenias from Cuttings?
Gardenias are commonly propagated by cuttings because it’s one of the most efficient ways to clone the plant. Unlike starting from seeds, cuttings provide a quicker route to maturity, as they already have the genetic material needed for the plant’s growth. There are several benefits to growing gardenias from cuttings:
- Consistency: Gardenias grown from cuttings will be genetically identical to the parent plant. This means the new plant will have the same flower color, fragrance, and other traits.
- Speed: Starting from cuttings is faster than growing from seed. With proper care, your gardenia cutting will establish roots within weeks, and you can expect it to bloom sooner than a plant grown from seed.
- Cost-Effective: Instead of purchasing multiple gardenia plants, propagating from cuttings allows you to expand your garden at little to no cost.
- Sustainability: By propagating gardenias from cuttings, you’re reusing a part of the plant that might otherwise be discarded, contributing to a more sustainable gardening practice.
Step-by-Step Guide to Propagating Gardenias from Cuttings
Follow this comprehensive step-by-step guide to ensure success in growing gardenias from cuttings.
Step 1: Select a Healthy Parent Plant
Start with a healthy, mature gardenia plant. Choose a plant that is disease-free and in good condition. If the plant is flowering, make sure to avoid cutting from the flowering branches, as this will reduce the plant’s energy reserves.
- Look for semi-softwood branches, which are easier to root than very young or woody stems.
- Choose a branch that is free from pests and diseases.
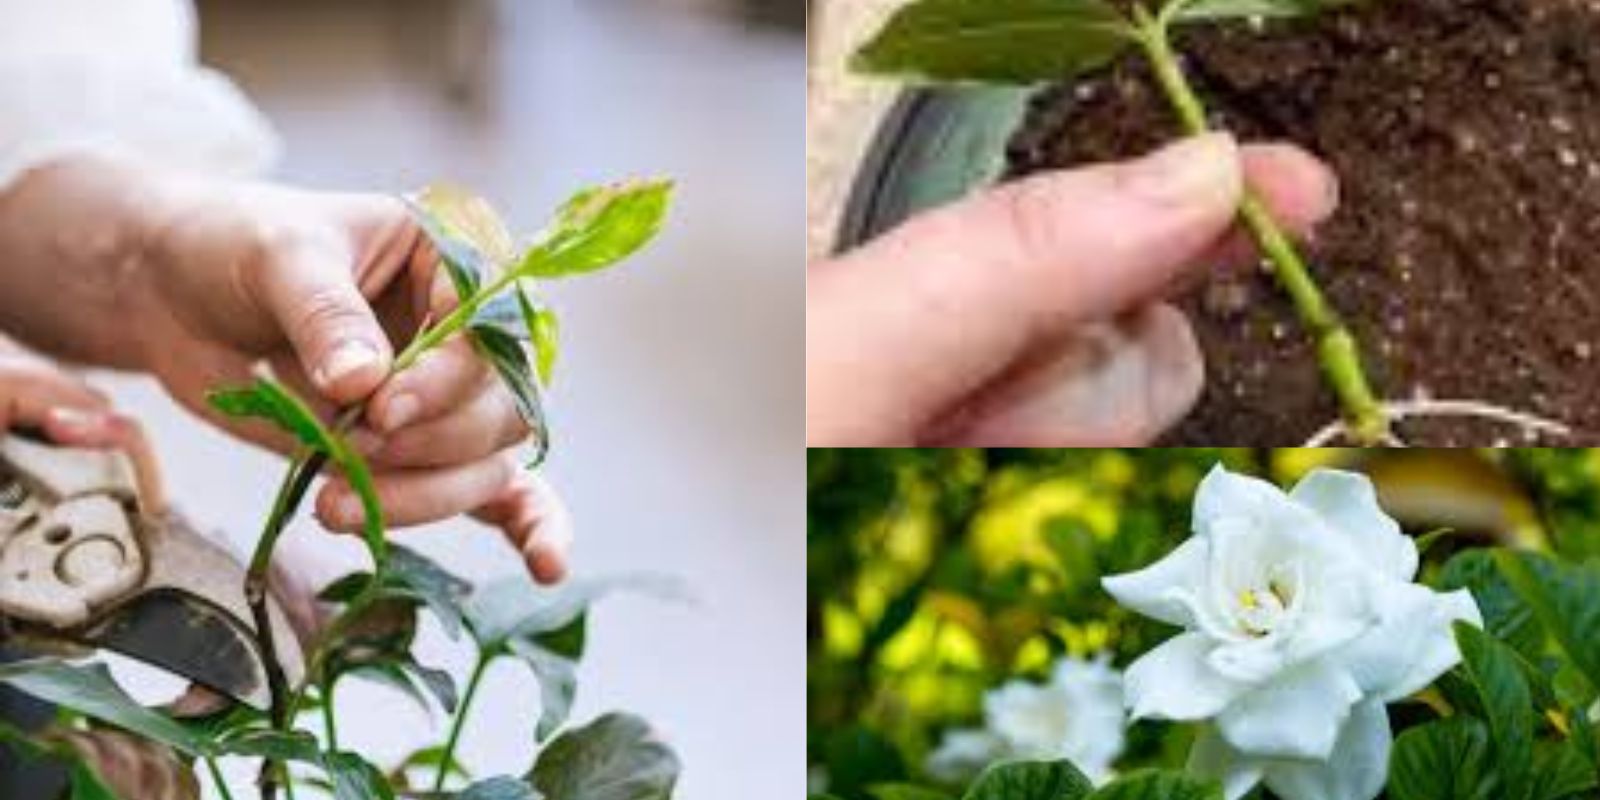
Step 2: Take the Cutting
The best time to take a cutting is in the spring or early summer when the plant is actively growing.
- Cut a 4-6 inch (10-15 cm) piece from the tip of a healthy stem. Make sure it’s a non-flowering branch.
- Use sharp, clean pruning shears to make a clean cut. This will prevent damage to the stem, which can hinder rooting.
- The cutting should have at least two or three leaves on it, with the leaves intact on the upper half of the stem.
Step 3: Trim and Prepare the Cutting
After cutting the stem, you need to prepare the cutting for rooting.
- Remove any leaves from the lower half of the cutting, leaving a couple of leaves at the top. This prevents the leaves from rotting when placed in the soil and encourages energy to focus on root development.
- Cut the stem just below a leaf node (the area where a leaf joins the stem). Nodes are where roots are more likely to form.
- Optional: If you want to encourage faster rooting, you can make a slight diagonal cut at the bottom of the cutting, which can help the plant absorb water and nutrients more efficiently.
Step 4: Use Rooting Hormone (Optional but Recommended)
Rooting hormone helps stimulate root growth and increases the success rate of propagation.
- Dip the cut end of the gardenia cutting into rooting hormone powder. This is not strictly necessary but can improve your chances of success.
- Shake off any excess powder before proceeding to the next step.
Step 5: Prepare the Planting Pot
To create an ideal environment for your cutting to root, choose a small pot with good drainage. Use a well-draining potting mix, such as a mixture of perlite and peat moss. This will allow air and water to flow freely through the soil, preventing the cutting from becoming waterlogged and promoting healthy root growth.
- Fill the pot with the soil mix, leaving about an inch from the top.
- Moisten the soil lightly to ensure it is damp but not soggy.
Step 6: Plant the Cutting
- Create a hole in the center of the soil with a stick, pencil, or your finger.
- Insert the cutting into the hole, ensuring that the bottom of the cutting is deep enough to stay upright and stable.
- Gently press the soil around the cutting to ensure it is securely in place.
Step 7: Create a Humid Environment
Gardenia cuttings thrive in a humid environment, which is essential for root development.
- Cover the cutting with a clear plastic bag, dome, or plastic wrap. This helps retain moisture around the cutting, creating a mini greenhouse effect.
- Make sure the plastic does not touch the leaves. You can use sticks or small supports to hold the plastic away from the plant.
- Place the pot in a bright location, but keep it out of direct sunlight. Too much direct sun can burn the cutting, and excessive heat can cause the humidity level to drop too low.
Step 8: Maintain the Right Conditions
For successful rooting, it’s important to maintain the proper care during this process:
- Keep the soil consistently moist but not soggy. Overwatering can lead to rot, while underwatering can dry out the cutting.
- Keep the cutting in a warm area with temperatures between 65-75°F (18-24°C). If necessary, place the pot in a warm spot near a windowsill or use a grow light.
- Check the cutting regularly for signs of mold or rot, and remove any affected parts if you notice them.
Step 9: Wait for Roots to Form
After a few weeks, your gardenia cutting should begin to develop roots. You can check the progress by gently tugging on the cutting; if there’s resistance, it means the roots have started to form.
- It typically takes about 4-6 weeks for roots to develop, but this can vary depending on environmental conditions and the specific gardenia variety.
Step 10: Transplant to a Larger Pot
Once the cutting has established a healthy root system, it’s time to transplant it into a larger pot.
- Choose a pot that is slightly bigger than the current one, ensuring it has good drainage holes.
- Carefully remove the rooted cutting from its current pot and plant it in the new pot with a good-quality potting mix. Be sure to plant it at the same depth it was in the smaller pot.
- Water the plant well and place it in a spot with plenty of indirect light to encourage further growth.
Step 11: Ongoing Care for Your Gardenia
- Keep the plant in a bright location with moderate temperatures and humidity.
- Water the plant regularly, ensuring the soil stays moist but not waterlogged.
- Once your gardenia begins to grow, consider fertilizing it with a balanced liquid fertilizer to encourage healthy growth and blooming.
- After a few months, your gardenia should be well-established and ready to bloom.
Conclusion
Growing gardenias from cuttings is a simple and rewarding process that allows you to multiply your collection of these stunning plants. By following these steps and providing the right conditions, you can successfully propagate your gardenia plants and enjoy beautiful blooms for years to come. Whether you’re a novice gardener or a seasoned pro, propagation is a great way to experience the joy of gardening while expanding your plant family.
With patience and the right care, your gardenias will thrive and reward you with their fragrant flowers and lush green foliage. So, give it a try and watch your garden bloom!
Hashtags: #GardeniaPropagation #PlantLovers #PlantPropagation #HomeGardening #GardeningTips #GreenThumb #GardenGoals #DIYGarden #PlantCare #GrowYourOwn