
Growing your own peach tree from seed can be a rewarding and exciting journey. This process allows you to witness the entire life cycle of a peach tree, from the moment the seed is planted until it blossoms and bears fruit. With a little patience and the right conditions, you can enjoy sweet, juicy peaches from your own tree. In this comprehensive guide, we’ll walk you through every step of the process, from selecting the right peach pit to caring for your young tree.
Why Grow a Peach Tree from Seed?
Growing a peach tree from seed not only saves money but also offers a unique experience. While it takes more time than purchasing a young tree from a nursery, the satisfaction of growing a tree from scratch is unparalleled. Here’s why it’s worth it:
- Sustainability: By using peach seeds from the fruit you already consume, you’re reducing waste and promoting a more sustainable lifestyle.
- Variety: Growing from seed can sometimes result in a tree with slightly different characteristics than the parent tree, giving you the chance to cultivate a new variety of peach.
- Personal Achievement: Watching a tree grow from a seed can give a deeper sense of accomplishment than purchasing a ready-grown tree.
Step 1: Selecting and Preparing the Seed
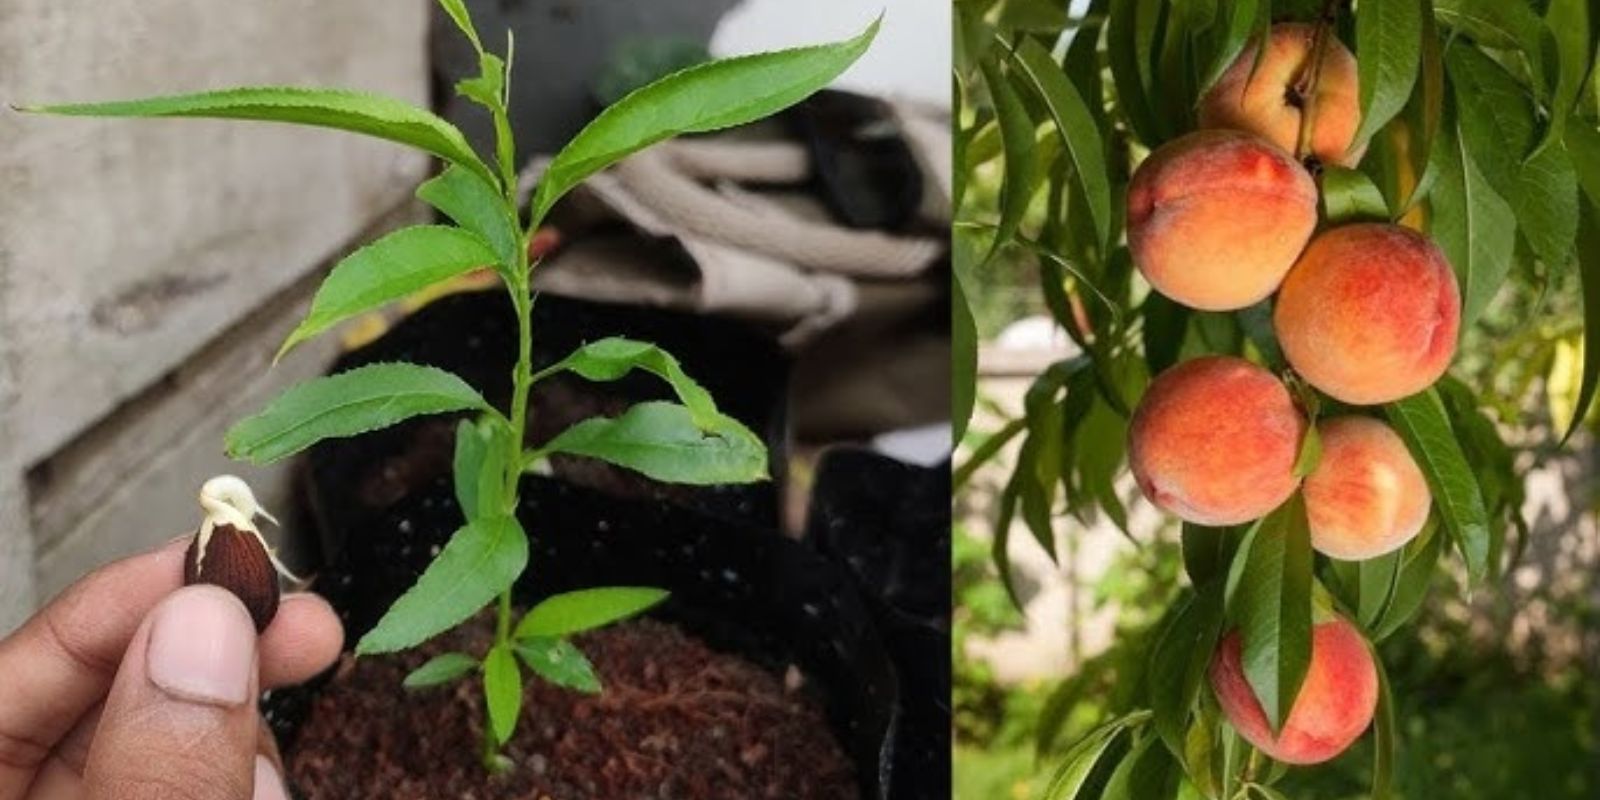
The first step in growing a peach tree is selecting the right seed (pit). If you’ve just enjoyed a juicy peach, don’t throw away the pit! That seed inside can be the start of your future peach tree.
- Choose a Good Variety: Not all peach pits will grow into strong, productive trees. It’s best to use seeds from local, organic peaches as they’re more likely to thrive in your specific climate.
- Cleaning the Pit: After enjoying the fruit, wash the pit thoroughly to remove any remaining flesh. Allow it to dry for a few days.
- Cracking the Pit (Optional): To speed up germination, you can crack open the hard outer shell of the pit to expose the seed inside. Be careful not to damage the seed. Alternatively, you can leave the pit intact and allow nature to take its course.
Step 2: Stratification – Mimicking Winter Conditions
Peach seeds need a period of cold dormancy (stratification) to trigger germination. This mimics the natural winter conditions the seed would experience outdoors.
- Refrigeration: Place the dried pit (or seed) in a damp paper towel, then put it in a plastic bag. Seal the bag and place it in the refrigerator for about 8 to 12 weeks. Keep the temperature between 34°F and 42°F (1°C to 5°C).
- Check for Germination: After the stratification period, check the seed. If the seed has begun to sprout a small root, it’s ready to be planted. If not, leave it for a little longer, checking periodically.
Step 3: Planting the Seed
Once the seed has sprouted, it’s time to plant it. This stage is crucial, as proper planting will set the foundation for a healthy tree.
- Choosing a Container: Start with a small pot that has drainage holes. A 4-inch (10 cm) pot works well for the initial planting.
- Soil Preparation: Use a well-draining, nutrient-rich potting mix. Peaches prefer slightly acidic soil (pH 6.0-7.0), so you can amend your soil with organic matter or compost if necessary.
- Planting Depth: Plant the seed about 1 to 2 inches deep in the soil, with the root pointing downward.
- Watering: Water the soil lightly to keep it moist but not waterlogged. Use a spray bottle to avoid displacing the seed.
Step 4: Providing the Right Growing Conditions
Peach trees need specific conditions to thrive. Although they can grow indoors during their initial stages, they will eventually need to be planted outside.
- Sunlight: Place the pot in a warm, sunny spot. Peach trees need full sunlight to grow, so ensure they get at least 6-8 hours of sunlight each day.
- Temperature: Keep the tree in a warm environment. A temperature range of 65°F to 75°F (18°C to 24°C) is ideal for young peach seedlings.
- Watering: Keep the soil consistently moist but not soggy. Overwatering can lead to root rot, while underwatering can stunt growth.
- Fertilizing: Once the tree has a few sets of leaves, you can start fertilizing it. Use a balanced fertilizer every 4-6 weeks to promote healthy growth.
Step 5: Transplanting Outdoors
When the peach tree has outgrown its pot and the weather conditions are favorable (typically in the spring), you can transplant it outdoors.
- Choosing a Location: Peach trees need full sun, so choose a spot that gets at least 6-8 hours of direct sunlight per day. The soil should be well-draining.
- Spacing: If you’re planting multiple trees, ensure that they are spaced about 15-20 feet apart to allow for proper growth.
- Transplanting Process: Dig a hole that’s twice as wide as the root ball and just as deep. Gently place the tree in the hole, ensuring that the roots are spread out. Backfill the hole with soil, and water thoroughly.
Step 6: Caring for Your Growing Peach Tree
Now that your peach tree is planted in its permanent home, ongoing care is essential to ensure it grows healthy and strong.
- Watering: Water deeply once a week, more often in hot, dry weather. Peach trees prefer consistent moisture, especially when they’re young.
- Mulching: Apply a layer of organic mulch around the base of the tree to retain moisture, regulate soil temperature, and suppress weeds. Keep the mulch away from the trunk to prevent rot.
- Pruning: Peach trees require regular pruning to maintain their shape and encourage fruit production. Prune during the winter (while the tree is dormant) to remove any dead or weak branches. In the summer, prune lightly to control the size and shape of the tree.
- Pest and Disease Control: Keep an eye out for common peach tree pests, such as aphids and peach tree borers. Using organic pest control methods, like neem oil, can help prevent infestations. Additionally, watch for fungal diseases like peach leaf curl, and treat them promptly.
Step 7: Patience – Waiting for Your First Harvest
Growing a peach tree from seed requires patience, as it can take anywhere from 3 to 6 years for the tree to bear fruit. While waiting for your tree to mature, enjoy the process of nurturing your tree and watching it grow.
- Flowering: When your peach tree is about 3 years old, it may start producing flowers in the spring. These delicate pink blossoms are the first sign that your tree is on its way to producing fruit.
- Fruit Development: After flowering, the tree will begin to develop peaches. Thin the fruit early on, leaving about 6 inches between each peach. This ensures that the remaining fruits grow larger and healthier.
- Harvesting: Once your peaches are ripe (usually in late summer), gently twist them off the tree. You’ll know they’re ready when they have a fragrant aroma, slight give when pressed, and a deep color.
Conclusion
Growing a peach tree from seed is a rewarding process that requires time, care, and patience. By following these steps, you can successfully cultivate your own peach tree and enjoy fresh, homegrown peaches for years to come. Watching your tree grow from a tiny seed to a fruit-bearing tree is an incredible experience that connects you to nature in a unique way.
So, why not start today? 🌱🍑 Begin your peach tree journey, share your progress with the gardening community, and don’t forget to tag your photos using #GrowYourOwnPeachTree #PeachTreeJourney #HomegrownFruit #GardeningJoy #SustainableGardening. Happy planting!