
Growing your own peach tree from seed is a gratifying experience that connects you with nature and allows you to enjoy the delicious fruits of your labor. Not only are peaches a delightful treat, but they also carry a sense of nostalgia and summer joy. This article will take you through the entire process of growing a peach tree from seed, covering everything from selecting the right peach to caring for your young tree. Whether you have a spacious backyard or just a few pots on your balcony, this guide will help you successfully cultivate your own peach tree.
Why Grow a Peach Tree from Seed?
Before diving into the details, let’s explore why you might want to grow a peach tree from seed:
- Cost-Effective: Growing from seed is often less expensive than buying a grafted tree.
- Variety: You can grow unique varieties of peaches that may not be available at your local nursery.
- Learning Experience: The process is educational and rewarding, especially for gardening enthusiasts and families.
- Homegrown Flavor: There’s nothing quite like biting into a ripe, juicy peach that you grew yourself.
Step-by-Step Guide to Growing a Peach Tree from Seed
Step 1: Select a Ripe Peach
The first step in your peach-growing journey is selecting a ripe peach. Look for:
- Fresh and Organic: Choose organic peaches when possible to avoid pesticides and chemicals.
- Variety: Consider which type of peach you want to grow—clingstone, freestone, yellow, or white peaches. Each has its unique flavor and texture.
Step 2: Remove the Seed
Once you have your peach, it’s time to extract the seed:
- Cut the Peach: Slice the peach in half and carefully remove the pit. Be cautious not to damage the pit, as it houses the seed.
- Clean the Pit: Rinse the pit under running water to remove any leftover fruit residue. This is crucial as any remaining flesh can promote mold growth.
Step 3: Stratification
Peach seeds require a period of cold stratification to germinate effectively. This mimics winter conditions that seeds would naturally experience. Here’s how to stratify:
- Moisten Sand or Paper Towel: Use a zip-lock bag filled with a handful of moist sand or a damp paper towel.
- Place the Pit: Insert the cleaned pit into the bag and seal it.
- Refrigerate: Place the bag in the refrigerator for 30-60 days. Check periodically to ensure the medium remains moist.
Step 4: Prepare for Planting
After the stratification period, it’s time to prepare for planting:
- Soak the Pit: Remove the pit from the refrigerator and soak it in water for a few hours. This helps to soften the outer shell and encourages germination.
- Check for Cracks: If the pit has developed small cracks, it’s a good sign that it’s ready to be planted.
Step 5: Plant the Seed
Now you’re ready to plant your peach seed:
- Choose the Right Container: Select a small pot (about 4-6 inches in diameter) with drainage holes to prevent waterlogging.
- Fill with Soil: Use well-draining potting mix, ideally one that retains some moisture but allows for good drainage.
- Plant the Seed: Plant the pit about 1 inch deep, with the pointed end facing down. Cover it lightly with soil and gently press down.
Step 6: Provide Ideal Conditions
To encourage germination, your seed needs the right environment:
- Location: Place the pot in a warm, sunny spot that receives at least 6-8 hours of sunlight each day.
- Watering: Keep the soil consistently moist but not soggy. Water lightly to avoid disturbing the seed.
- Humidity: You can cover the pot with plastic wrap or a humidity dome to maintain moisture levels, but be sure to check regularly to prevent mold.
Step 7: Transplant
Once your seedling has sprouted and grown a few inches tall, it’s time to transplant it:
- Check the Roots: Make sure the seedling has developed a healthy root system. You can gently lift the seedling out of the pot to inspect.
- Choose a New Pot or Garden Location: If you’re transplanting to a larger pot, choose one that’s at least 10-12 inches in diameter. If planting in the garden, select a sunny location with well-draining soil.
- Transplanting Process: Carefully remove the seedling from its pot, keeping the roots intact. Place it in the new pot or in the garden, fill with soil, and water thoroughly.
Step 8: Care for Your Tree
Caring for your young peach tree is crucial for its growth and fruit production:
- Watering: Water regularly, especially during dry spells. Mature peach trees require deep watering once a week.
- Fertilization: Apply a balanced fertilizer designed for fruit trees in early spring. Follow the manufacturer’s instructions for the right amount.
- Pruning: Once your tree reaches about a year old, prune it to encourage branching and a strong structure. Remove any dead or crossing branches.
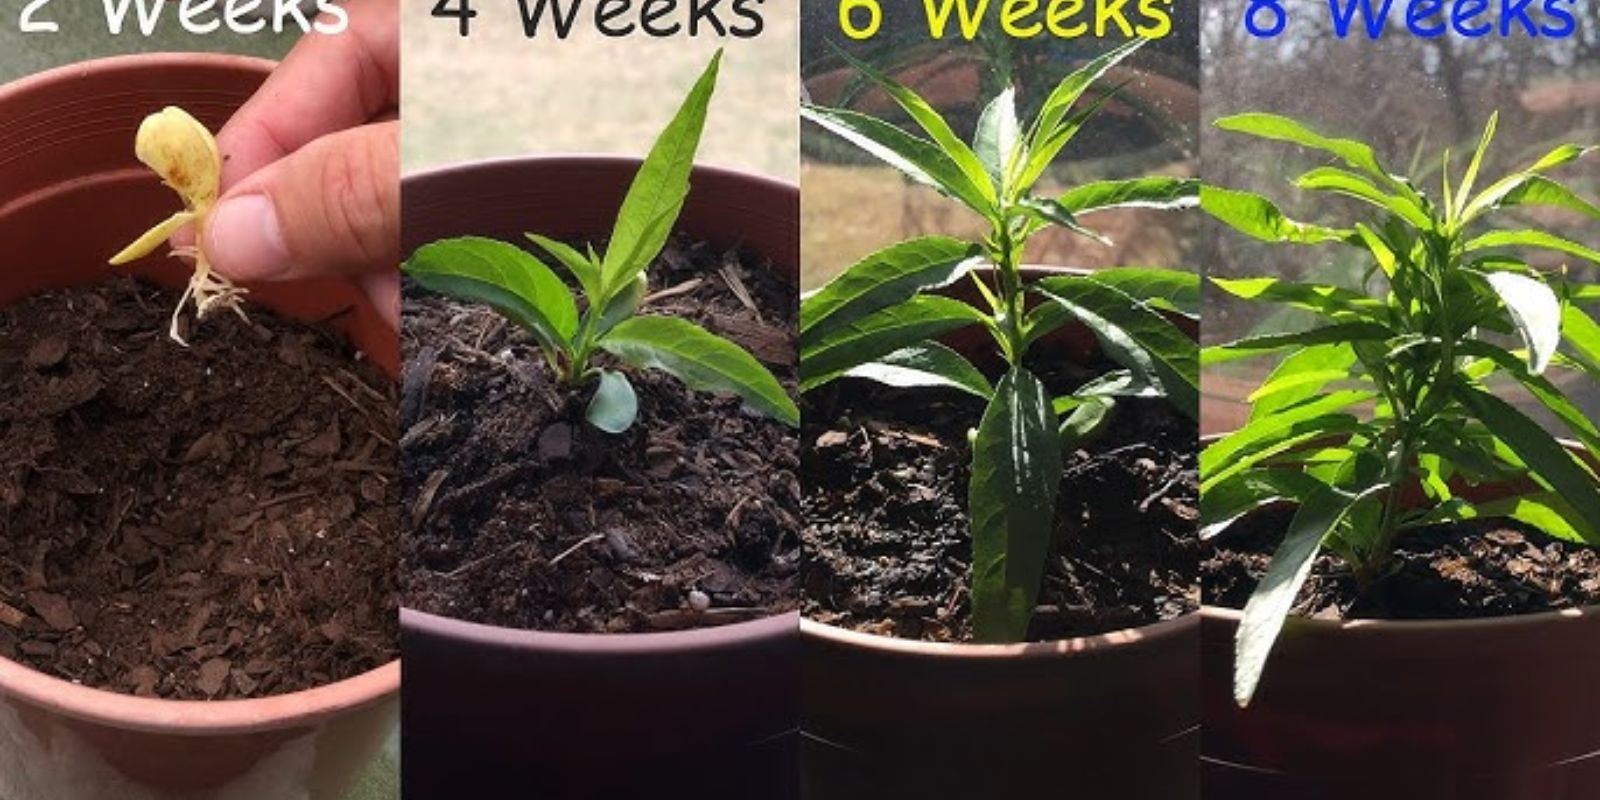
Step 9: Patience and Observation
Growing a peach tree from seed takes time, so be patient:
- Germination Time: Peach seeds can take anywhere from 2 to 6 weeks to germinate.
- Growing Season: Depending on your climate, your tree may take several years to produce fruit. Most peach trees will begin to bear fruit in 3-4 years.
- Observe for Pests: Keep an eye out for pests and diseases. Regularly check the leaves and stems for any signs of trouble.
Conclusion
Growing a peach tree from seed is not only a delightful endeavor but also a rewarding journey filled with learning and patience. With proper care and attention, you’ll soon find yourself enjoying delicious, homegrown peaches right from your garden. Remember to share your journey with fellow gardeners and inspire others to take on this sweet adventure!
So, why wait? Start your peach-growing journey today and savor the rewards of your hard work! 🍑🌳
Join the community of passionate gardeners and share your experience! #PeachTree #HomeGardening #GrowYourOwnFood #GardenJoy #FruitfulHarvest