
Orchids are one of the most beautiful and exotic flowering plants you can grow indoors, and their blooms can add elegance and charm to any space. However, after the initial bloom fades, many orchid owners find themselves unsure of how to get their plants to bloom again. With a little patience and the right care techniques, you can encourage your orchid to bloom repeatedly. This article will guide you through the steps to achieve consistent, stunning blooms, turning you into an orchid-growing expert.
Understanding Your Orchid
Before diving into care techniques, it’s essential to understand the basic needs of your orchid. The most common type of orchid grown indoors is the Phalaenopsis orchid, also known as the “moth orchid.” These plants are epiphytes, which means they grow naturally on trees rather than in soil. This unique growth habit explains their preference for airy growing media, good drainage, and moderate humidity.
Orchids bloom in cycles, often producing flowers once or twice a year, depending on care. After flowering, the plant enters a resting phase where it prepares for the next bloom. Supporting your orchid during this phase is critical to achieving repeated blooming.
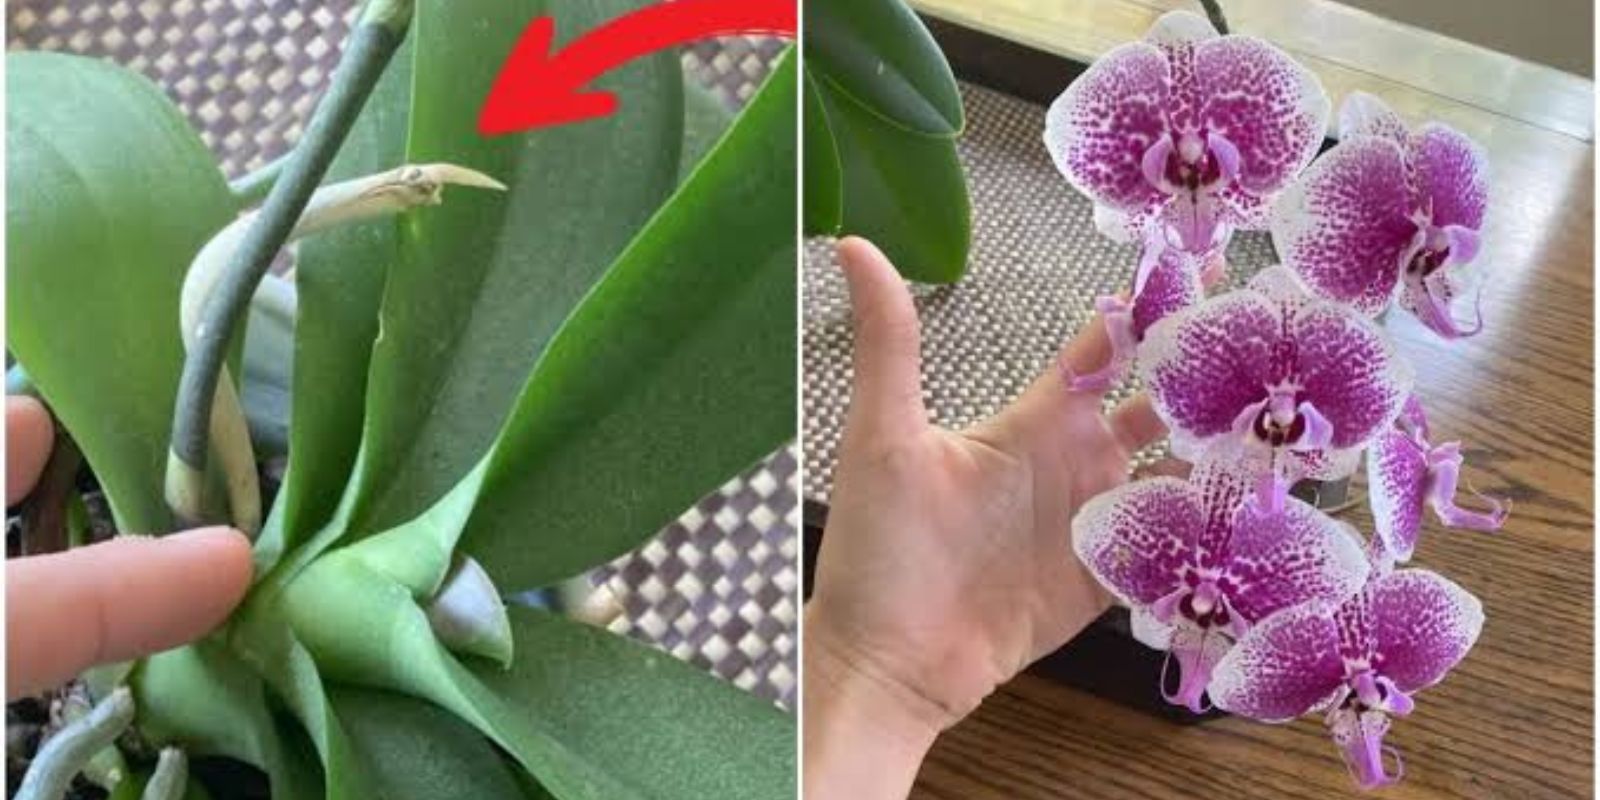
Step 1: Prune the Flower Spike
Once the flowers have faded and dropped, your first task is to assess the flower spike (the stem where the flowers were attached). There are two options:
- Partial Cut: Trim the spike just above the second or third node (a small bump on the spike). This can encourage the orchid to produce a secondary bloom from the same spike.
- Full Cut: If the spike has turned brown and dried out, cut it back entirely to the base. This allows the plant to focus its energy on producing a new, healthy spike.
Both methods are effective, but the best choice depends on the health and condition of the existing spike.
Step 2: Provide the Right Light
Orchids require bright, indirect light to thrive and bloom. Place your plant near an east- or south-facing window where it can receive gentle morning light. Avoid direct sunlight, which can scorch the leaves, and ensure the plant isn’t in a dark corner.
Signs your orchid is receiving the right amount of light:
- Healthy Leaves: Bright green leaves indicate optimal light conditions.
- Dark Green Leaves: Suggest insufficient light, which can prevent blooming.
- Yellow Leaves or Burn Marks: Indicate too much direct sunlight.
If natural light is limited, consider using a grow light designed for orchids.
Step 3: Create a Temperature Drop
One of the most effective ways to encourage an orchid to bloom is by exposing it to a slight drop in temperature. Orchids thrive in temperatures between 65°F and 75°F (18°C to 24°C) during the day, but they require a nighttime drop of about 10°F (5°C) to stimulate flower production.
Tips for creating a temperature drop:
- Place your orchid near a slightly open window or in a cooler room at night.
- Ensure the temperature does not fall below 55°F (13°C), as this can stress the plant.
This temperature fluctuation mimics the orchid’s natural environment and signals that it’s time to bloom.
Step 4: Water Wisely
Proper watering is crucial for orchid health and blooming. Orchids prefer to dry out slightly between waterings, so check the roots and growing medium before adding water.
- When to Water: Water when the roots appear silvery-white, but avoid letting the medium dry out completely.
- How to Water: Use lukewarm water and thoroughly soak the roots, allowing excess water to drain away completely. Never let the orchid sit in standing water, as this can lead to root rot.
- Avoid Overwatering: Orchids are more tolerant of under-watering than overwatering. Yellow, mushy roots are a sign of overwatering.
Step 5: Fertilize Regularly
Orchids need regular feeding to produce strong, vibrant blooms. Use a balanced fertilizer labeled for orchids (e.g., 20-20-20) and apply it every 2-3 weeks during the growing season.
- Dilution: Always dilute the fertilizer to half the recommended strength to avoid burning the roots.
- Timing: Reduce or stop fertilizing during the resting phase after blooming, as the plant requires less energy at this time.
Step 6: Increase Humidity
Orchids thrive in environments with moderate to high humidity levels (50%-70%). Dry indoor air, especially during winter, can hinder blooming.
- Use a Humidity Tray: Place a shallow tray filled with water and pebbles beneath the orchid pot (ensure the pot doesn’t touch the water).
- Group Plants Together: Placing orchids near other plants can create a microclimate with higher humidity.
- Mist Sparingly: Lightly mist the plant in the morning, avoiding the leaves and crown to prevent rot.
Step 7: Repot When Necessary
Orchids benefit from being repotted every 1-2 years, as their growing medium breaks down over time and loses its ability to drain effectively.
- When to Repot: Repot after the blooming phase or if the roots appear crowded, rotted, or escaping the pot.
- Medium: Use a specialized orchid mix with bark, sphagnum moss, or coconut husk to provide aeration.
Repotting encourages healthy root growth and prepares the plant for future blooms.
Step 8: Be Patient and Consistent
Re-blooming orchids takes time and consistency. During the resting phase, focus on maintaining healthy leaves and roots, as this sets the stage for new flower spikes. Avoid moving the plant frequently, as orchids dislike sudden changes in environment.
Common Orchid Problems and Solutions
- No New Spike: If your orchid isn’t producing a new spike, ensure it’s getting enough light and experiencing a temperature drop.
- Yellowing Leaves: Could be caused by overwatering or excessive sunlight. Adjust care as needed.
- Pests: Keep an eye out for mealybugs, scale, and spider mites. Treat infestations promptly with insecticidal soap or neem oil.
Why Orchids Are Worth the Effort
Orchids are not just beautiful; they are also a symbol of patience, care, and achievement. Watching your orchid bloom again is an incredibly rewarding experience that makes all the effort worthwhile. These plants can live for years with proper care, providing you with an ongoing display of elegant flowers.
Conclusion
With the right care and attention, your orchid can bloom repeatedly, gracing your home with its delicate beauty. By following these steps—pruning, providing adequate light, adjusting temperature, watering wisely, fertilizing, increasing humidity, and repotting—you’ll become a pro at keeping your orchid healthy and thriving.
Have you had success with re-blooming orchids? Share your tips in the comments below! Let’s grow together!