
Growing your own food is an immensely rewarding experience, and there are few things more satisfying than harvesting fresh, homegrown potatoes. However, many people think that growing potatoes requires a large amount of space and a big garden plot. The truth is, you don’t need a massive backyard to grow a bountiful crop of potatoes – in fact, you can grow them in a small space by using a technique known as a potato tower.
Potato towers are an ingenious solution for gardeners with limited space, and they allow you to grow potatoes vertically. By stacking layers of soil around the plants as they grow, you maximize the yield of your crop while minimizing the amount of space you need. The result? A larger harvest in a compact area, and a fun gardening project that can be done right at home.
In this guide, we’ll walk you through everything you need to know about building a potato tower, from selecting the materials to planting, caring for, and harvesting your crop. Whether you have a small balcony, a patio, or a tiny garden space, building a potato tower is an easy and efficient way to grow your own food at home.
Why Build a Potato Tower?
Before we dive into the steps of building a potato tower, let’s first explore why this technique is so beneficial for gardeners, especially those with limited space.
- Space Efficiency: The potato tower allows you to grow potatoes vertically, which is perfect for small spaces like balconies, terraces, or even small backyards. By stacking soil and straw, you can grow potatoes in a confined area and still produce a large harvest.
- Increased Yield: Potato plants tend to produce more tubers when they are given room to spread their roots horizontally. In a traditional garden bed, potatoes grow in one flat layer, but by using a tower, you can encourage the plants to grow upward, which leads to an increased yield of potatoes.
- Easy to Manage: Unlike traditional potato growing methods that require digging into the soil to harvest your crop, a potato tower allows you to harvest your potatoes easily by simply removing the layers of soil. This reduces the amount of hard labor required during harvest and makes it a more accessible option for beginners.
- Reduced Weeding: Growing potatoes in a tower reduces the need for constant weeding. As the soil is stacked, it creates a natural barrier to prevent weeds from growing, saving you time and effort.
- Better Drainage: A potato tower provides excellent drainage for your plants. The soil is well-draining, preventing water from pooling around the roots, which can lead to rot and other issues.
Materials You’ll Need to Build a Potato Tower
Building a potato tower doesn’t require many materials, and you can create one with simple supplies you probably already have at home. Here’s a list of materials you’ll need:
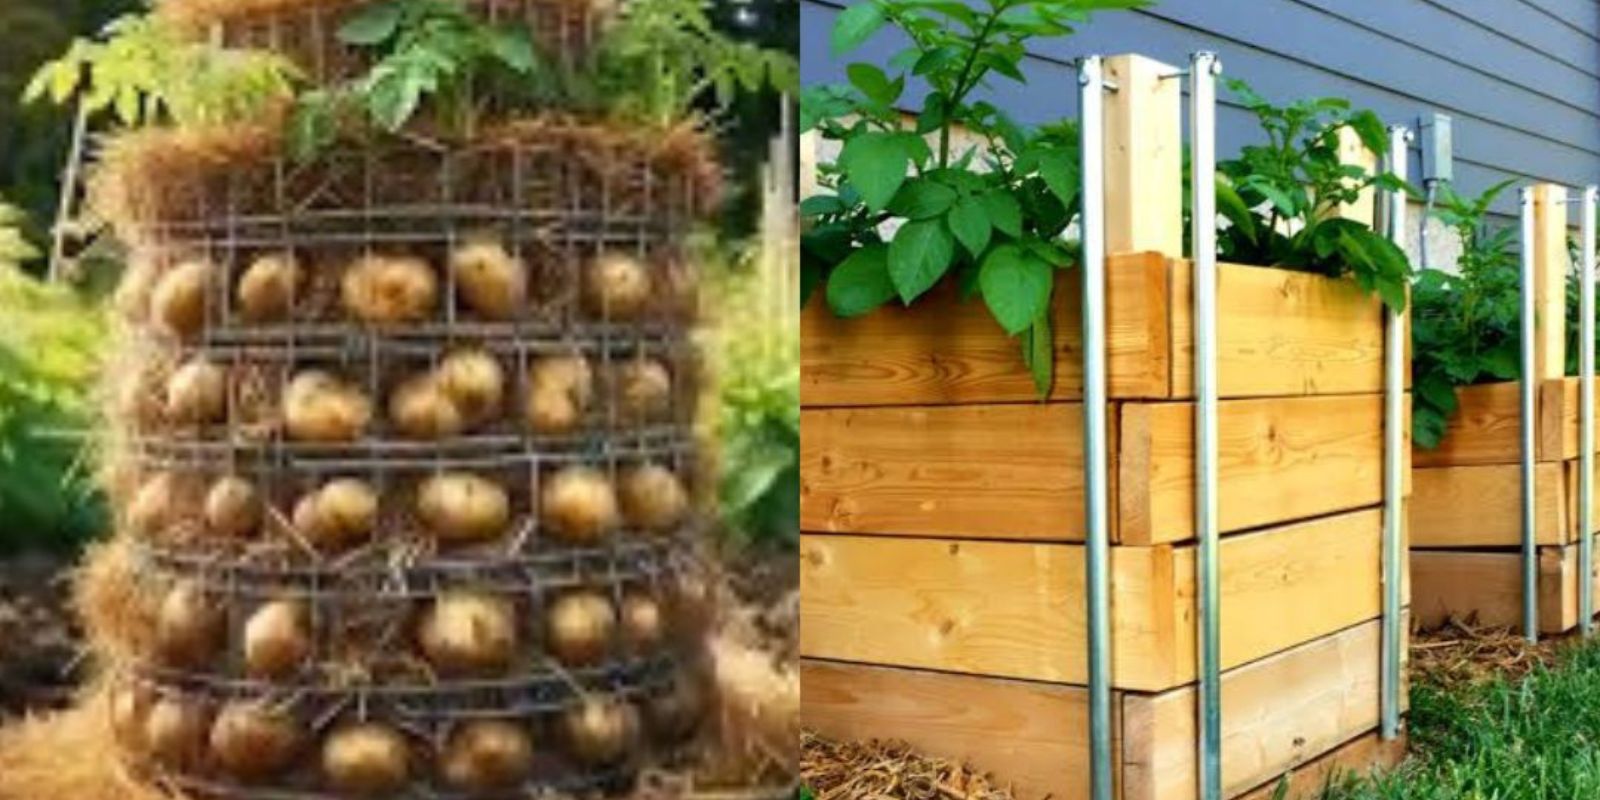
- Wire Mesh or Chicken Wire: You can use wire mesh or chicken wire to form the structure of your tower. This will help keep the tower standing and allow the potatoes to grow upward. You can use any sturdy material that will hold the weight of the soil and plants.
- Wooden Pallets: Wooden pallets can be used to create a frame for your tower. They’re a great eco-friendly option and can be stacked on top of each other to create layers. If you don’t have access to wooden pallets, you can also use other materials like old crates or even bricks to create the structure.
- Plastic or Burlap: You can line the inside of your tower with plastic or burlap to prevent the soil from falling through the gaps. This helps to hold the soil in place and create a better growing environment for your potatoes.
- Soil: Good-quality, nutrient-rich soil is essential for growing potatoes. A mixture of garden soil, compost, and some organic matter will provide the best results.
- Seed Potatoes: Seed potatoes are specially grown for planting and are free from disease. Choose a variety of potatoes that are suitable for your climate and growing conditions. You can buy seed potatoes from local garden centers or online.
- Straw or Mulch: Straw or mulch is used to add layers around the potato plants as they grow. This helps to keep the soil moist and encourages tuber production.
Step-by-Step Guide to Building a Potato Tower
Now that you have your materials ready, it’s time to start building your potato tower! Follow these steps to create your very own potato-growing structure:
1. Choose the Right Location
Start by selecting a sunny spot for your potato tower. Potatoes need plenty of sunlight to grow, so choose a location that receives at least 6-8 hours of sunlight per day. If you’re growing your tower in a small space, like a balcony or patio, make sure the location gets enough direct sunlight to support healthy growth.
2. Prepare the Foundation
If you’re using chicken wire or wire mesh for your tower, cut it to the desired height (around 3 to 4 feet is ideal) and form a cylinder shape. Attach the ends together using wire or zip ties. Make sure the structure is sturdy and well-secured. If you’re using wooden pallets, simply stack them to create a box-like structure, ensuring that each pallet is stable and won’t tip over.
3. Line the Inside of the Tower
To keep the soil inside the tower and prevent it from falling through the gaps in the mesh or pallets, line the inside with plastic or burlap. This will also help keep the moisture in and provide a better environment for your potatoes.
4. Add a Layer of Soil
Once your tower is set up, add a 3-4 inch layer of soil at the bottom. Use a mixture of compost, garden soil, and organic matter for the best results. Make sure the soil is loose and well-draining to avoid waterlogging.
5. Plant the Seed Potatoes
Next, place your seed potatoes on top of the soil. Space them about 6-8 inches apart. If you’re using a larger tower, you can plant several seed potatoes in each layer. Cover the potatoes with about 2-3 inches of soil.
6. Add More Soil and Mulch as the Plants Grow
As your potato plants start to grow, continue to add layers of soil around the plants. This will encourage them to grow upwards and produce more tubers. You can also add a layer of straw or mulch around the plants to retain moisture and suppress weeds. Continue this process until the tower is filled with soil, and the plants have grown tall enough to flower.
7. Water Regularly
Potatoes need plenty of water to grow, especially in the early stages. Be sure to keep the soil consistently moist, but not waterlogged. Check the moisture level regularly, especially during hot weather, as the soil can dry out quickly in a vertical garden.
8. Harvesting Your Potatoes
Once the plants have flowered and the foliage starts to die back, it’s time to harvest your potatoes. Carefully remove the layers of soil, and you’ll be able to access the potatoes that have grown in each layer. The yield from a potato tower is usually impressive, with plenty of fresh, homegrown potatoes ready to eat!
Tips for Success
- Choose the Right Potato Variety: Make sure to select a potato variety that grows well in your climate. Some varieties are better suited for container gardening and vertical growing than others.
- Keep an Eye on Pests: Although potato towers are great for reducing the risk of pests, it’s still important to monitor for common potato pests like aphids or Colorado potato beetles.
- Rotate Crops: After harvesting your potatoes, don’t plant another crop in the same soil immediately. Rotate your crops to keep the soil healthy and free from disease.
Conclusion
Building a potato tower is a fantastic way to grow your own potatoes in a small space. Not only will you save room in your garden or on your patio, but you’ll also get a greater yield and enjoy the satisfaction of harvesting fresh, homegrown potatoes. Whether you’re a beginner gardener or an experienced grower, a potato tower is a fun, rewarding project that’s perfect for any gardening enthusiast.
So, gather your materials, pick your spot, and start building your potato tower today. You’ll soon be enjoying a bountiful harvest of delicious, homegrown potatoes straight from your own backyard!