
Roses are often considered the queen of flowers, renowned for their elegance, beauty, and captivating fragrance. They have been cherished in gardens for centuries and are a symbol of love and beauty around the world. While many gardeners are familiar with propagating roses from cuttings or seeds, there is a lesser-known method that is equally effective and often overlooked: growing roses from buds. This technique is a hidden gem in the world of rose propagation, offering a simple yet rewarding approach to expanding your rose garden. In this article, we will explore this unique method, step-by-step, and guide you on how to achieve stunning results with minimal effort.
Introduction
The art of rose propagation has evolved over time, with various techniques developed to suit different preferences and conditions. Among these methods, growing roses from buds is a fascinating approach that is not widely known but can yield beautiful results. This method leverages the natural ability of rose buds to develop into new plants, allowing gardeners to create new rose bushes with ease. Whether you’re a seasoned gardener or a beginner, this technique offers a straightforward way to expand your collection of roses.
Why Grow Roses from Buds?
**1. *Efficiency:* Growing roses from buds is a straightforward and efficient method of propagation. It bypasses the need for rooting hormones and complex procedures associated with other methods.
**2. *Cost-Effective:* This technique uses readily available materials and reduces the need for purchasing new plants or expensive propagation supplies.
**3. *Customization:* Propagating roses from buds allows you to replicate specific rose varieties that you already admire, ensuring that you get the exact colors and characteristics you desire.
**4. *Success Rate:* When done correctly, this method can offer a high success rate, making it a reliable choice for gardeners looking to expand their rose collection.
Materials Needed
To get started with this method, you will need the following materials:
- Healthy rose buds (from a mature plant)
- Small pots or trays
- Well-draining potting mix (such as a mix of peat moss and perlite)
- Scissors or pruning shears
- Plastic bags or a humidity dome
- A watering can or spray bottle
- A sunny location or grow lights
Step-by-Step Guide
1. Select Healthy Buds
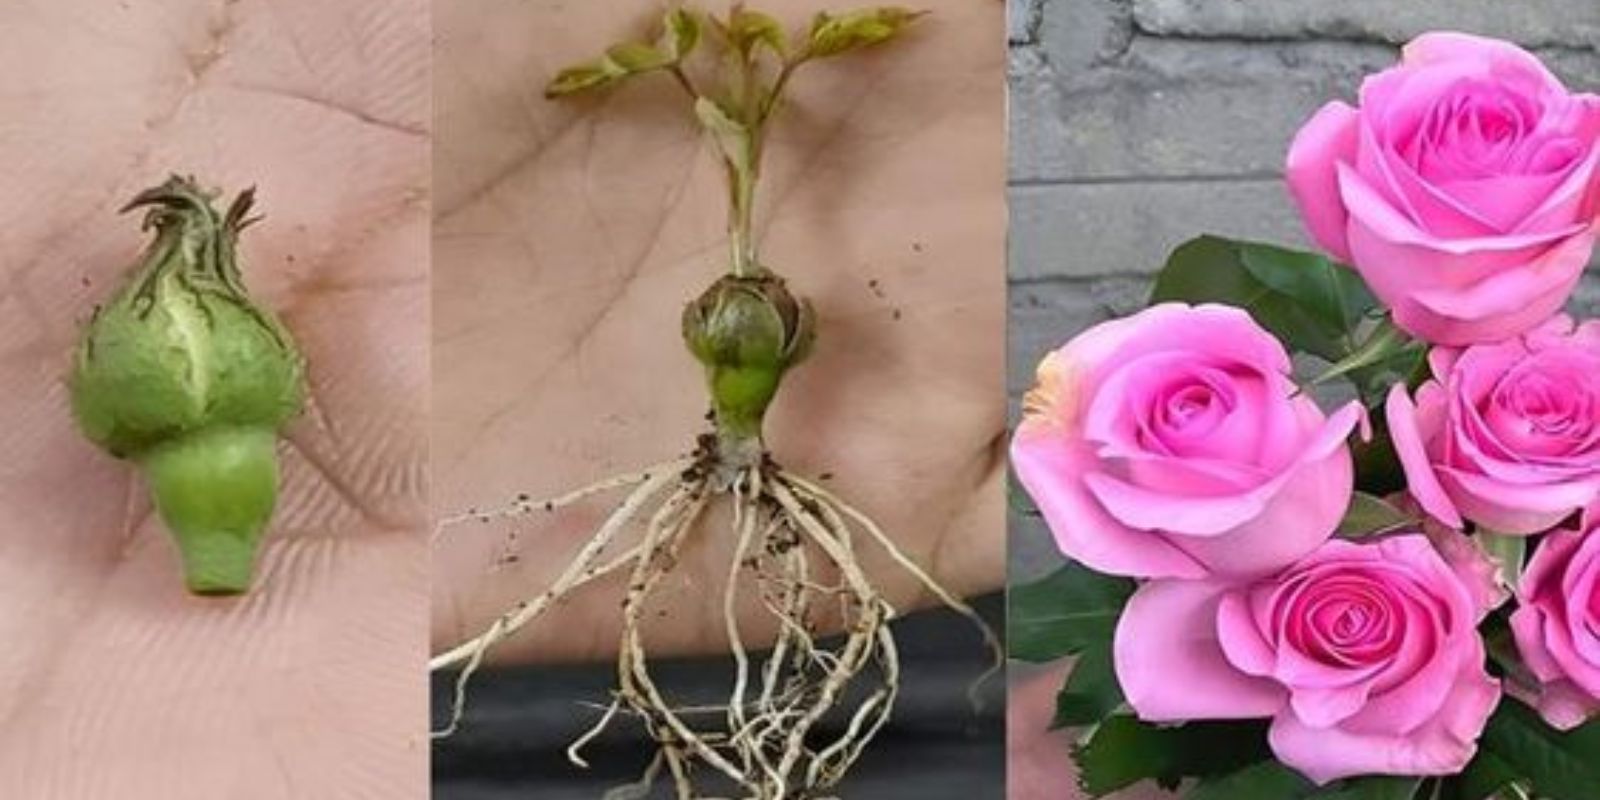
- Choose the Buds: Look for rose buds that are healthy, plump, and free from disease or damage. Ideally, the buds should be from a mature rose plant that has shown good growth and blooming.
- Harvest the Buds: Use clean, sharp scissors or pruning shears to carefully cut the buds from the plant. Trim them with a small portion of the stem attached to ensure that they have enough tissue to develop roots.
2. Prepare the Buds
- Trim Excess: Remove any excess leaves or stems from the buds, leaving only a small portion of the stem attached. This helps to minimize potential sources of rot and focuses the plant’s energy on root development.
- Prepare for Planting: If you’re using multiple buds, you can group them together in a single pot or tray. Ensure that they are spaced adequately to avoid overcrowding.
3. Prepare the Soil
- Choose the Right Mix: Use a well-draining potting mix to fill your pots or trays. A mix of peat moss and perlite works well as it provides good aeration and drainage.
- Moisten the Soil: Lightly moisten the potting mix before planting the buds. The soil should be damp but not waterlogged.
4. Plant the Buds
- Insert the Buds: Gently insert the rose buds into the prepared soil, making sure to cover them lightly. The buds should be planted at a depth where they are secure but not buried too deep.
- Firm the Soil: Lightly press the soil around the buds to ensure good contact and stability.
5. Water and Cover
- Water Gently: Water the planted buds gently to avoid displacing them. Use a watering can with a fine spout or a spray bottle to control the flow of water.
- Cover for Humidity: To maintain high humidity and encourage root development, cover the pots or trays with a plastic bag or a humidity dome. This helps create a greenhouse effect, which is beneficial for the buds.
6. Provide Light and Warmth
- Location: Place the pots or trays in a sunny location or under grow lights. Rose buds need plenty of light to develop into healthy plants.
- Monitor Temperature: Maintain a warm and consistent temperature to promote growth. Most rose buds thrive in temperatures between 65°F and 75°F (18°C to 24°C).
7. Transplant When Ready
- Check for Roots: After a few weeks, check the buds for root development. Gently tug on the buds to see if there is resistance, indicating that roots have formed.
- Transplanting: Once the buds have developed a healthy root system, transplant them to larger pots or directly into your garden. Ensure that the new location has well-draining soil and provides ample sunlight.
Tips for Success
- Clean Tools: Always use clean and sharp tools to avoid introducing pathogens that could harm the buds.
- Monitor Humidity: Keep an eye on the humidity levels inside the covering. Too much moisture can lead to mold growth, while too little can hinder root development.
- Be Patient: Rose propagation can take several weeks, so be patient and continue to care for the buds as they grow.
- Record Keeping: Keep track of the varieties of roses you are propagating and any specific care instructions for each type.
Conclusion
Growing roses from buds is a lesser-known but effective method of propagation that offers a range of benefits for gardeners. By following the simple steps outlined in this article, you can successfully create new rose bushes and expand your garden with beautiful, customized varieties. This technique not only helps reduce the need for commercial plants but also provides an opportunity to enjoy the satisfaction of growing roses from scratch.
So, why not give this unique method a try? With a bit of patience and care, you’ll be rewarded with stunning roses that add beauty and elegance to your garden. Happy gardening and happy propagating! 🌹✨