
Introduction
Orchids are among the most exquisite and sought-after plants, admired for their intricate and delicate blooms. However, propagating orchids can often be a challenging task, requiring specific conditions and careful handling. A new, revolutionary method involving a simple “miracle pill” has emerged, promising to make orchid propagation easier and more accessible. This method simplifies the process and opens up possibilities for both novice and seasoned gardeners. In this article, we will delve into the details of this innovative approach, explore its benefits, and provide a step-by-step guide to successfully propagating orchids using the miracle pill.
Understanding the Miracle Pill
The miracle pill is a specially formulated capsule containing a blend of nutrients, growth hormones, and beneficial microorganisms designed to promote the healthy growth of orchid cuttings. These ingredients help accelerate root formation and enhance the overall vitality of the cuttings, making the propagation process more efficient and reliable.
The concept behind the pill is rooted in plant tissue culture and hydroponic techniques, where plants are provided with a controlled and nutrient-rich environment. The pill acts as a catalyst, providing the necessary elements for the cuttings to thrive, even if the gardener lacks extensive knowledge or resources.
Benefits of Using the Miracle Pill
1. Simplified Process
Traditional orchid propagation methods can be complex and time-consuming, often requiring specific conditions and equipment. The miracle pill simplifies the process by providing a ready-made solution that can be easily used at home without the need for specialized tools or knowledge.
2. Increased Success Rate
One of the biggest challenges in orchid propagation is ensuring the cuttings develop strong roots. The nutrients and growth hormones in the miracle pill significantly increase the success rate of root formation, leading to healthier and more robust plants.
3. Versatility
The miracle pill can be used with various orchid species, making it a versatile tool for gardeners who wish to expand their collection. Whether you’re working with Phalaenopsis, Dendrobium, Cattleya, or other types of orchids, this method can help you propagate them effectively.
4. Cost-Effective
By simplifying the propagation process and increasing the success rate, the miracle pill can save gardeners money and time. There is no need for expensive equipment or extensive trial and error, making it an economical choice for hobbyists and professionals alike.
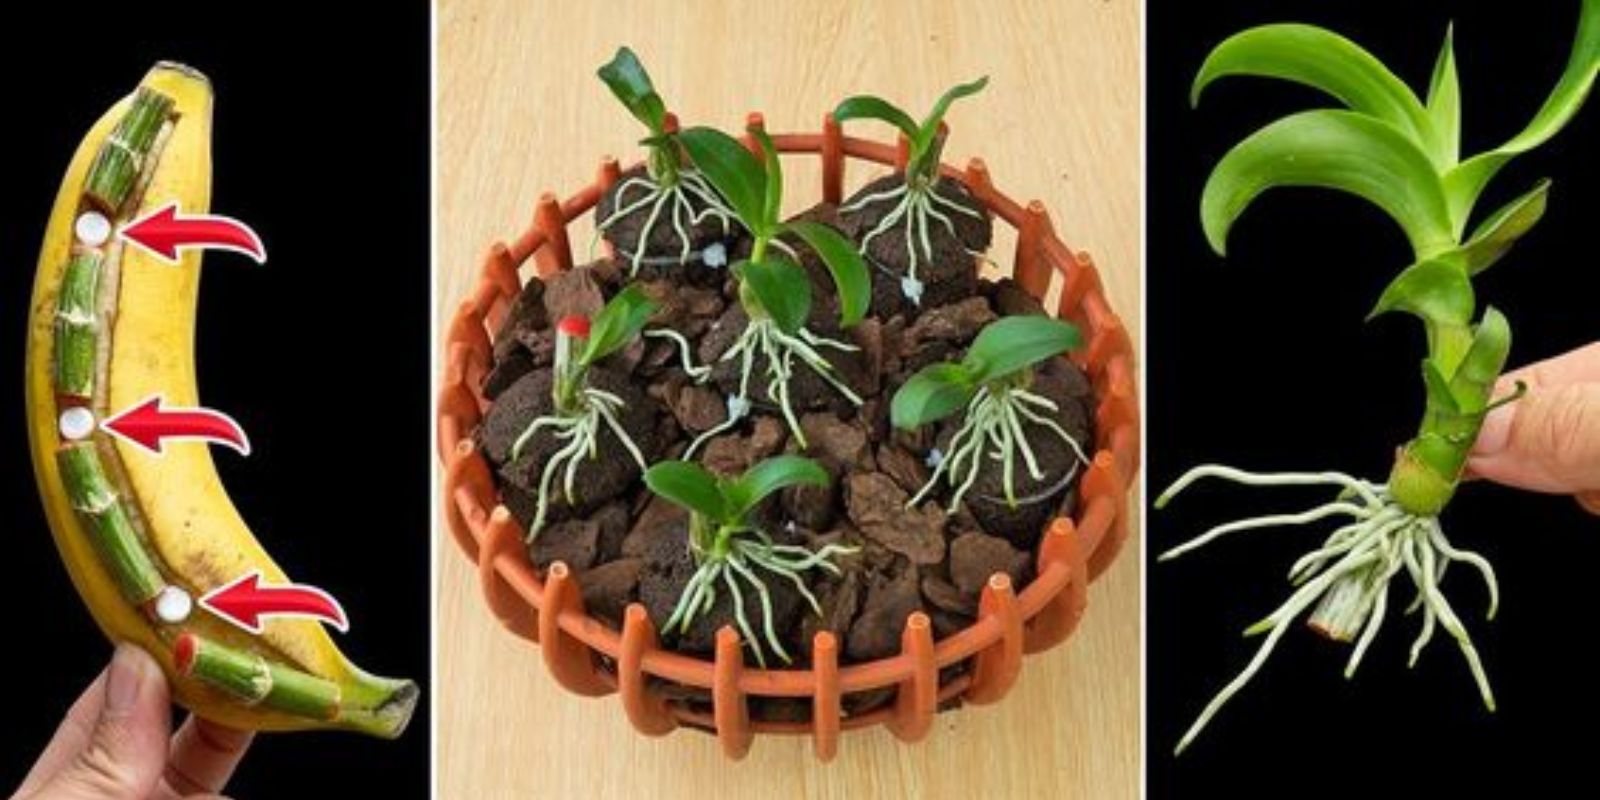
How to Use the Miracle Pill: A Step-by-Step Guide
1. Gathering Materials
To begin, you’ll need the following materials:
- The miracle pill (available from specialized garden centers or online stores)
- A clean container or bowl
- Warm water
- Sterilized scissors or a sharp knife
- Orchid cuttings with at least one node or aerial root
- Orchid substrate (such as a mix of bark, perlite, and sphagnum moss)
- Pots for planting
2. Preparing the Solution
Fill a clean container or bowl with warm water. Carefully open the miracle pill and dissolve its contents in the water. Stir the solution until the pill is completely dissolved, creating a nutrient-rich mixture.
3. Preparing the Orchid Cuttings
Using sterilized scissors or a sharp knife, take cuttings from a healthy orchid plant. Each cutting should include at least one node, which is crucial for root development. If the orchid has aerial roots, include some of these in the cutting, as they can aid in nutrient absorption.
4. Soaking the Cuttings
Place the orchid cuttings in the nutrient solution and let them soak for a few hours. This step allows the cuttings to absorb the nutrients and growth hormones, preparing them for successful root formation. Ensure the nodes are fully submerged in the solution.
5. Planting the Cuttings
After soaking, gently remove the cuttings from the solution and plant them in a pot filled with orchid substrate. The substrate should be well-draining to prevent root rot. Place the cuttings with the nodes buried slightly under the substrate surface, ensuring they are stable.
6. Providing Care and Monitoring
Water the substrate lightly, keeping it moist but not waterlogged. Orchids generally prefer high humidity and indirect sunlight, so place the pots in a bright area without direct exposure to the sun. If needed, use a humidity tray or mist the plants to maintain adequate moisture levels.
Over the next few weeks, monitor the cuttings for signs of new growth, such as the emergence of roots or new leaves. The miracle pill’s nutrients and hormones should help expedite this process, leading to quicker and more vigorous development.
Tips for Success
1. Maintain Cleanliness
To prevent infections and diseases, always use sterilized tools and clean containers when handling the cuttings and preparing the solution.
2. Be Patient
Orchid propagation can take time, and even with the miracle pill, it may take several weeks for significant growth to appear. Patience is key to allowing the cuttings to establish themselves.
3. Monitor Conditions
Ensure the growing environment is suitable for orchids. This includes maintaining proper humidity levels, avoiding direct sunlight, and keeping the substrate moist but not overly wet.
4. Experiment with Different Species
The miracle pill is versatile and can be used with various orchid species. Feel free to experiment with different types to see which ones respond best to this propagation method.
Conclusion
The miracle pill offers a game-changing solution for orchid propagation, making it accessible and straightforward for gardeners of all experience levels. By providing essential nutrients and growth hormones, this innovative approach increases the success rate of propagating orchids, allowing enthusiasts to expand their collections effortlessly. Whether you’re a beginner looking to try your hand at orchid cultivation or an experienced grower seeking a more efficient method, the miracle pill is a valuable tool to consider. Give it a try and enjoy the satisfaction of seeing your orchids thrive and multiply with ease. Happy gardening!