
Okra, known for its unique flavor and versatility in various dishes, is a favorite among gardeners and chefs alike. This nutrient-rich vegetable thrives in warm climates, making it a popular choice for summer gardens. While many gardeners are familiar with traditional growing methods, a few lesser-known techniques can significantly accelerate the growth of okra. In this article, we’ll explore the fastest way to grow okra that nobody talks about, covering everything from seed selection to planting tips, care, and harvesting.
Understanding Okra
What is Okra?
Okra (Abelmoschus esculentus), often referred to as lady’s finger, is a flowering plant in the mallow family. It’s renowned for its edible green pods, which are harvested and used in various culinary dishes, especially in Southern and Creole cuisines. Besides being delicious, okra is also rich in vitamins A and C, fiber, and antioxidants, making it a valuable addition to your diet.
Benefits of Growing Okra
Growing okra at home has several benefits:
- Nutritional Value: Okra is low in calories and packed with nutrients, including vitamins, minerals, and fiber.
- Versatility: It can be used in soups, stews, salads, and as a fried snack.
- Easy to Grow: Once established, okra is relatively low-maintenance and can produce a bountiful harvest.
- Heat Tolerance: Okra thrives in hot weather, making it an ideal choice for summer gardens.
Fastest Ways to Grow Okra
To achieve a quick and successful okra harvest, consider the following techniques that many gardeners may overlook.
1. Selecting the Right Variety
Choosing the right variety is the first step to growing okra quickly. Some varieties mature faster than others. Here are a few fast-growing options:
- Clemson Spineless: This is one of the most popular varieties, known for its tender pods and spineless nature. It typically matures in 50-60 days.
- Burgundy: This variety produces beautiful, deep red pods that turn green when cooked. It also matures in about 50-60 days.
- Emerald: Another quick-growing variety, Emerald okra is known for its high yield and disease resistance, maturing in about 55 days.
Selecting these fast-maturing varieties will help you reap the rewards of your labor sooner.
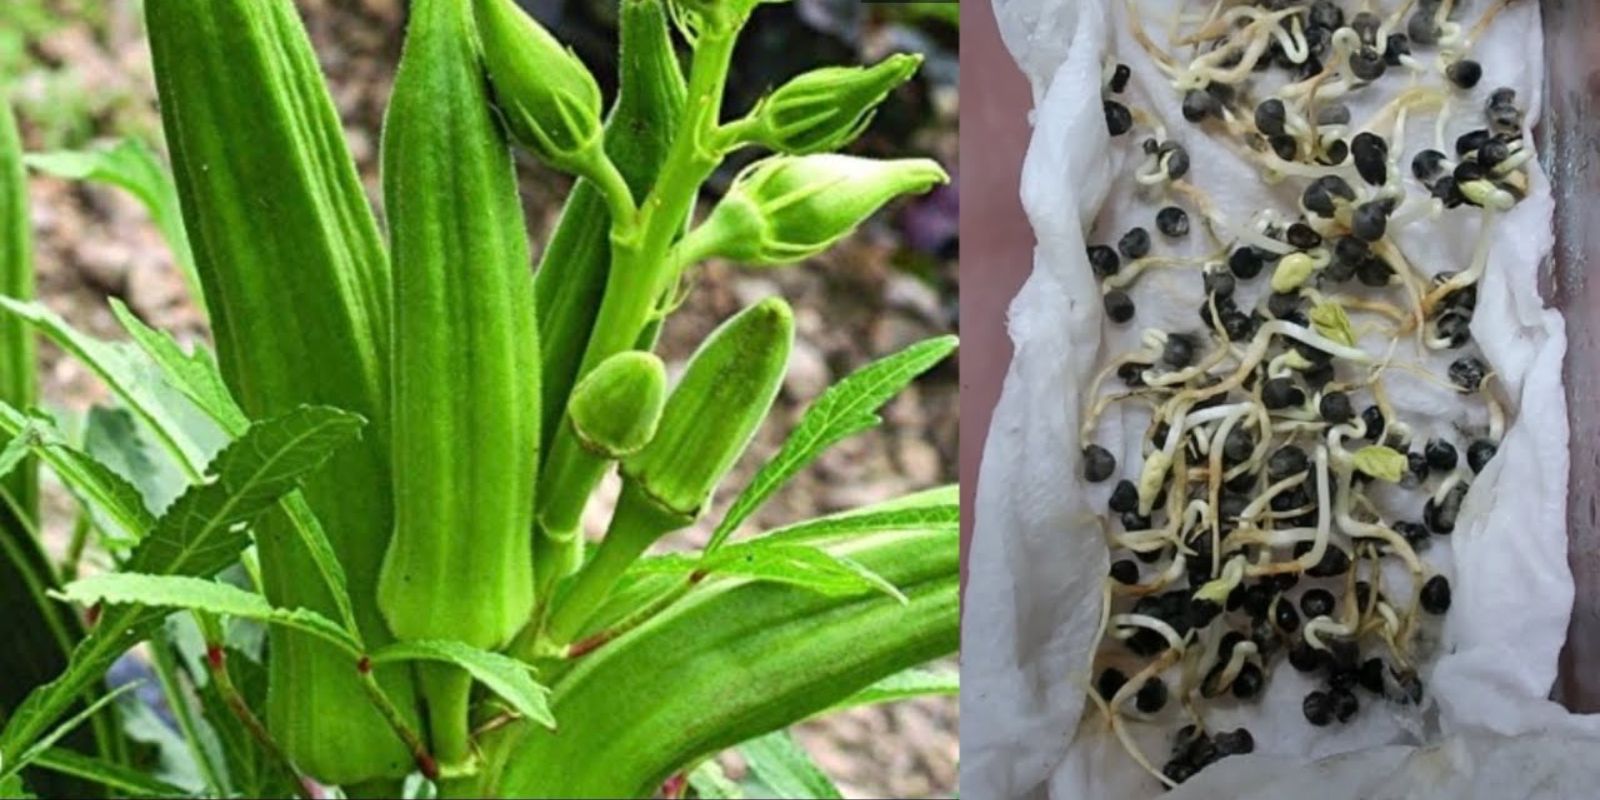
2. Pre-Soaking Seeds
One of the best-kept secrets for accelerating okra germination is soaking the seeds before planting.
Why Soak Seeds?
- Softens Seed Coat: Okra seeds have a tough outer shell that can impede germination. Soaking helps soften this shell, allowing moisture to penetrate and stimulate germination.
- Promotes Faster Sprouting: By soaking seeds for 24 hours, you can reduce the germination time significantly, enabling quicker plant establishment.
How to Soak Seeds
- Place the Seeds: Put your okra seeds in a bowl or container.
- Add Water: Cover the seeds with room-temperature water, ensuring they are fully submerged.
- Soak Overnight: Leave the seeds in the water for 12-24 hours.
- Drain and Dry: After soaking, drain the water and let the seeds dry briefly before planting.
3. Starting Seeds Indoors
Starting okra seeds indoors can give you a head start on the growing season, especially in regions with shorter summers.
Benefits of Starting Indoors
- Early Growth: Starting seeds indoors allows you to take advantage of the early growing season, leading to a quicker harvest.
- Controlled Environment: You can provide optimal growing conditions, such as warmth and moisture, which enhances germination rates.
How to Start Seeds Indoors
- Choose Containers: Use biodegradable pots or seed trays with drainage holes to allow excess water to escape.
- Fill with Soil: Use a high-quality seed-starting mix that retains moisture but drains well.
- Plant Seeds: Plant the soaked seeds about ½ inch deep in the soil. Space them 2-3 inches apart.
- Provide Warmth: Place the containers in a warm area (ideally 70°F to 85°F) or use a heat mat to encourage germination.
- Water Regularly: Keep the soil consistently moist but not waterlogged.
4. Timing and Transplanting
Timing is crucial for growing okra quickly. Understanding when to transplant your seedlings will set the stage for rapid growth.
When to Transplant
- Timing: Transplant okra seedlings outdoors 2-4 weeks after the last frost date in your area. Ensure the soil temperature is at least 70°F (21°C) for optimal growth.
- Hardening Off: Before transplanting, gradually acclimate your seedlings to outdoor conditions. Start by placing them outside for a few hours each day, gradually increasing the duration over a week.
How to Transplant
- Prepare the Site: Choose a sunny location with well-draining soil. Amend the soil with compost to improve fertility.
- Spacing: Space your seedlings 12-18 inches apart to allow room for growth.
- Transplant Carefully: Gently remove the seedlings from their containers, taking care not to damage the roots. Place them in prepared holes and cover with soil.
5. Optimal Growing Conditions
Creating the right environment for your okra plants is essential for fast growth.
Soil Requirements
- Well-Draining Soil: Okra prefers sandy loam or loamy soil that drains well. Heavy clay soils can lead to root rot and slow growth.
- pH Level: Aim for a soil pH between 6.0 and 7.5, as okra thrives in slightly acidic to neutral soils.
Watering Techniques
- Regular Watering: Keep the soil consistently moist, especially during the germination and early growth stages. Aim for about 1 inch of water per week.
- Mulching: Apply a layer of organic mulch around the plants to retain soil moisture and suppress weeds. Mulching also helps regulate soil temperature.
Sunlight Requirements
- Full Sun: Okra requires full sun for optimal growth, so choose a location that receives at least 6-8 hours of sunlight per day.
6. Fertilizing for Success
Proper fertilization is vital for fast growth and high yields.
Types of Fertilizers
- Balanced Fertilizer: Use a balanced fertilizer (such as 10-10-10) when planting and again when plants start to flower. This provides essential nutrients for healthy growth.
- Organic Options: Consider using organic fertilizers like compost, worm castings, or well-rotted manure to enrich the soil and promote healthy growth.
7. Pest and Disease Management
Keeping pests and diseases at bay is crucial for ensuring rapid okra growth.
Common Pests
- Aphids: These tiny insects can sap the strength from your okra plants. Spray them off with water or use insecticidal soap.
- Flea Beetles: These pests can create small holes in leaves. Row covers can help protect young plants.
Common Diseases
- Powdery Mildew: This fungal disease can be prevented by ensuring good air circulation and avoiding overhead watering.
- Root Rot: Ensure well-draining soil and avoid overwatering to prevent this disease.
8. Harvesting Your Okra
The final step in growing okra quickly is knowing when and how to harvest.
When to Harvest
- Timing: Okra is best harvested when the pods are 2-4 inches long. This usually occurs 50-60 days after planting, depending on the variety.
- Check Regularly: Check your plants every few days, as okra can grow quickly. Harvesting regularly encourages the plant to produce more pods.
How to Harvest
- Use Gloves: Okra plants can have tiny spines, so wearing gloves can protect your hands.
- Cut the Pods: Use scissors or pruning shears to cut the pods from the plant, taking care not to damage the stem or leaves.
Conclusion
Growing okra quickly doesn’t have to be a mystery. By implementing these lesser-known techniques—selecting the right variety, soaking seeds, starting them indoors, transplanting carefully, providing optimal conditions, and managing pests—you can enjoy a bountiful harvest in no time. With a little dedication and attention to detail, you’ll soon be savoring delicious, homegrown okra in your favorite recipes. So, roll up your sleeves, get your hands in the soil, and start your okra-growing adventure today! Happy gardening! 🌱💚