
Bleeding Hearts (Dicentra spectabilis) are enchanting perennial plants known for their heart-shaped flowers and graceful, fern-like foliage. These stunning plants are a staple in many gardens, appreciated not only for their beauty but also for their resilience and adaptability. If you want to incorporate these delightful plants into your garden without buying new ones, propagating them from cuttings is a rewarding and straightforward method. In this article, we’ll explore the best practices for growing Bleeding Hearts from cuttings, ensuring you have a thriving display of these lovely blooms in no time.
Introduction to Bleeding Hearts
Before diving into the propagation process, let’s take a moment to appreciate why Bleeding Hearts are so beloved. Native to North America and parts of Asia, these perennial plants bloom in spring and early summer, producing clusters of delicate, pink, or white flowers that dangle like hearts from arching stems. The foliage is equally appealing, providing a lush green backdrop that enhances any garden landscape.
Bleeding Hearts prefer partial to full shade and thrive in well-drained soil, making them an excellent choice for woodland gardens or shaded areas in your yard. They are relatively low maintenance, requiring minimal care once established, which is another reason for their popularity among gardeners.
Benefits of Propagating from Cuttings
- Cost-Effective: Propagating from cuttings allows you to grow new plants without spending money on nursery plants.
- Preserve Varieties: If you have a favorite variety or a particularly beautiful plant in your garden, taking cuttings allows you to preserve that specific cultivar.
- Share with Friends: Growing your own Bleeding Hearts means you can share cuttings with fellow gardening enthusiasts, spreading joy and beauty.
When to Take Cuttings
The ideal time to take cuttings from Bleeding Hearts is during the growing season, typically in late spring to early summer when the plant is lush and actively growing. This period offers the best chance for successful propagation, as the plant is full of vigor.
Step-by-Step Guide to Growing Bleeding Hearts from Cuttings
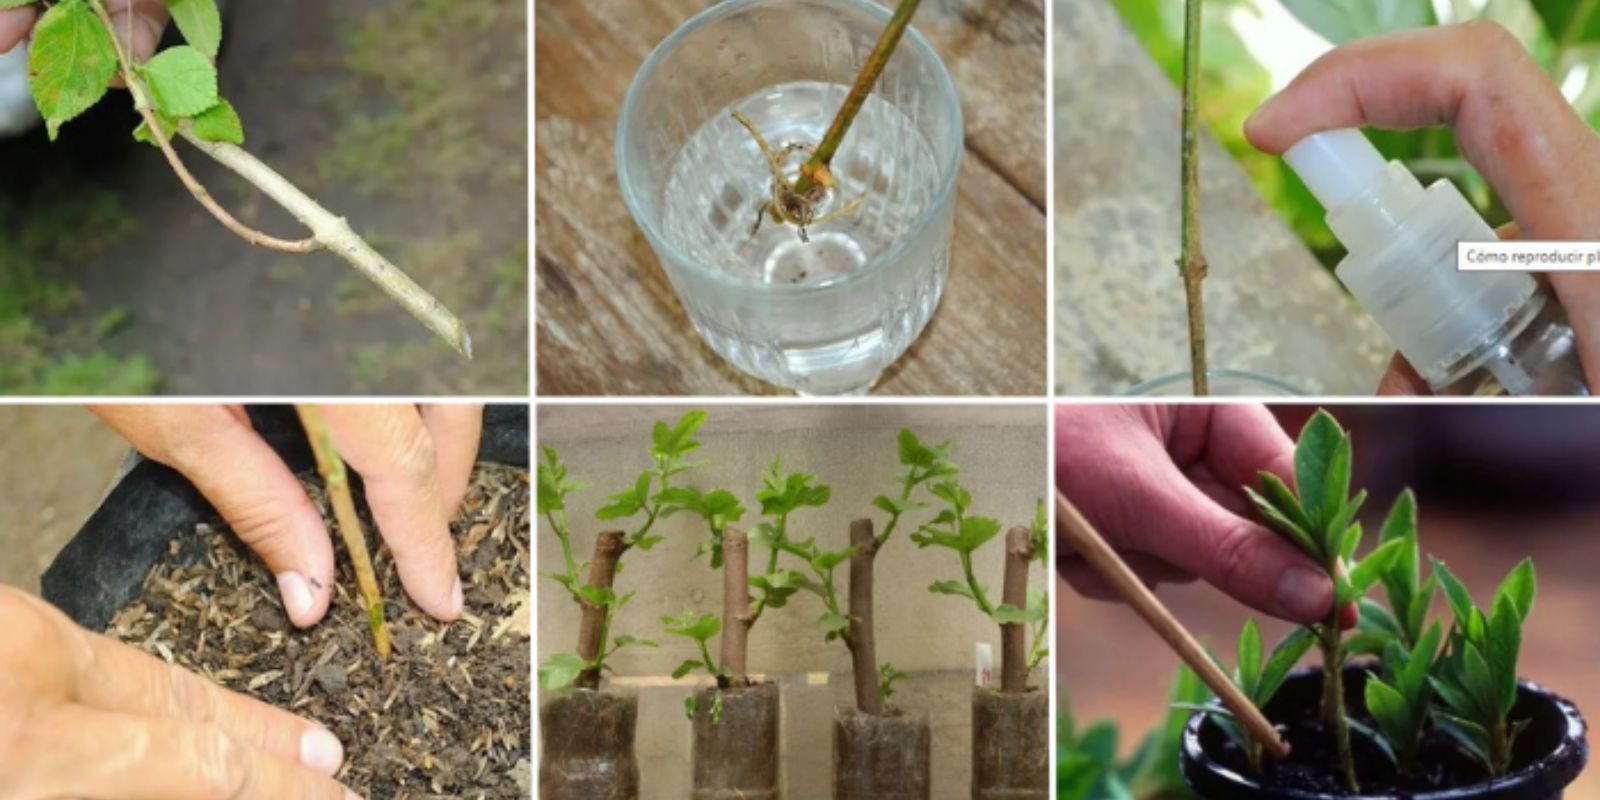
Step 1: Select Healthy Cuttings
To begin, you’ll want to select healthy stems from an established Bleeding Heart plant. Look for vigorous, disease-free stems that are around 4-6 inches long and have at least one leaf node. Avoid stems that appear wilted or damaged, as they are less likely to root successfully.
Step 2: Prepare the Cuttings
Using sharp, clean garden shears or scissors, cut the selected stems just below a leaf node. This is important because the leaf node is where the roots will emerge. Remove any lower leaves to prevent them from rotting when planted, leaving a couple of leaves at the top for photosynthesis.
Step 3: Use a Rooting Hormone
While this step is optional, dipping the cut end of each cutting in rooting hormone can significantly improve your chances of success. Rooting hormones contain auxins, which are plant hormones that stimulate root development. Simply dip the cut end into the powder or gel and tap off any excess.
Step 4: Plant the Cuttings
Fill a small pot or seed tray with a high-quality, well-draining potting mix. You can use a mix designed for seed starting or create your own by combining potting soil with perlite or sand. Moisten the soil lightly before planting the cuttings.
Insert the cuttings into the soil, burying them about an inch deep, ensuring the leaf node is under the soil. Space the cuttings about 2-3 inches apart to give them room to grow. Firm the soil around the cuttings to eliminate air pockets and provide stability.
Step 5: Create a Humid Environment
To encourage root growth, it’s essential to maintain a humid environment for your cuttings. You can achieve this by covering the pot with a plastic bag or using a clear plastic dome. This creates a mini greenhouse effect, trapping moisture around the cuttings.
Make sure to open the cover occasionally to allow fresh air to circulate and prevent mold growth. If condensation forms inside the cover, it’s a sign that humidity is high, so remove it for a few hours to let the excess moisture escape.
Step 6: Water and Care for the Cuttings
Keeping the soil consistently moist is crucial for successful rooting. Water the cuttings gently to avoid displacing them and ensure the soil remains damp but not waterlogged. Overwatering can lead to rot, while underwatering can dry out the cuttings.
Place the pot in a location with indirect sunlight, as direct sun can be too harsh for newly planted cuttings. A warm, well-lit area is ideal, but avoid exposure to extreme temperatures.
Step 7: Check for Root Development
After about 4-6 weeks, the cuttings should start developing roots. You can check this by gently tugging on the cuttings; if you feel resistance, they are likely rooted. Additionally, you may notice new growth emerging from the tops of the cuttings, which is another positive sign.
Step 8: Transplanting Your New Bleeding Hearts
Once your cuttings have rooted and show signs of new growth, it’s time to transplant them into the garden or larger pots. Choose a planting location that offers partial to full shade and has well-drained soil.
Before transplanting, acclimate the young plants to their new environment by gradually exposing them to outdoor conditions. This process, known as hardening off, typically takes about a week. Start by placing them outside for a few hours each day and gradually increase the time until they are fully acclimated.
To transplant, dig a hole slightly larger than the root ball of the cutting and gently place it in the ground. Fill in around the roots with soil, and water thoroughly to settle the soil. Mulching around the base can help retain moisture and suppress weeds.
Care and Maintenance
Once your Bleeding Hearts are established in their new home, they require minimal maintenance. Here are a few care tips to ensure they thrive:
- Watering: Keep the soil consistently moist during the growing season, especially in dry spells. However, avoid waterlogging the soil, as this can lead to root rot.
- Fertilizing: Apply a balanced fertilizer in early spring as new growth begins. This will provide essential nutrients and promote healthy development.
- Pruning: After blooming, you can cut back the spent flowers to encourage a tidier appearance and support the plant’s energy for the next growth cycle.
- Pest and Disease Control: While Bleeding Hearts are relatively pest-resistant, keep an eye out for aphids and slugs. If infestations occur, treat them promptly with insecticidal soap or organic remedies.
Conclusion
Propagating Bleeding Hearts from cuttings is an easy and satisfying way to expand your garden without spending a fortune. By following these steps, you can successfully grow your own Bleeding Hearts, enjoying their enchanting blooms for years to come. Whether you’re a seasoned gardener or a novice, this method allows you to share the beauty of these plants with friends and family.
So, gather your materials and start your propagation journey today! You’ll be amazed at how quickly and easily you can fill your garden with these delightful, heart-shaped blooms.
Get Involved!
Have you tried propagating Bleeding Hearts or other plants from cuttings? Share your experiences, tips, and beautiful blooms with us! Join the conversation and connect with fellow garden enthusiasts using these viral hashtags: #BleedingHearts #PlantPropagation #GardenJoy #GreenThumb #FlowerPower. Happy gardening!