
Roses have long been symbols of beauty, love, and elegance. Their fragrant blossoms and variety of colors make them a perfect addition to any garden or home landscape. For many gardeners, the idea of growing roses from scratch can seem daunting. However, the good news is that growing roses from cuttings is one of the easiest and most rewarding ways to propagate this classic plant. Whether you’re an experienced gardener or a beginner, with just a few simple steps, you can grow beautiful rose plants from cuttings.
In this article, we’ll guide you through the entire process of growing roses from cuttings, from selecting the right stem to transplanting your new plant into your garden. With some patience and care, you can grow your own roses without much effort. Let’s get started!
Why Grow Roses from Cuttings?
Before diving into the steps, it’s helpful to understand why propagating roses from cuttings is a great method. Here are a few reasons:
- Clonal Reproduction: Growing roses from cuttings allows you to create an exact clone of the parent plant. This means that the new plant will inherit all of the same characteristics, such as color, fragrance, and disease resistance, making it a reliable way to preserve the best traits of your favorite rose variety.
- No Need for Seeds: Unlike growing roses from seed, which can be unpredictable and time-consuming, growing roses from cuttings allows you to skip the germination phase and start with a plant that is already rooted and ready to grow.
- Saves Money: Instead of buying new rose bushes, propagating roses from cuttings is a low-cost way to expand your garden. You can grow multiple plants from a single cutting, making it an affordable and efficient method for increasing your rose collection.
- Faster Growth: Roses grown from cuttings will establish themselves more quickly than those grown from seed, giving you quicker results and potentially blooms within the first year.
What You’ll Need to Grow Roses from Cuttings
Before starting, it’s essential to gather a few basic tools and materials:
- Healthy Rose Cutting: Choose a healthy, mature rose stem from a parent plant you wish to propagate. The stem should be about 6-8 inches in length and have a few sets of leaves.
- Sharp Pruning Shears or Knife: To make clean cuts without damaging the plant material.
- Rooting Hormone (optional): This helps stimulate root growth and increase the chances of successful propagation.
- Well-Draining Potting Soil: A good-quality potting mix that drains well is essential for preventing root rot.
- Plastic Bag or Clear Container: To create a mini greenhouse effect that helps keep the cutting moist.
- Small Pot or Container: For planting your cutting once it roots.
Step-by-Step Guide to Growing Roses from Cuttings
Step 1: Select a Healthy Cutting
The first step in growing a rose from a cutting is to select a healthy, disease-free stem. When choosing a cutting, it’s important to look for a mature, non-flowering stem. The cutting should be approximately 6-8 inches in length and have a few leaves on it. Avoid using a stem that is too young (soft and green) or too old (woody), as these will have less success in rooting.
Make the cut just below a leaf node (where a leaf joins the stem) to ensure that there are enough growth points to encourage root formation. Ensure the cutting is free from any disease or pests that could hinder the rooting process.
Step 2: Prepare the Cutting
Once you have your cutting, it’s time to prepare it for planting. Start by removing the leaves from the bottom half of the stem, leaving just a few leaves at the top. This prevents the cutting from losing too much moisture while it’s trying to establish roots.
Next, dip the cut end of the stem into rooting hormone. While this step is optional, rooting hormone can significantly improve your chances of success by encouraging faster root development. Simply dip the bottom 1-2 inches of the cutting into the powder, ensuring that it is evenly coated.
Step 3: Plant the Cutting in Soil
Now that your cutting is prepared, it’s time to plant it in a pot with well-draining soil. Choose a small pot that is large enough to accommodate the cutting but not so large that the soil becomes waterlogged. Fill the pot with a high-quality, well-draining potting mix. You can use a cactus mix, perlite, or sand mixed with standard potting soil for added drainage.
Create a small hole in the center of the soil using a pencil or stick, and insert the cutting into the hole, burying the cut end about 2 inches deep. Gently press the soil around the cutting to secure it in place, making sure it is upright and stable.
Step 4: Water Gently
After planting the cutting, water the soil lightly. You want the soil to be moist, but not soaking wet. Overwatering can cause the cutting to rot, so be cautious. Water just enough to keep the soil slightly damp. It’s important to ensure that the cutting doesn’t dry out, as this can hinder root formation.
Step 5: Cover the Cutting and Maintain Humidity
One of the keys to success in rooting rose cuttings is maintaining high humidity around the cutting. To do this, cover the cutting with a plastic bag, clear plastic container, or even a plastic bottle to create a mini greenhouse effect. This will help retain moisture and keep the cutting humid, which is crucial for root development.
Place the covered cutting in a location with indirect light, as direct sunlight may cause the cutting to overheat. It’s important to keep the cutting warm but not too hot, with temperatures between 65-75°F (18-24°C).
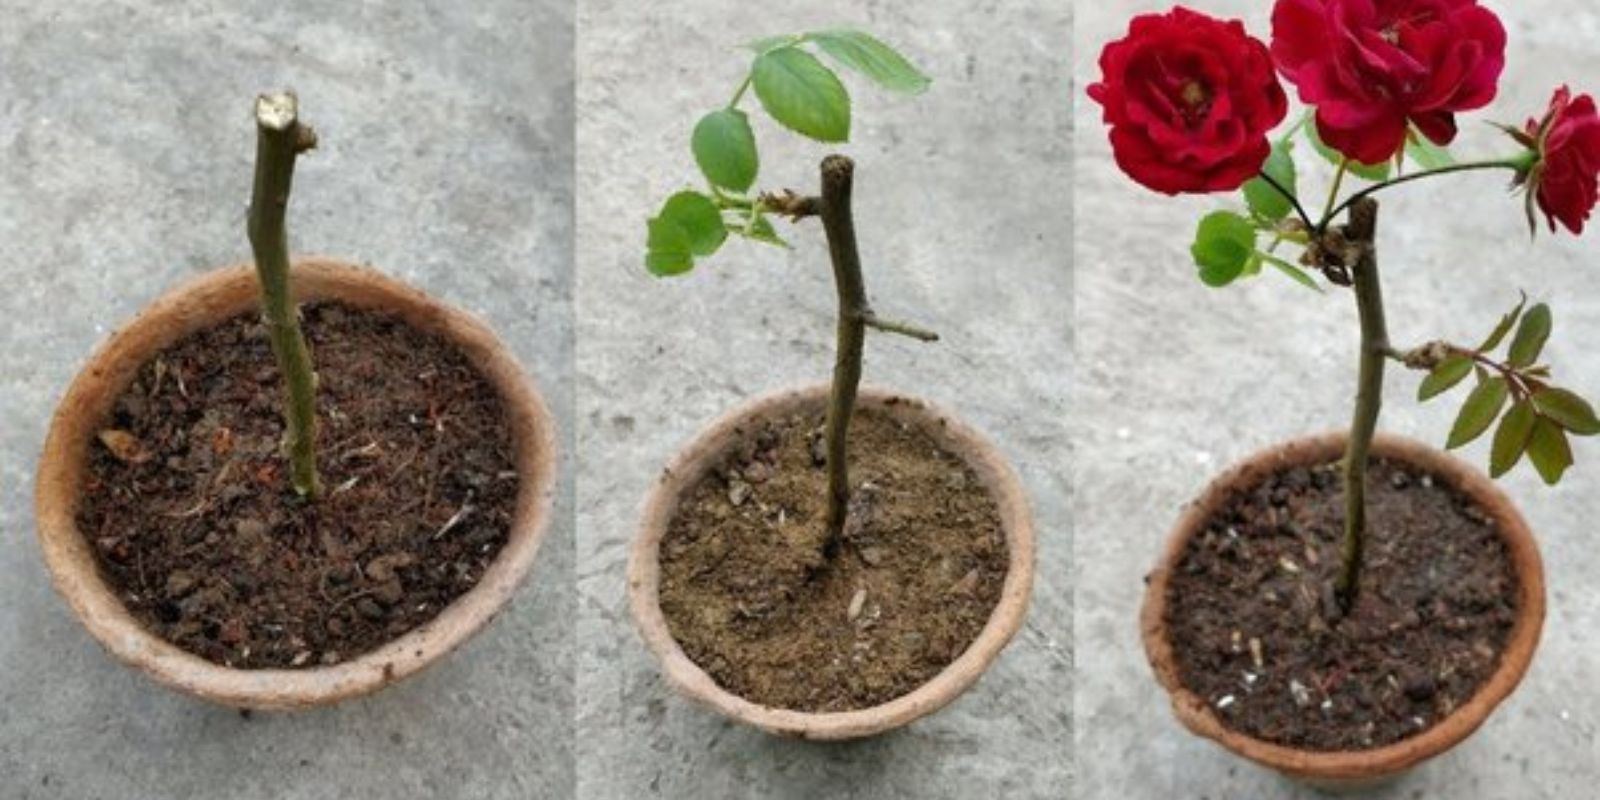
Step 6: Check for Root Development
Over the next few weeks, check on your cutting regularly to make sure the soil remains moist and that the cutting is not showing signs of disease or mold. If necessary, remove the cover for short periods of time to allow for air circulation, but avoid exposing the cutting to drafts or direct sunlight.
Roots should begin to develop within 3-4 weeks, although it may take longer depending on the variety of rose and environmental conditions. You can gently tug on the cutting to check for resistance, which is a sign that roots have formed.
Step 7: Transplant the Cutting
Once your rose cutting has rooted and you notice new growth, it’s time to transplant it into a larger pot or directly into the garden. If you’re planting it in the ground, choose a location with well-draining soil and plenty of sunlight. Make sure the area has good air circulation to prevent disease.
If transplanting into a pot, move the rooted cutting to a larger container with fresh potting mix. Keep the plant in a sunny location, water it regularly, and continue to care for it as it grows.
Additional Tips for Success
- Temperature and Light: Rose cuttings thrive in warm temperatures (65-75°F) and bright, indirect sunlight. Avoid placing them in direct sunlight while they are rooting.
- Soil Moisture: Consistent moisture is key, but avoid overwatering. The soil should be moist but not waterlogged.
- Patience: Rooting roses from cuttings can take a few weeks, so be patient. It may take longer in cooler temperatures or if the cutting is taken from a slower-growing variety.
- Keep a Humid Environment: Use plastic bags or containers to maintain humidity around your cutting, but make sure the environment isn’t too damp, as this can cause mold.
Conclusion
Growing roses from cuttings is a simple and rewarding way to propagate this beautiful plant in your garden. With just a few basic tools and some patience, you can multiply your rose collection and enjoy the sight of vibrant blooms year after year. Whether you’re an experienced gardener or a beginner, propagating roses from cuttings is a technique anyone can master.
So, why not give it a try? Start your rose propagation today, and soon you’ll have an abundant, blooming garden to admire. Happy gardening!